
Discover morel mushroom hunting secrets to help you find the elusive morel mushroom — or grow your own morel mushrooms!
My alarm clock pulls me out of a dream — a vision of honeycombed patterns and boots sloshing through wet hunting grounds, my basket so full I have to weave branches into the sides to make walls to keep them all from falling over the edges. It’s 4 a.m. I’m already tired from hunting morels all night long in my sleep, but my eyes are tuned and I quickly realize it’s time to do the real thing. I am suddenly more alert than usual, realizing the excitement is just a couple hours drive away to make that dream come true.
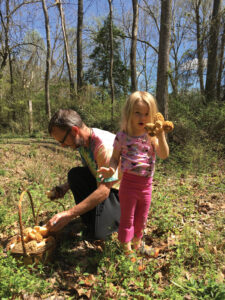
I start the coffee, and wake up my wife, Olga. I whisper to her, “It’s time!” while our daughter Heidi sleeps in. We carefully assemble in the kitchen for coffee and tea and continue to wake up and discuss our plans. The previous night we had gathered the items that we would need for the trip and they were already loaded into the back of my car: baskets, paper bags, knives, boots, a cooler, maps, snacks, bottled water, and walking sticks. The areas we go to typically are off the beaten path, so taking rations of food and drinks is a must since we typically hunt a few different spots. Olga is the master chef who makes amazing sandwiches, and she quickly constructs six, two for each of us, and I put them into the cooler with some ice packs. We double feed the chickens and animals with expectations of coming back late — we hope.

The weather outside is chilly at 5 a.m., but it is expected to rise into the mid-50s Fahrenheit. We bundle up the sleeping Heidi like a burrito in a fuzzy blanket and transplant her into the car in a nest of more blankets to keep her sleeping for the drive to the hunting grounds. She wakes momentarily, confused by the disturbance and new location, but she’s used to it and falls back to sleep. It’s still dark as we pull out of the driveway, and we make our way to our secret spots, occasionally glancing in the rearview mirror looking for followers in a scene from a Hollywood spy movie.
As we arrive at 6:30 a.m. at the first spot in a series of a well-planned and strategic routes, the twilight is beginning to reveal the road edges. As we slowly descend in elevation to the first spot, we can make out the trees and plants that line the gravel drive. “Look! Redbud blooms … open!” Olga exclaims. “It’s time, they should be here.”
With every turn down the winding road, anxiety builds with the possibility of someone beating us to our spots. It happens sometimes. When someone beats you to the spot, they can clean it out, leaving cut, hollow “stumps” of stems and leaving you with a feeling of defeat. But luckily, this day is different — we are here first.
Olga, Heidi, and I race to the spot in competition even amongst ourselves to find the first morels. It takes a while. Even after hours of dreaming, visions of hexagonal patterns burned into your retinas, it’s always difficult to spot the first one. That is the challenge: to calibrate your vision and overcome the discovery of the first hiding morel.

“Bingo!” Olga yells. And she has rung the bell to start the day. All of a sudden that phrase echoes repeatedly and the hunt is no longer on, it’s time to harvest morels!
Multiple Morels
Morel mushrooms belong to the genus Morchella, of the order Ascomycota, which is the largest division of fungi. The general group of mushrooms that morels fit into is the “cup fungi,” which are single cups or structures that possess a cluster of cups on a central stem, or stipe. The spores escape from long, thin microscopic tubes packed into the inner lining of the cups and can be released as the mushrooms mature or as they are drying or a breeze activates the spore release. Morels are completely hollow when cut from top to bottom, never wavy or wrinkled on the outside or inside of the stem like the false morel (Gyromitra).
Morels produce resting structures called “sclerotia” that you can think of like small fatty potatoes or nodules that overwinter in the soil and eventually experience environmental changes such as chill hours and floods, then fruit from the sclerotia when conditions are right. Understanding sclerotia and environmental triggers is the key to cultivating morels, as you’ll find at the end section of this article.
There are several shapes and colors of morels, and they typically define the habitat and region where they are growing, which is very specific — making them difficult to cultivate. I have generalized the morel species into groups, since they have recently been renamed using molecular data, but for the purpose of this article I am going to focus on the most common species and the habitats where you can expect to find them.
The general lumping of morel types macroscopically relies mostly on determining the color of the outer “ridges” or edges of the cups, and the color of the inner pits in a few species. By no means is this a species key, and since morels are one of the easiest mushrooms to identify in the world, lumping them together will do just fine for beginners. While most species can be found in the forests, a few can actually fruit in urban environments in landscaping mulch.
Where to Find Morel Mushrooms
Morels are perfectly camouflaged in their environment, and straining your eyes to locate your very first morel can be discouraging when your eyes keep locking onto fallen pinecones, sweetgum balls, magnolia pods, and walnut shells that can resemble a similar pattern. Once you find your first morel, the best technique I would recommend is to hold it in your hand for a while, continuing on your hunt, and occasionally stop and look at the morel hand, then return your focus back to the ground. I do this repeatedly until I have found a few and my eyes have adjusted to the patterns, then they jump out of the background and everything else is blurred out and ignored except the morel texture. Take a color photo of a morel into the woods if you do not have one for reference, then use a real morel when you find one.
Start by looking around trees that are suitable host trees at the right time. Since morels are slow growing, typically maturing in seven to 14 days, checking spots twice a week when the temperatures are right is sufficient in determining if that spot hosts morels. Once a location has been producing morels, it will typically produce for years, so coming back to that spot is then only a question of timing versus taking the time to search a new spot for hours that may or may not be a good location.

Location, Location, Location
Olga and I drove five hours from our home on a group morel hunt several years ago. It was a paid event, where only a few lucky people found a small handful of morels for the majority of the attendees to gaze upon at the end of the day. A bit disappointed and tired, we drove home and left the event a day early.
When we pulled in and unloaded, I stepped into the 8 acres of woods behind our house walking our trail with a beer to relax, and thought I was hallucinating — morels? I leaned down and touched it to make sure I wasn’t dreaming, and it was true. I ran up to the house and yelled out, “Bingo! Hey Olga, bingo in our woods!” Olga, who knows me too well, was not buying, but I reassured her to come look, and behold, they were everywhere.
We picked over 400 small morels — on the property where we had been living for three years with no clue that we had our own personal morel patch right on our own property. We determined they were small tulip morels, since they were growing all around our tulip poplar trees, so we then began to systematically work our way through the woods filling up our baskets and have had the same luck almost every year since.

Timing is Everything
You can have all the right trees, habitat, ground moisture, and chill hours perfectly aligned and it will all be for nothing if you miss the small window of opportunity in which morels fruit every year. Typically in any given spot, that window can be as short as three or four weeks, sometimes two weeks if the temperatures warm quickly and sustain. That leaves you with 48 weeks of waiting and scheming your strategy to visit the places you’ve identified as suitable. In the off-season, Olga and I drive around to new locations to check out the habitats and mark them as suitable or not on our topographical maps to make good use of our time when morel season is near. When morel time is upon us, there is no time to waste.
Ground temperatures are important cues that can’t be ignored to determine the timing of the morel emergence in your area. We carry around cheap digital cooking thermometers with a 6-inch probe to monitor soil temperatures early in the morning. Every species of morel has different soil temperature requirements. So when you find morels, take the soil’s temperature and make notes to help you for the following year. For example, the morel species I hunt for seem to start at 50 degrees F and peak at 60 degrees F at a soil depth of 6 inches. Meaning just a few can be found increasing occasionally in an area when the temperatures are slowly climbing into the mid-50s. All of a sudden, there’s a sweet-spot, and massive fruiting occurs between 57 and 60 degrees.
If I arrive at the location and the temperatures in the morning are 48 F, I look around a few trees where I have found the early ones, then go home. Why waste time? Websites with ground temperature data in your area are helpful. I sift through weather station data and download graphs and charts that show ground temperature trending, and sometimes the temperature drops, delaying fruiting once again.
Native plant indicator species budding or blooming can be extremely helpful if you are paying attention to nature’s clues. Put two and two together. If morels are fruiting, look around. What else is in bloom? How far have the ferns uncurled? How tall are the river oats? What leaves are budding from the trees? In my area, for example, one of the most reliable indicators is the redbuds blooming in the woods. Not redbuds blooming along paved roads or in the city landscape. Temperatures in the woods are much cooler, and city plants can throw off your timing by as much as two to three weeks. Pay attention, take notes, and take soil temperatures.
How to Grow Morel Mushrooms
If cultivating morels was easy, everyone would be doing it. So there, I’ve scared you out of trying, right? Probably not, since most people who have tasted morels would do anything, even if there were a small chance at success, to try to create their own private patch. So here we go.
The key to morel cultivation is bed preparation. There are two methods I’ve seen be the most successful, and they’re both very similar to one another. One technique is from my book, and the other method was developed in China. They both work fundamentally in the same way. Morel mycelium (the vegetative form of the fungus) can be purchased, or you can make homemade “slurry.” Using strains isolated from your area will be your best bet to increase your chances of success. Always locate your mushroom cultivation efforts in shady spots.
Until you become an expert at identifying wild mushrooms and wild food, always do your homework. Check with local experts in your area, and do plenty of reading and research. Now that you have the basics of hunting and cultivating morels down, head to the woods this spring. If nothing else, few things beat a good nature walk.
Cultivating Morels Method 1
- Dig a hole or trench 8 to 10 inches deep and keep the dirt nearby.
- Fill the trench with a mixture of hardwood sawdust, compost, and drench with apple juice until moist. The mixture should be level with the surrounding soil.
- Cover the mixture with the native soil you removed to make a mound or row.
- Spawn the very top or drizzle the slurry over the soil surface.
- Cover with leaves or straw.
- The mycelium will burrow its way down to find food and translocate the energy upward to form sclerotia in the upper soil layer.
- Water occasionally to keep moist. Check the fruiting beds when morels fruit in your area.
Cultivating Morels Method 2
- Make a mound of soil approximately 3 feet wide by 6 feet long by 4 to 6 inches high. Native soil is best. Do not use compost or nutritive media, just mineral soil that is non-nutritive.
- Place a bag of commercial spawn consisting of grain and straw mixture on the soil in the center of the mound. Pierce the underside of the bag with a few knife slits or small holes so the mycelium can burrow its way down into the soil, but not holes so large the spawn spills out.
- Cover with leaves or straw.
- The mycelium will burrow its way down into the mineral soil and form sclerotia.
- Water occasionally to keep moist. Check the fruiting beds when morels fruit in your area.
Morel Mushroom Discrepancies
Toxic Look-Alikes, False Morels
- Gyromitra esculenta
- Verpa bohemica

Yellow or Blonde Morels
- White to yellow cup edges.
- Habitats: Mixed hardwood forests, floodplains, and along creeks and rivers.
Black Morels
- Dark brown to black cup edges.
- Forest habitats: Mixed hardwood forests, burn areas on the West Coast.
- Urban habitats: Landscapes with mulch from West Coast.
Fuzzy Morels
- Dark velvety appearance, including pits
- Habitats: Burn areas on the West Coast.
Related: Great fun and a full pantry await when you take the family foraging.
Mycologist Tradd Cotter has been researching innovative mushroom cultivation practices for more than 20 years. He is the author of Organic Mushroom Farming and Mycoremediation.


