
When I built a big root cellar back in 1989, I thought I was the only one still interested in old-fashioned things like this. I realized I was wrong when a publisher approached me with an invitation to write The Complete Root Cellar Book in 2010. Since then, I’ve heard from many people eager to learn more about building their own root cellar for storing and preserving food at home.
Why bother? Some folks want a cellar to save money, stocking up on fruits and vegetables at low harvest prices. Others use a root cellar to store their homegrown garden produce and maybe even protect them and loved ones from storms. Still others build root cellars as protection against social or economic collapse that would cut off the steady supply of supermarket food we’ve come to depend on. Regardless of your motivation, the three root cellar designs you’ll find here cover the needs of most people looking to become more self-reliant when it comes to food.
What is a root cellar?
Traditionally speaking, any cool, moist, underground space set aside for long-term storage of vegetables, fruits, and even meats and cheeses, is a root cellar. Although root cellars have been used since prehistoric times, people these days are renovating their homes or building new root cellars from scratch in ways not seen before. Some people with no access to underground spaces are even making electrically assisted root cellars.
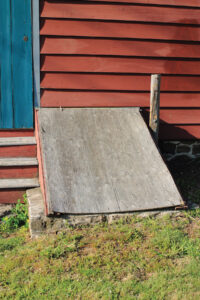
The under-steps root cellar
Millions of homes across America have a small “cold room” off the basement, located under the concrete front porch of the house. While it’s nice that home builders have made at least a small attempt at allowing for home food storage, most under-the-steps cold rooms don’t work. If you’ve lived with one, you’ll know why. Temperatures usually get too warm in summer to keep foods from spoiling, and too cold in winter to prevent freezing that ruins fruits and vegetables. So why don’t cold rooms hold a more even temperature? Two reasons: Not enough soil cover, and not enough protection from basement heat.
The plans show how extruded polystyrene insulation can be applied to the inside of the cold room down to about 12 inches below the level of the soil to moderate cold room temperatures. The same goes for the underside of a cold cellar ceiling. In most houses it’s only a few inches of concrete, and that’s way too thin to keep out the cold and heat. Foam insulation like this needs to be covered with some kind of sheet material to protect against fire and damage, so don’t skip that step. Tapcon screws driven into holes drilled through the cement board and into the underlying masonry is one option.
As you plan your cold room retrofit, pay attention to these details:
Controllable vent: Many cold rooms already have vents to the outdoors, but few can be opened, closed, or adjusted. Install the kind of louvre or damper that allows full control of air ventilation.
Add soil: The more soil you can bank up next to your front steps, the better cellar performance you’ll get. The best you can do is to bring the soil level up to just below the joint, where the precast porch floor rests on the foundation that forms the cold room walls.
Install an insulated door: Standard cold rooms either have no doors or uninsulated doors. Changing this is one of the most important cold room upgrades you can complete. Use a prehung, insulated exterior door.
Planning to keep apples in your cellar? These present a special case. Ripe apples give off a colorless gas called ethylene. It has a faint odor and is completely harmless when given off by apples. The thing is, ethylene gas does cause other produce to ripen and spoil more quickly. Always keep your apples in a separate section from the other produce in your cellar.

The basement root cellar
Walling off a section of your basement for a root cellar is a big step up from the cold room option. Not only will you get more stable temperatures and longer storage times, but you’ll also have much more storage space. The trick is to give yourself every advantage when it comes to making the most from the moderating effects of the soil. The more the exterior walls of your cellar can be covered in soil, the better. If possible, choose a location that includes two exterior walls, one of which is facing north. You’ll also want to add soil around the foundation walls if more than 8 to 10 inches extends above the current ground level. The blueprints show all the construction details. As you plan your work, pay special attention to the following points.
Dual vents: One 4-inch-diameter vent should open at ceiling level, and another 4-inch vent at ground level at the other end of the cellar. This promotes full circulation within the root cellar, with no stagnant air.
Wall insulation: Foam insulation delivers the best energy performance for a given R-value (thermal resistance) of insulation, so consider using spray foam between wall studs. Mineral wool batts are the next best option. You’ll get better results if you apply a 2-inch layer of extruded polystyrene foam on the interior surface of walls, before applying wall board.
Ceiling insulation: Warmth from the living space above a basement needs to be stopped from moving into the cellar. Since you’ll be dealing with floor joists above the cellar, mineral wool batts or spray foam will both do a great job. Don’t leave this insulation exposed, but cover it in the same mold-resistant board that is ideal for the walls.
Wall surfaces: The surface of interior walls should be as mold-resistant as possible. Cement board or fiberglass drywall are two excellent options. Don’t use regular drywall, as it’s too soft, and high levels of humidity will make it softer.
Insulated door: As with the cold room design, an exterior insulated steel door is ideal for a basement root cellar. These come prehung with weather stripping.

The stand-alone root cellar
This is the ultimate option for serious food storage, and a stand-alone cellar also offers shelter from hurricanes and storms. The plans show all the details for building. The most important detail is location. You need a well-drained spot that’s handy to your house. Building into a bank isn’t necessary, but it does make things easier. If you don’t have a naturally occurring bank, you can have soil trucked in to bury your cellar after the walls are up, but before the roof goes on.
Another option is to build a stand-alone cellar around a new concrete septic tank. You’ll need one larger than usual (at least 1,500 or 2,000 gallons), with any central dividing wall removed. Concrete septic tank manufacturers are always local because shipping something that heavy is too expensive over long distances.
Once your root cellar is in place, enjoy being able to store the fruits of your gardening labor and the ability to grab homegrown produce for a delicious meal.

Operating a Root Cellar
Operating a root cellar is about more than just putting food into storage then taking it out weeks or months later. Your job also involves managing temperature and humidity. The ideal root cellar conditions for most produce is a few degrees above freezing and between 80 percent and 90 percent relative humidity. The thing is, conditions like these are ideals, and no root cellar will deliver them all the time. This is why you need to steer your cellar conditions in the right direction, and you’ve got two tools to make that happen.
Vent control is the biggest and most powerful management tool at your disposal. Opening vents and increasing ventilation during winter decreases cellar temperature and lowers humidity. Do the same thing when it’s above freezing outside, and it will increase cellar temperatures and raise humidity. The challenge is always the same: You’ll have to work to get temperatures low enough during most of the year, and you’ll have to work to keep humidity levels high enough. You can boost humidity by sprinkling water on the floor or leaving open buckets of water in the cellar.
Root Cellaring without a Cellar
Even if you live in a place that gets 20-below-zero Fahrenheit winters, it’s possible to preserve root crops in the garden until spring without freezing. In fact, the quality of food you’ll get is excellent. The key is mulch and snow. Piled deep enough, mulch will insulate the soil and keep it from freezing. Snow cover certainly helps, too. Instead of one big harvest in the fall, simply burrow down through the snow, dig out the produce as you need it, then tuck the mulch and snow back over the row again.
How Long Will Food Keep
This all depends on the kinds of food you’re storing, the conditions within your cellar, and the way the food was grown. Generally speaking, root crops like carrots, beets, and potatoes keep the longest — easily three to six months or more. I’ve kept beets for 18 months in a sand can in my root cellar one season, and though they lost some flavor, they were still crisp and rot-free. Apples can keep for two to four months, but only if they’re grown without soluble fertilizers.
Over the years I’ve noticed a big difference in the mold resistance between organically grown produce and conventionally grown fruits and vegetables. Conventionally-grown produce goes moldy much more readily, whereas organic produce tends to go bad only by drying out, sprouting, or both.
Save time and money with these food storage methods.
Steve Maxwell is the author of The Complete Root Cellar Book. He stores produce in a limestone cellar he built under his home on Manitoulin Island in Canada.


