
Learn how to build a simple bridge over a stream, and what factors to consider before any DIY bridge construction.
Several decades ago, when my wife, Melody, and I had corporate careers, we dreamt of a peaceful retirement property with streams, ponds, and wildlife. Before 1900, when North America was largely rural, folks enjoyed visiting their local town for shopping and Sunday church. Things began to change after rural people moved to crowded urban areas where they had frequent, daily contact with others. Like other urban folks today, we yearned for distance, and to enjoy coming to a crowded town on our own terms.
We hoped to build our timber-framed dream home on a quiet rural property, and, in 1995, we found some land about 10 miles southwest of town, thanks to my persistent wife and good realtors. Our land included a weekend-getaway house next to the pond, and a bridge. Both structures needed to be replaced, or at the least, undergo major repairs. Over the next two years, we camped out on weekends and felled about 75 trees, and tore down most of the pond house because it suffered from a termite infestation. I bought (and still use) a secondhand Ford 555B tractor with a backhoe and front bucket to do most of this work, including installing nine underground culverts. We built our dream home. This has been one of the most interesting, challenging, and rewarding experiences of my life! And today, we enjoy the fruits of our labors, and the gentle sounds of nature.

Living on our beautiful property, we’ve had to deal with three wooden bridge designs in the same place – two of the replacements we’ve built with the help of good neighbors. Here’s some advice on how we planned for and managed how to build a simple bridge.
DIY Bridge Construction
A small stream courses alongside our long driveway, with a side road leading to a small meadow across the stream. When we bought our property, that first bridge was decrepit and mostly rotted away. Fortunately, we didn’t need immediate access to the meadow, so I removed the bridge’s few remaining boards with my Ford 555B and considered my options.
My first step was to decide on subcontracting the job or doing it myself. I settled on a DIY bridge construction. I urge you to check out your local building codes and laws before you decide. I then educated myself on the stream, especially upstream where I talked to neighbors about their past experiences, such as annual gushers and rare floods, and how the stream’s history could affect my bridge design. I walked the stream in the dry season and noted adjacent trees and shrubs, and also the animals – turtles, beavers, frogs, fish, and others – inhabiting the stream and banks.

Finally, I probed and carefully examined the soil where the replacement bridge would rest on both sides of the stream bank to make sure it provided strong support for the bridge’s girders. On our property, we had a mix of differently sized boulders and gravel. I packed smaller stones around the larger ones and firmly tamped the area, then added cement to create a smooth shelf. I situated the shelf 1 foot below grade level to allow for 10-inch girders topped with 2-inch-thick decking planks. This held up well for a quarter century!
If your stream banks are made of loose soil or sand, you’ll have to dig down and pour a concrete footer set well back from the flowing water. This footer must be below the frost line and have adequate width and depth; you may need certified engineering advice to determine the appropriate dimensions, considering the type and amount of traffic likely to use the bridge. If your stream banks are sedimentary rock, you may be able to chisel out a resting spot for the bridge’s girders. If the soil is clay mixed with rocks, you might be able to pound in a number of steel stakes to provide strength for a concrete slab where the girders would rest. Additionally, you could pack large, flat rocks from the stream bed up to bridge level, set at a 45-degree angle, to funnel flowing water toward the center of the stream bed.
How to Build a Simple Bridge
After settling on the details of our replacement bridge, I visited the owner of the Woodpecker Sawmill in southwestern North Carolina. We discussed how sturdily the bridge needed to be built to handle the 13,000-pound Ford tractor, plus an additional ton for a front bucket loaded with gravel.
The mill sawed and delivered five girders, each 10 feet long and 10 inches square, plus 20 12-foot-long 2×6 planks, all of white oak. I maneuvered these into place with my Ford and a crowbar, and bolted the decking planks to the girders. This second bridge lasted about 20 years, after which some of the 2x6s needed to be replaced by our good neighbor and sawmill owner Joe McGee. During that process, I discovered that all five of the girders were rotting!
Bridge No. 2 collapsed in spring 2021, while I was driving the Ford tractor over it. Luckily, I was able to safely get out of the streambed by gunning the engine. So, I tore out what remained of that bridge and set about determining its replacement.
Bridge No. 3
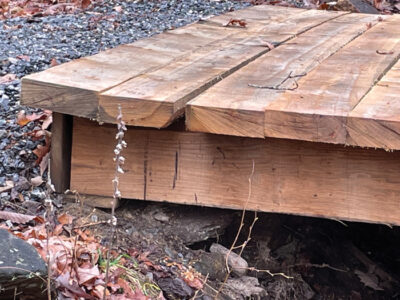
Another neighbor, Jon Neamand, had just installed his own sawmill. He agreed, for a fee, to saw white oak timbers from local trees so I could build the third bridge. For the girders, he used heartwood oak from dead trees, already dried and ready to be coated with a proven oil-based preservative of Jon’s invention. The decking oak needed to cure for a few months, and then it would be treated with an all-weather one-coat sealer.
To assemble the bridge, a chain was attached to the center of each oak girder, with the other end of the chain connected to the bucket of my backhoe, and then I carefully lifted and maneuvered the girders into place, one at a time, with Jon nudging each into its precise location. He placed five girders this way. Then Jon screwed the decking planks to the girders below. We used stainless steel wood screws between 3 and 6 inches in length, as needed, for this project.
We placed a buttress plank across the ends of the girders, and a decking plank overlapping that buttress, to shed water into a 12-foot-long gravel-filled trough at both ends of the bridge. Then Jon squared the sides, cutting off uneven decking ends.

Since then, I’ve confidently and frequently driven over this sturdy bridge with everything from an SUV to my loaded tractor to a gardening cart. I’m hoping this third bridge will last 30 years. Or maybe it’ll stick around to eventually be uncovered and admired in a future archeological dig.
Bob Heltman has been a U.S. Air Force pilot, corporate executive, fisherman, hunter, and more. Over the past 25 years, he’s installed nine culverts, built a dam, and moved countless boulders on his property outside Hendersonville, North Carolina.


