
Get this vintage clothespin bag pattern for your laundry and clothesline. Gather clothespin holder ideas that you can make at home.
After some misadventures installing my clothesline, I quickly realized that carrying clothespins in my hands wouldn’t do for hanging a full load of laundry. Never one to buy a product when a few hours’ work could solve a problem, I decided to make a decorative pocket patterned after 18th-century European pockets. Although the style with a wire hoop to hold the opening is handy outside, the space by my back door is narrow, so I wanted something that would hang flat against the wall. A flat pocket also gave me the opportunity to decorate the front surface, a nice benefit since it’d be in plain view most of the time.
I rounded up scraps from other sewing projects for my pocket, and, in the spirit of using up the waste from other projects, I also made the double-fold binding. (See “How to Make Double-Fold Binding” below for instructions.) If you don’t have scrap fabric, you should be able to find supplies at a local craft store for less than $20.
Tools and Materials
- Scissors
Instructions
Fold the 1/2 yard of fabric widthwise, or stack the fat quarters, wrong sides together. Find the halfway point of the shorter sides and lay the measuring tape across to mark the bottom of the pocket and the length of the slit. My pocket is 18 inches long, and the slit is 10 inches long. Also mark the top corners at equal distances from the top of the slit; my corners are 4-1/2 inches away from the slit for a top that’s 9 inches wide.

Next, pick a point about halfway between the bottom of the slit and the bottom of the pocket. Mark it on either long side, and draw straight lines from the top corners to those points. Then, connect these diagonal lines to the bottom with smooth curves (see Photo 1, above).
Cut around the pocket through both layers of fabric, leaving the slit uncut for now. (I cut about half an inch outside my lines, because the denim I used for the pocket body didn’t fray much.) Separate the two pieces.

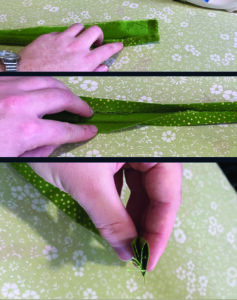
Pin the unfolded binding around the marked slit on what will be the front of the pocket. If your binding has a right and a wrong side, like mine, lay it right-side down. Line one edge up with the slit marking, with the rest of the binding overlapping the pocket piece. Turn the bottom corner sharply (see Photo 2).
Stitch down from the top along the first fold from the inner edge of the binding (next to the slit marking). Ease the binding around the bottom corner. It’s OK if it’s a bit rumpled at this point, but try not to stitch wrinkles into the seam. Come back up the other side.
a. Carefully, cut the slit open. b. Next, fold the binding around the cut edges, and pin on the other side. Ease the fabric around the bottom corner into rough pleats to make it lay flatter (see Photos 3 and 4).


For a nearly invisible finish, use a needle to hand-stitch the folded edge of the binding down with a small whipstitch. You can also machine-stitch the folded edge down; be sure your bobbin thread is the color you want to show, because you’re working from the wrong side of the fabric.
(Note: If you want to appliqué a design on your pocket, do so now; if you’d rather make a plain pocket, skip to Step 13.)
Mark out any guidelines you might need, and cut pieces from your fabric scraps. As you can see (Photo 5), I laid out my whole design before I started stitching to make sure I liked the overall design and color placement. Templates for all the pieces I used but the vase, which I cut freehand, are below. My roses are about 2 inches across.

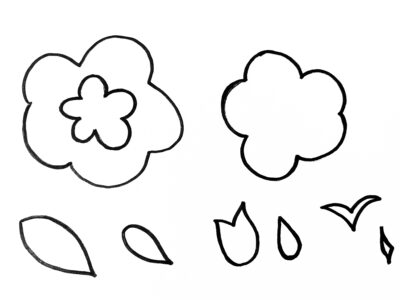
Pin the leaves, vase, and the first layer of the rosebuds and blooms in place, and stitch them down with a blanket or buttonhole stitch. This will create texture and protect the cut edges of the appliqué from wear as you use the pocket. I used matching embroidery floss and thin crochet cotton for my applique stitching. You can skip stitching the innermost edges of the rose petals, because they’ll be covered by the next layer of pieces.
Pin each successive layer of rose petals and stitch them down, being sure to cover any remaining raw edges from the earlier layers. The final layer will need to be stitched all the way around.
Add stamens in the centers of the open blooms with embroidery floss. Work straight stitches out from the center like a starburst, and then add French knots in a loose ring around the outer ends of the stitches.
Finally, add the stems with chain stitch to connect the leaves, flowers, and buds. I used two shades of green floss threaded together for the stems on my pocket, and worked from the vase up each stem. I started each new branch from inside one stitch of the old branch, to make the new stem look like it had sprouted off the old one.

Stack the front and back of the pocket again, wrong sides together, to prepare for the binding around the outside. Pin unfolded binding from one top corner all the way around to the other, with the edge aligned with the cut edge of the pocket pieces, and the rest of the binding lying on the pocket.
As before, stitch along the fold of the binding nearest to the cut edge. This seam will hold the pocket together. Then, fold the binding over the edge to the back of the pocket. Pin it in place, hiding all the raw edges. You can hand-stitch or machine-stitch the binding to the back.

To add a hanging loop, like I did, cut a 3-inch piece of binding, fold the raw edges to the center and then in half to make a thin strip, and stitch along the open edge. You can also use a short piece of ribbon. Pin one end of this piece to the pocket back, just left of the top center. Bring the other end up just right of the top center and pin it too. Baste in place, and remove the pins.
For the waist ties, cut 3 yards of binding, and center the piece across the top of the pocket. Fold the raw edges inward and tuck the top of the pocket into the center, so the binding sandwiches the raw edges. Starting at one end of the binding, fold the short end in by 1/2 inch, and then pin the binding closed. Make sure the front and back folds of the binding are aligned when you pin across the top of the pocket. Continue pinning until you reach the other end of the binding, where you’ll tuck the other short end inside to finish.
Stitch the waist tie shut, starting at the big fold on one short end. Stitch across the end, and pivot when you reach the corner. Stitch down the long edge, across the top of the pocket and to the other end. Pivot again when you reach the corner, and stitch across the end.
To wear the pocket, you can tie it around your waist or knot the ties together to make a strap you can sling over a shoulder. Make sure the pocket hangs high enough that you can easily reach the clothespins inside.
How to Sew a Double Fold Binding
If you have a long strip of fabric and an iron, you can make double-fold binding. This isn’t bias binding, which is cut on the diagonal and requires a larger piece of fabric; although bias binding is handy if you have a lot of corners or curves to go around, straight binding does the job for this project.
Tear strips four times as wide as you want your finished binding to be. I started with 2-inch-wide strips. Tearing the fabric instead of cutting it will ensure that you get perfectly straight pieces to start with, because the tear will follow the path of the threads in the fabric.
Stitch strips together across the short ends if you need longer continuous pieces. Press the seams open so they’ll be as flat as possible when you use the binding.
Fold each piece of binding lengthwise, wrong sides together. Press firmly with the iron, and then open the binding and fold each long edge in to meet the crease you just made, again with wrong sides together.
Bring the two folded edges together to enclose the raw edges at the center of the “sandwich,” and press firmly.
Caitlin Wilson is an editor for Grit. When she isn’t making magazines, she enjoys gardening, sewing, and going on adventures with her dog, Peanut.


