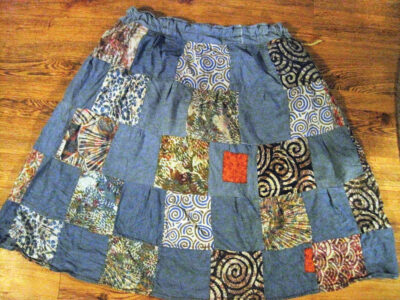
Sew a DIY patchwork skirt to reduce textile waste by upcycling old clothes torn to bits into a custom-made skirt.
I’m not what you’d call a skilled seamstress by any stretch of the imagination. I never received any training – they even canceled the sewing portion of my middle-school home-economics class the year I took it! I first touched a sewing machine when I was in my 20s. Suffice to say, my current approach to crafting my own clothing is very much a renegade approach – informal, unofficial, and sometimes made up as I go along. As a result, however, I feel like I have an inventive approach to making clothing – one that’s fun, somewhat recklessly fearless, and often results in decent clothing because of, and despite, my efforts.
If you check out “How to Make a Simple Skirt Without a Pattern” in the May/June 2023 issue of GRIT, you’ll find my first set of no-skills-needed instructions for how to make a skirt from a round tablecloth and flowy, adjustable pants from old bedsheets. Here, we’ll be redeeming unwanted scraps into a funky patchwork skirt and trimming a pillowcase into a soft and comfy tunic-style shirt.
Making a DIY Patchwork Skirt
The inspiration for this skirt came from the tangled acre of blackberries and roses on the eastern edge of my property. Despite the absolute assurance that I’ll be scratched bloody, nothing will stop me from venturing into the razor-wire-like thicket of vines to get some free summer fruit. As a result, two of my skirts were soon shredded to tatters after one-too-many tussles with the Rubus genus. There were still enough usable bits, however, that I couldn’t consign my poor cotton garments to the compost heap (at least, not yet). I harvested same-size squares from both skirts and turned them into an (almost) new skirt.
If you, likewise, have an assortment of fabrics to harvest squares from, you can make this fun, customizable, and one-of-a-kind skirt for yourself. There are no measurements for the skirt portion – on purpose. You can choose what size you want to suit the skirt you’re making – big squares are bold and blocky and require less sewing. Smaller squares make the most of rescued fabric, create a more delicate pattern, and require a lot more sewing. Select the style that suits you best – or make more than one! Use a piece of cardboard as a template to keep the squares consistent. (Note: Be sure to factor in the seam allowance when determining the size of your squares. If you’d like a 6-by-6-inch square, for example, add in a 1/2-inch seam allowance to all sides for a 6-1/2-by-6-1/2-inch square. – Grit Editors)
Tools and Materials
- A sewing machine (recommended), or needle and thread
- 1 piece of stretchy fabric, at least 6 inches wide and long enough to wrap around your waist with 3 inches to spare (this will be your waistband)
- Fabric squares, all trimmed to the same dimensions
- Sewing pins
- 1 stout cord to use as a drawstring
- Elastic cord for the waist (optional, but recommended)
Directions
- Measure the length of your waistband.
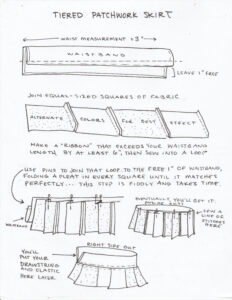
- Hem the waistband fabric on all sides with a 1/2-inch seam allowance. Leaving 1 inch free at the bottom, fold the rest of the waistband horizontally in half. Stitch along the bottom edge of the fold to form a tube with a 1-inch flap at the bottom.
- Sew several of your squares together, side to side, alternating colors and patterns for the best effect, with a 1/2-inch seam allowance. Make a “ribbon” that’s 6 inches (or more) longer than your waistband’s original measurement. Sew into a loop.
![]()
- Pin the loop to the 1-inch flap at the bottom of the waistband, with the “right” sides facing each other. (Note: Each piece of fabric has a “right” and “wrong” side. The “right” side is the one where the pattern, color, or print of the fabric is most visible. For these projects, you’ll be sewing your garment inside out, so all the seams will be hidden on the inside when you flip it out and wear it. – Grit Editors) Pleat every square until the length of the row of squares fits along the waistband perfectly – this will take a lot of fiddling and adjusting. Pin and sew the first loop to the flap with a 1/2-inch seam allowance.
- Sew another “loop” of alternating-colored squares, this time making it 12 inches longer than your original waist measurement.
- Pin the second loop to the first loop, making sure the “right” sides are facing each other. And again, fold and pin pleats until the two loops match up perfectly. Once they finally fit, sew the two loops together.
![]()
- Following that pattern, add as many tiers as you want, always increasing the length of each succeeding tier by 6 inches.
- Once you’re satisfied with the length, hem the bottom by 1 inch. Add a drawstring to the waistband loop (and elastic cord, if desired). Flip that lovely skirt right-side out and enjoy the patchwork fruit of your frugal labors!

When sewing, make sure the pins don’t come in contact with the needle of the sewing machine. Pins can damage the needle of the sewing machine, and they can potentially cause the broken pieces of the needle to become airborne and hurt or blind you. Always remove your pins as you’re sewing the seam, and never sew over the pins.
For crisp seams, iron your seams after sewing them but before moving on to the next step. This will make a noticeable difference in the appearance of your finished garment.
Depending on which fabric you choose, the raw edges of your garment may need to be finished to prevent fraying and unraveling. Since jersey-knit fabric doesn’t fray, its seams can be left raw, but other types of fabric, such as quilting cotton, will likely need to be finished. If you’re using a sewing machine, you can use the zig-zag function to overlock the edges, and if you’re sewing by hand, use an overcast stitch.
– Grit Editors
Wren Everett and her husband live off-grid in the Ozarks in a home they built with their own hands. They try to grow as much of their own food as possible and rediscover the old skills of self-sufficiency.
Originally published as “Scrappy Sewing” in the November/December 2024 issue of GRIT magazine and regularly vetted for accuracy.


