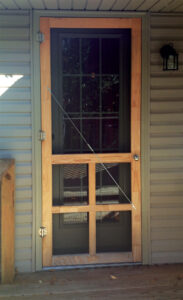
Follow these step-by-step instructions for building a beautiful DIY screen door that will stay on its hinges for many years to come.
Not every open door lets everything in. Not every closed door keeps everything out. Dutch doors are designed so the top half can open leaving the bottom shut, letting air and bugs in, but keeping animals out. Screen doors are designed to let air in, but no bugs, and only when they’re shut. Got it?
Screen doors are traditionally thin and lightweight. In part this is because they don’t need to be thicker. Screening weighs next to nothing, so the door is only holding up its own frame. They also need to be thin to fit the outside of a jamb already occupied by a full-size door. The trouble with thin, though, is obvious — thin means flimsy, and making a durable screen door is something of a trick.

I use pegged mortise-and-tenons and stock at least 7/8-inch, but preferably 1 inch thick to make a durable screen door that looks nice and holds up over time. You can make thinner doors, but you’ll need to come up with a different way to integrate the screen, perhaps losing the stop that covers the spline.
I made this DIY screen door out of western red cedar, a lightweight yet rot- and weather-resistant softwood. It is sold in my area as dimensional building lumber in housing construction-oriented lumberyards, and not in hardwood lumberyards.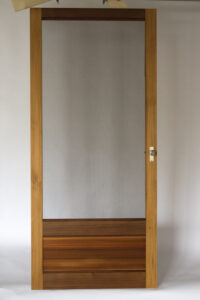
Finished Dimensions
80 inches by 36 inches by 1 inch
Materials
- 1-14-foot 2-by-4 clear western red cedar
- 1-9-foot 2-by-6 clear western red cedar
- 1-6-foot 1-by-6 clear western red cedar
- 18 square feet of screening
- 18 linear feet of spline
Cutlist
- 2 stiles clear western red cedar – 80-inch-by-3-1/4-inch-by-1-inch
- 2 rails clear western red cedar – 34-1/2-inch-by-5-1/4-inch-by-1-inch
- 1 rail clear western red cedar – 34-1/2-inch-by-3-1/4-inch-by-1-inch
- 1 panel clear western red cedar – 29-3/8-inch-by-10-1/2-inch-by-3/8-inch
- 2 stops clear western red cedar – 60-inch-by-1/2-inch-by-1/4-inch
- 2 stops clear western red cedar – 30 1/2-inch-by-1/2-inch-by-1/4-inch
- 6 pegs white oak -7/8-inch-by-1/4-inch-by-1/4-inch
Hardware
- Screen door latch
- 2 butt hinges – 2-1/2 inches
Step-by-Step DIY Screen Door Plans
There are simpler and faster ways to make screen doors, which is to say with exterior-grade floating tenons or dominoes. If you go this route, I highly recommend adding a turnbuckle to keep the door joinery together. As screen doors effectively cover the exterior doors, they are often as decorative if not more ornate than the main door. Let your whimsy be your guide to curved corner brackets, carvings and other details.
Step 1: Mill your rails and stiles to end up with two stiles, straight, flat, square that are 3-1/4 inches wide by 1 inch thick and at least 80 inches long. As you’re working with 2-by-4 material, you can make a door up to about 1-3/8 inches thick if you prefer and have room for it in the jamb, but 1 inch is thick enough. At the same time, mill the rails to the same thickness, all a little long if possible. As they are shorter, they may not need to be fine-tune milled the same number of times, but be sure they end up the same thickness as the stiles and just as straight and square.

Step 2: Lay out the door parts in the orientations that look best and mark the joints for reference. Label each joint with letters to keep track of which part goes where.

Step 3: Clamp the stiles together and lay out the mortises on both at the same time. Place a mark where the rails intersect the stiles.

Step 4: Mark the length of the mortises in the stiles. Around the screen area, they should be about 1/4 inch in from either side and around the lower panel, about 5/8 inch. At the ends of the stiles, they should be at least 3/4 inch from the top and bottom of the stiles.

Step 5: Mark the width of the mortises with the marking gauge. Scribe from both sides to ensure you’ve centered the mortise. Make the mortise between 3⁄8 and 1⁄2 inch wide.
Step 6: Cut the mortise 2-3/8 inches deep, or as deep as your tooling can go. For this door I used a slot mortiser because the stock is thin and light. If you don’t have a slot mortiser, a router will do a perfectly good job. Just clamp the stiles together and even an additional board, to give the router base enough support in the cut.

Step 7: Rout the outward-facing edges of the rails with a 1/2-inch bead (except the very top and bottom, of course). Don’t rout the inside edges, as you’ll just cut it away to add the stop over the screening groove. You can do this with a handheld router, just take care to keep it steady on the rail edges for a smooth cut. Making this cut on a router table is another good option. This is a nice detail and adds no complexity to the construction. If you mold the stiles as well, it’s a different story.
Step 8: Measure and mark the tenon shoulders on the rails. If you’ve milled the stiles perfectly 3-1/2 inches wide, and cut the mortises 2-3/8 inches deep, then the total length of the rails should be 34-1/4 inches. But of course, you should calculate this on your own.
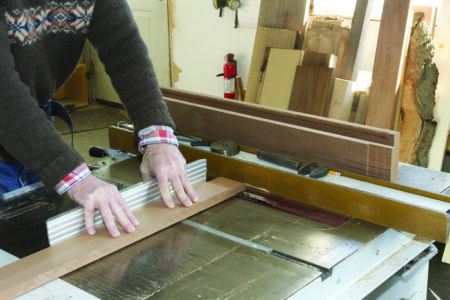
Cut the tenon faces on the table saw with a dado blade. I first mill the tenon faces too thick on one of them, then take small increments off and test the fit each time. When the tenon fits snugly with only hand pressure, I’ve got a good fit. This is an alternate and faster way to fit tenons. It can be accurate depending on how accurate your mortises are. It doesn’t accommodate variation, though. I take this shortcut here because an uneven joint face can be sanded out easily in the soft cedar.
Step 9: Cut the tenon faces on the table saw with a dado blade. I first mill the tenon faces too thick on one of them, then take small increments off and test the fit each time. When the tenon fits snugly with only hand pressure, I’ve got a good fit. This is an alternate and faster way to fit tenons. It can be accurate depending on how accurate your mortises are. It doesn’t accommodate variation, though. I take this shortcut here because an uneven joint face can be sanded out easily in the soft cedar.

Step 10: Trim the tenon shoulders and round the tenon sides to fit each mortise. If necessary, adjust the tenons to align with the pencil marks on the stiles. Leave the pencil marks there for now, but erase them before assembly.

Step 11: Dry-fit the frame and check the diagonals and joint connections to see that everything is aligned at 90 degrees and fits.

Step 12: With the frame still clamped up, rout the groove for the panel, 3/8 inch wide but not centered. Locate the groove approximately 1/4 inch from the back of the door as the bead weakens the front edge. Square up the groove corners with a chisel to make space for the rectangular panel. Measure the frame for the panel size, subtracting 1/16 inch from the length and 1/4 inch from the distances to allow for wood movement.

Step 13: Lastly before you take the frame apart, rout the shallow 1/4-inch-deep-by-1/2-inch-wide rabbet for the screen stop.
Step 14: Cut the groove for the spline on either a router table or the table saw, stopping the cut at either end on the stiles (on the rails, you can groove the tenons without weakening them much). As the groove is 1/8 inch wide, a standard table saw blade is the right thickness, but it is hard to make a stopped cut on the table saw. Also the blade diameter means you’ll have to finish a fair amount of the groove with a chisel. Consequently, it is easier to do on a router table with a grooving bit. Cut the groove 1/2 inch deep from the face of the door. Eventually, the ends of the groove and shallow rabbet will need to be squared up, but I wait until after assembly to do that.
Step 15: Cut and sand the panel and test the fit in the groove.

Step 16: Assemble the door frame with a water-resistant glue (unless this is an interior screen door, or the screen is really protected from the elements — no, no “unless.” Just use waterproof glue). It is not a good idea to glue the panel in place. However, if you use an exterior-grade plywood panel, you can glue it in the frame and add to the door’s strength.

Step 17: After the glue has cured, square up the corners of the screen groove and the screen stop rabbet. Use a 1/8-inch chisel for the groove and a fine-toothed saw and wider chisel to cut the rabbet. Make sure your chisels are sharp, and use a shearing cut movement or they will crush rather than cut the soft cedar fibers.

Step 18: Peg each joint from either the inside or the outside, depending on where you’d like to see the pegs. The pegs can be made of any durable wood, though I have a preference for white oak, 7/8 inch long and 1/4 inch square. As the cedar is soft, it is easy to pound the peg too far, such that it either comes out the other side or compresses the cedar fibers so that you can see the peg location from the other side. There’s no good way to fix this except drilling out the peg and setting a longer one that goes through both sides.
Step 19: Sand both door faces, steaming out any dents, of which you’ll have many as the cedar is soft.
Step 20: Trim the top and bottom of the door square and to 8-inch height.
Step 21: I finished the door with exterior-grade oil that leaves a matte finish. I think it’s a good pairing with the soft cedar, which will dent and age quickly, giving the door an older rustic look in no time. Apply several even coats to the cedar as it can blotch if you apply the oil unevenly.
Fitting the Screen
Fitting a screen is both easy and maddening. You can do it with standard shop tools, but the process is made easier with a “screen mouse” or spline wheel. This tool has a thin wheel with a concave face that puts even pressure on the spline as you push it into the groove.
Step 22: Spread the screen material over the frame on your bench. The screen material should be wide and long enough to stretch at least 2 inches over the groove you’ve cut for the spline. The more overlap the better as it will prove handy later. Although not necessary, I like to tape it at the corners to keep the screen aligned. You may also want to clamp the door to the table to keep it from moving around while you work.

Step 23: Start pressing the spline into the groove at a corner, capturing one edge of the screen. You can use any tool without sharp edges that fits the groove. I use a screwdriver tip with rounded edges, but a spline wheel works better and even a pizza cutter with a dull blade can work fine (be careful not to cut the screen with a sharp pizza cutter). It’s important to press the spline in evenly to avoid kinking the screen, so run the screwdriver along the spline in a fluid motion. Check to see that the screen stays aligned with the door, i.e., that the mesh stays square to the frame.

Step 24: When you reach a corner, cut the screen at a 45-degree angle so they don’t overlap under the spline.

Step 25: After you’ve set the spline around all four sides, the screen may be loose in places. To tighten it, pull on the outside edge and roll the spline back down into the groove with the screwdriver.

Step 26: Trim the excess screening with a knife, careful not to cut either the spline or the screen on the inside edge of the spline.

Step 27: Mill 1/4-inch-thick-by-1/2-inch-wide strips from the leftover cedar for screen stop. Cut the vertical strips to length first, then nail them in the stile using evenly spaced copper weather-stripping nails. Next, set the horizontal strips in the two rails. These aren’t necessary to hold the screening in place, but they give the interior a finished look.
Congratulations — you’re now the proud parent of a screen door slab.

Step 28: A note on the location of knobs or handles. It’s a very common mistake to set them at the same height as the front door handles, then find the handles hit each other when you hang the door. Set the screen door handles a few inches lower or higher than the main door to avoid this problem. I tend to set them lower, but I’m not sure why other than habit.
Related: Woodworking plans for building a sturdy workbench that will serve you for years to come.
Doormaking: Materials, Techniques, and Projects for Building Your First Door, by Strother Purdy was published by Linden Publishing in 2017, and provides insights and beautiful projects for beginners and intermediate woodworkers alike.


