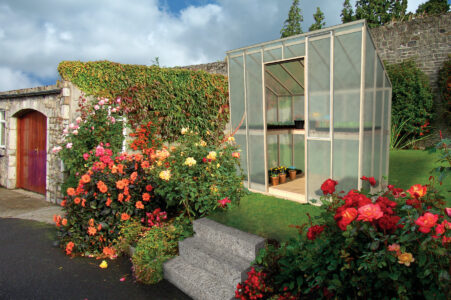
Learn how to build a greenhouse out of wood to extend the growing season and treat your plants to a safe transition.
When I decided to build my first greenhouse, I wanted a place for my vegetable plants to continue growing after they had become too large for the lighted shelves where I started them. I wasn’t sure I wanted a greenhouse at all and didn’t, therefore, want to put much money into one to use for a trial. Buying a kit or a complete structure involved more than I wanted to spend, so I decided to build my own.
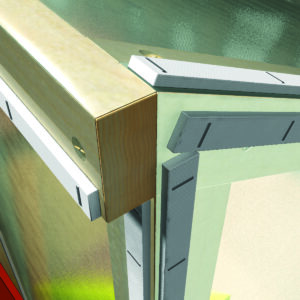
How to Build a Greenhouse Out of Wood
Because I wasn’t sure where I might locate the greenhouse, I made it light and sturdy enough to move around, and covered it with an elaborate array of laminated arc-shaped beams supporting two layers of hardware store plastic. These plastic-covered laminations have survived winter storms, thunderstorms and some small hail, but creating the beams was tedious and time consuming so I designed a more conventional structure for this project. I also chased pieces of the cheap plastic I used as a cover (the first time) all over the neighborhood one winter, so I recommend using film made for greenhouses – it will last for several years.
When I leave my plants in the greenhouse at night, a small thermostatically controlled electric heater keeps the temperature above 50°. During the day, heat is always a hazard so ventilation is essential. On a cold but sunny day, the temperature in the greenhouse tops out at about 140° with the door closed. I try to keep the temperature below 80° by propping the door open, but during my first house’s second spring, I accidentally left the door shut at noon. After lunch and a brief nap, I returned to plants that looked as if they had been sprayed with brush killer the day before. Opening the door and watering didn’t revive them. To help prevent that happening again, I’ve included a window and a heat-activated opener in this design. Commonly available radio-transmitter systems have alarms to alert you if the temperature inside the greenhouse gets too hot or cold. I’m going to set mine up this spring.
The wall and roof framing used in this greenhouse is appearance-grade 1-by-2 pine. The base is untreated construction grade plywood and pine 1-by-4s and 2-by-4s. The skids are 10-foot, treated, construction-grade 2-by-4s. If you intend to water by general spraying, you should consider using treated or naturally rot-resistant lumber, such as cedar, redwood or walnut heartwood. Other possibilities are Osage orange, mulberry and black locust. I’m not concerned about rot because I moisten flats by pouring water into a corner I have lifted, and pots I water just enough to keep the soil damp.
I used a 4-foot-by-8-foot piece of wood lattice as the shelf in my first greenhouse; I replaced it a year later with plastic lattice. Both proved too flimsy. In this design I used 3/4-inch thick cedar lattice. I like lattice because it allows some light to shine through, and spilled water doesn’t puddle on its surface.
Greenhouse Materials List
- 1-4-foot-by-8-foot sheet of 3/4-inch lattice (plant shelf)
- 1-30-inch wooden screen door
- 2-4-foot-by-8-foot sheets of 3/8-inch plywood (top and bottom of base)
- 3-8-foot 2-by-4s (perimeter of base)
- 7 8-foot 1-by-4s (interior of base frame)
- 5 8-foot 1-by-3s (support frame for plant shelf)
- Total 8-foot 1-by-2s = 40 (sort carefully at the lumberyard or buy several extras)
- 12-8-foot 1-by-2s (back wall)
- 8-8-foot 1-by-2s (end walls)
- 11-8-foot 1-by-2s (rafters)
- 6-8-foot 1-by-2s (plates)
- 3-8-foot 1-by-2s (window frame)
- 1-10-foot 1-by-2 (ridge pole)
- 2-10-foot treated 2-by-4s (skids)
- 2-3-inch eye bolts with nuts and washers
- 2 tubes construction glue
- 1 heat-activated opener
- 120 linear feet of batten tape
- 10-foot-by-30-foot greenhouse plastic
Approximate Numbers of Screws
- One hundred 1-1/2-inch exterior screws
- Fifty 2-inch exterior screws
- One hundred 3-inch exterior screws
- Twenty 3-1/2-inch exterior screws
Construction Notes

The strength and rigidity of the torsion box that forms the base of the greenhouse require only that the frame pieces fit snugly together and provide a level base for the plywood until the glue sets. The completed base weighs about 140 pounds so you might want help moving or tipping it to attach the plastic and skids to the underside. The upper frame is amply strong for its intended purpose, but it is best not to use it as a lever to tip the base.
The upper frame’s joints are “crowded” with screws. If you hit a screw while drilling a pilot hole, adjust the angle of the bit until it clears.
Greenhouse plastic is damaged by oil-based paint; use latex coatings only.

Base Construction
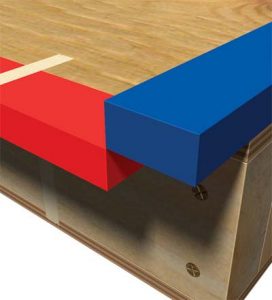
First, make a frame by cutting two 45-inch 2-by-4s and fastening them to two 8-foot 2-by-4s (shorter ends between the longer sides) using two 3-1/2-inch deck screws at each corner as shown in Figure 2. Next, mark three 93-inch-long 1-by-4 stringers shown in red and fasten them inside the frame at the points marked on the ends using two 3-inch deck screws at each joint.
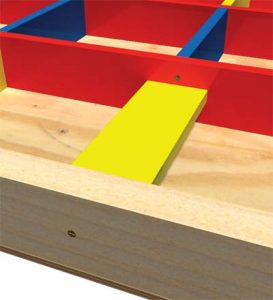
Measure the distance from the inside of one side to adjacent red stringer (10-1/8 inches in our box). (Because of minor deviations in the thickness of lumber, a direct measurement is best.) Cut 14 1-by-4 blocks to that length. Measure the distance between two of the red stringers (11-1/4 inches in our box) and cut 14-1-by-4 blocks to this second length.
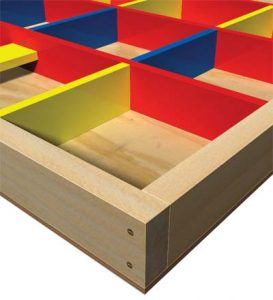
Fasten seven of the shorter blocks to the first of the red stringers using one screw at the marks. For now, leave the other end of these blocks unfastened (the end that would connect to the outside 8-foot frame). Next fasten seven of the longer blocks between the second and third stringer using one screw at the center of the stringer. Rotate these two rows of blocks (in yellow) 90 degrees as shown in Figure 2. Fasten the remaining blocks (in blue) in place using two screws at each joint. Then rotate the other two rows of blocks back into position and fasten the first row to the frame. Drill a hole in each end 2-by-4 for a 5/16-inch eye bolt 2 inches long. Locate these holes just far enough off center to miss the red stringer centered on the inside. Put the eye bolts in the holes and put washers and nuts on the inside.
Next, fasten 3/8-inch thick plywood sheets to both sides of the frame using 1-1/2-inch screws in each corner and at the center of each side. Remove the screws on one piece of plywood and set it aside as shown. Run beads of construction glue on the top edge of all the frame pieces. Lower the plywood onto the frame; be careful that the plywood drops directly down onto the frame. Replace the screws. Place weight on the plywood. Remove the weights after the glue has cured. Turn the box over and repeat the process with the other piece of plywood.
End Wall Framing
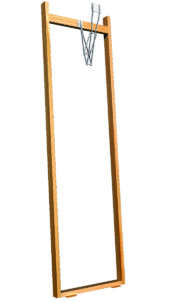
The completed base will now become a place to lay out the wall frames. Set it on a couple of sturdy sawhorses. (Don’t have sawhorses? See “Sturdy Sawhorses.”) See Figure 7 for details on the following. Make a mark on the base’s edge 7 feet 6 inches from one corner. From the adjacent corner make a mark at 5 feet 6 inches. Temporarily fasten (with tape) two 8-foot 1-by-2s (future end wall studs shown in red) with lower ends 1-3/8 (long dimension in 1-by-2 cross section) inches from the lower edge of the base as shown. Lay a straight edge from one mark to the other and draw a line that extends across each of the temporarily fastened future end wall studs.
Temporarily attach an 8-foot 1-by-2 (future end-wall bottom plate shown in blue) along the base opposite the diagonal line you just drew – be sure that it fully overlaps the two end-wall studs already attached to the base’s sides (Figure 6). Measure 16 inches from each of the base’s edges and mark the bottom plate. Position two 8-foot 1-by-2 studs (shown in yellow) on the 16-inch centers using the bottom plate as a guide, mark them for cutting using the diagonal line to determine the angle.
Lay a fresh 8-foot 1-by-2 (shown in green) with its lower edge on the 5-foot 6-inch and 7-foot 6-inch marks. Mark the 1-by-2 at both edges of the temporarily attached end wall studs (shown in red) – this will be the end-wall top plate.
Cut the four red and yellow studs and green top plate where you have marked them. Cut blue bottom plate to length (50-3/4 inches) and fasten the red end wall studs to its ends using 3-inch deck screws. Drill pilot holes for all screws used to fasten the frame together. Fasten the upper ends of the red studs to the ends of the green top plate. Fasten the two yellow center studs between the upper and lower plates. Repeat this process to build the other end wall frame.

Front Wall Framing
Lay an 8-foot 1-by-2 on the longest stud on one of the end wall frames (built in the first installment) and position one end ¾ inch (the smaller dimension of your 1-by-2) from the bottom edge of the end wall’s bottom plate. Mark the top end of the 1-by-2 on both edges beneath the side wall frame’s top plate and draw a line connecting the marks to pick up the angle. Cut this 1-by-2 on the line to make the first front-wall stud. Using this stud as a pattern, mark and cut five more studs (shown in red in Figure 1).

Take two fresh 8-foot-long 1-by-2s and mark them at 16 inches on center. One will be used for the front wall’s top plate and the other for the bottom plate (shown in blue in Figure 1). Cut a 31½-inch piece of 1-by-2 for the door header (shown in green in Figure 1). Screw the six red front wall studs to the blue bottom plate. Center your 30-inch door between the middle two – insert an approximately 3/8-inch-thick spacer between the door and the bottom plate.
Next, insert a 1-by-2 between the side of the door and an adjacent stud – be sure one end is snug against the bottom plate. Mark this 1-by-2 at the door’s top and cut it and another 1-by-2 to length. Remove the door (and spacer) and fasten these 1-by-2 trimmers (shown in yellow in Figure 1) to the inside of the studs on both sides of the door opening and install the 31½-long door header (shown in green in Figure 1, detail in Figure 2) on top of them. Now take a short piece of 1-by-2, set it on the door header’s upper surface and against one of the adjacent studs. Mark the 1-by-2 to match the stud’s angled end, cut to make a cripple stud (short studs placed between the header and top plate or between a sill and bottom plate; shown in orange in Figure 1) and screw it in place, centered above the door header.
Complete the front wall framing by attaching the top plate to the inside surface of the studs. Use a short 1-by-2 scrap positioned on the beveled end of the studs to ensure the top plate won’t interfere with the rafters (Figure 3).
Back Wall Framing
Lay an 8-foot 1-by-2 on the shortest stud in one of the end wall frames (built in the first installment) and position one end ¾ inch (the smaller dimension of your 1-by-2) from the bottom edge of the end wall’s bottom plate. Mark the top end of the 1-by-2 on both edges beneath the side wall frame’s top plate and draw a line connecting the marks to pick up the angle. Cut this 1-by-2 on the line to make the first back-wall stud. Using this stud as a pattern, mark and cut six more studs (shown in red in Figure 4).
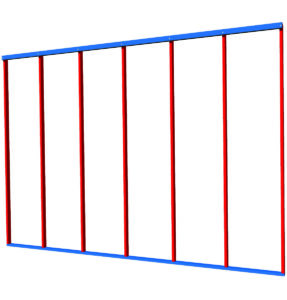
Take two fresh 8-foot-long 1-by-2s and mark them at 16 inches on center. One will be used for the back wall’s top plate and the other for the bottom plate (shown in blue in Figure 4). Screw the seven back wall studs to the bottom plate as shown. Attach the top plate to the inside surface of the wall studs flush with their pointed ends as shown in Figure 5.
Affix the Wall Frames to the Floor
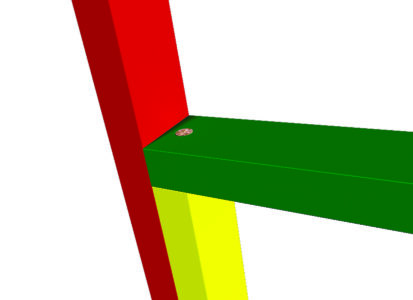
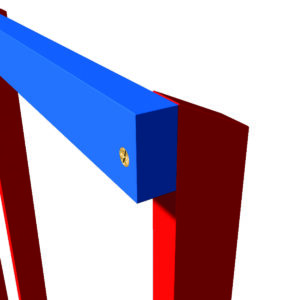
Fasten the front and back wall frames to the base with the bottom of the wall frames even with the bottom of the base using 3½-inch-long deck screws. Fasten the end wall frames to the base, and front and back wall frames using 1½-inch deck screws (as shown in Figure 6).
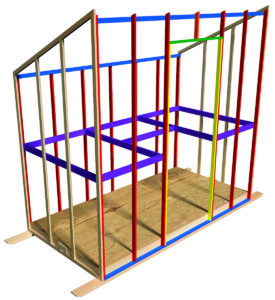
Mark the inside of all wall studs at 36 inches from the floor. Measure and cut lengths of 1-by-3 to fit inside the greenhouse and screw them to the frame with their upper edges on the marks as shown in purple (Figure 6). The 1-by-3 framing will support the shelving. Square up the front wall frame with 1-by-2 diagonals shown in yellow (Figure 7).
Next, construct the vent window frame by screwing two 527/8-inch-long 1-by-2s to one 13½-inch 1-by-2 and one 13½-inch 1-by-3 (as shown in Figure 8). Place the frame in one of the openings on the latch side of the door. Fasten two hinges on the underside of the window frame and the underside of the 1-by-3 shelf support (as shown in Figure 7). Install the vent opener to the top of the window frame following the manufacturer’s directions. You might need to position some blocking to complete this step.
Place the 4-by-8 piece of lattice on the support frame and cut it to fit (Figure 7). Fasten the lattice to the frame with No. 8 1¼-inch deck screws.
To create a surface for the door to seal against, measure and cut a piece of 1-by-2 that will extend from the outside of one trimmer to the outside of the other at the top of the door frame. Attach this to the inside of the frame so that it extends below the header ¾ of an inch. Measure, cut and install two 1-by-2s in a similar fashion on the inside surface of the trimmers.
Install your door following the manufacturer’s instructions. Don’t be surprised if you have to do a little trimming to get the door to fit, swing and latch correctly.
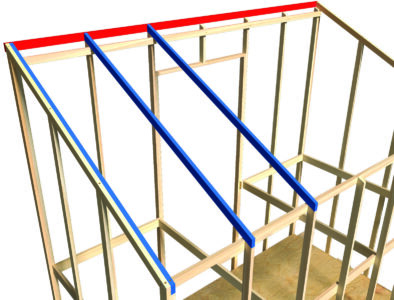
Assemble the Rafters
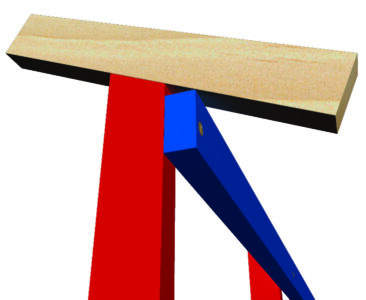
Position a piece of 1-by-2 directly inside and along the top plate of one end frame and trace the bevel at both ends. Cut this and six others to make the rafters. Fasten two rafters (shown in blue in Figure 9) alongside the end frames’ top plates using No. 8 1½-inch deck screws.
Fasten the ends of the five interior rafters to the tops of front and back wall studs with 2-inch deck screws. Fasten a 1-by-2 8-foot-1½-inch long 1-by-2 fascia (shown in red in Figure 9) to the front ends of the rafters with 2-inch deck screws.
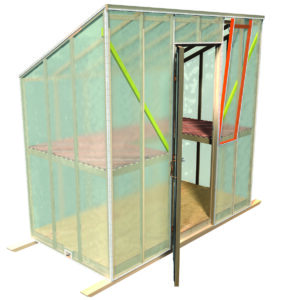
Attaching the Plastic
Cut 2 pieces of plastic (about 5 feet by 9 feet) that will cover the end frames generously. Staple (sparingly) the plastic to the frame, being careful not to stretch it so tightly that the frame is distorted. Leave the excess plastic for now.
Cut a piece of plastic about 9 feet by 20 feet. Mark the center of the 9-foot dimension every 3 or 4 feet along its length. Carefully tip the greenhouse onto its front. Center the bottom edge of the plastic on the bottom of the greenhouse with the edge covering about 5 inches of the bottom (skid must be removed). Staple at the center of the bottom edge of the plastic. Then adjust the plastic so the center marks are over the center stud and the center rafter. Staple at the top of the center rafter and then sparingly along the bottom edge.
Fasten a skid to the bottom with 3½-inch screws 1 foot apart and 2½ inches from the outer edge. Gently stretch the plastic over the greenhouse and staple onto the end frames, alternating sides to pull the plastic evenly. Tip the greenhouse in the other direction far enough to make the other bottom edge accessible. Gently stretch the plastic over the edge of the bottom and staple. Fasten the other skid to the bottom. Finish fastening the plastic; wrap it around the corners and staple on the end wall.
Staple batten tape around the perimeter of the end walls (Figure 10). Then carefully trim the excess plastic. Staple batten tape on both sides of the perimeter of the door and window. Slit the plastic along the outer edge of the door and window between the two sets of batten tape and add a slit for the door handle (see Figure 7).
Good Growing
Once completed, your greenhouse will supply years of service with minimal maintenance, and you can use it to extend your growing season at both ends. Since it’s mounted on skids, you can move the greenhouse around the yard or garden with relative ease, and slide it into your barn or shop for winter, or to replace the plastic and touch up the paint. My greenhouses have given me plenty of good growing. I know yours will, too.
An avid gardener and woodworker, Tom Larson combines these passions whenever possible. From his workshop in Sioux Falls, South Dakota, he produces lathe-turned bowls and vases, and from his garden comes beautiful organic produce.


