Our wood storage shed plans guide you through building a 3-cord woodshed for a good first project with the best portable sawmill for the money.
One of the most useful purchases we’ve made for our homestead is a portable sawmill, which enabled us to build a quality woodshed. Our mostly wooded 70 acres offer nearly endless opportunities to make use of varied forest products, including firewood to heat our home – quite a lot of it. In our area, we need to burn wood from about November through March, using about 6 rank (3 cords) of 2-foot-long logs.
While it’s possible to cut and dry your wood without a woodshed, a good woodshed makes all the difference for properly drying wood and keeping it clean. I’ll admit that quality woodsheds aren’t cheap. We’d wanted to build one for years, but the high prices of lumber made it hard to justify the extra expense. But after we got our sawmill, the woodshed was first on our list of projects.
Plan a Woodshed
You can construct outbuildings, including this woodshed, after letting the lumber dry or you can put the boards up wet. They’ll shrink and change some as they dry, but this isn’t a huge issue for a woodshed that won’t need to be airtight. In fact, cutting and immediately nailing some types of lumber, such as from sweetgum, can actually prevent twisting.
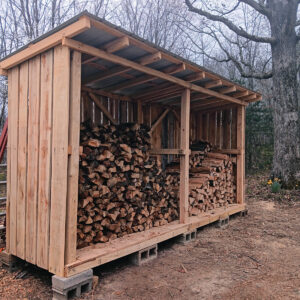
Start by deciding the size of shed you’ll need. Ours is 4 feet deep by 16 feet long and 8 feet tall in the front, sloping to 7 feet in the back. We put on a metal roof, and the 1-foot drop from front to back allows snow to mostly slide off. If you tend to get large amounts of snow or ice, I recommend an even sharper roof pitch. Ours will hold 3 cords of wood with plenty of airflow. The front is open and the two sides and back are boxed in.
Make a sketch of the size you’ll need. Then, assemble your materials list. Some pieces you’ll saw yourself, but you’ll still need to buy metal, screws or nails, concrete blocks, and a few other components. Among the bigger materials will be the metal for your roof. I order my metal in sheets. To determine the size of each sheet (and how many sheets you’ll need), measure the length and width of your shed, taking into account any overhang for the front and back. Divide the length of your shed by the width of a sheet of metal: For example, a 16-foot-long shed is 192 inches long. The metal sheets I used are 36 inches wide, so I divided 192 by 36 to equal 5-1/3 metal sheets. Because you need to round up, you’d order six pieces from your hardware store.
Determine your desired post size and select sturdy, straight logs for these. Remember, knots on the outside can weaken your posts and boards, so use the cleanest logs possible. We have mostly hardwoods where we live, so we used oak, sweetgum, and ash.
Wood Storage Shed Plans
We built our woodshed using 4x4s for the posts and 2x4s for the frame. It’s sided with 1-inch-thick boards of varying widths.
- Mill the boards. Begin by squaring up the logs on your mill. You may find it useful to mark out the boards on the ends of the logs, helping to keep you on track and giving you an idea for what each log will provide. We simply squared our logs and cut the boards 1 inch thick and as wide as the log. If you want the siding uniform, you’ll need to cut the boards to your preferred dimensions.
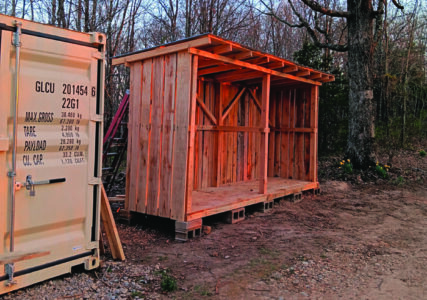
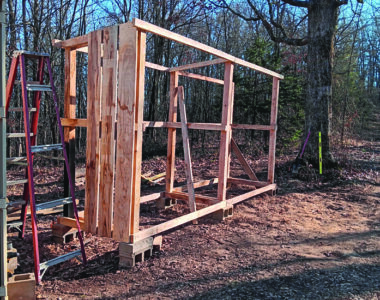
- Construct a foundation. We placed our shed on concrete blocks to keep the bottom off the ground, to prevent rotting. Alternately, you could pour concrete or gravel for your floor. Our floor was made from boards, because that’s what we had on hand to keep costs down. Level the ground before starting and place your concrete blocks (or alternate base choice).
- Install supporting posts. We placed six posts, one for each corner and one each in the middle of the front and back walls. Placing the posts requires a bit of a balancing act, so we built temporary supports for the posts while they were being placed. Once the frame is attached, the weight of the building will hold the posts firmly in place on top of the blocks.
![]()
- Build the frame. This consists of attaching 2x4s at the bottom all the way around. Then, attach 2x4s at 4 feet high on two sides and in the back. Also attach 2x4s all the way around on the front. When placing the top frame on the sides, keep in mind that the side walls will be on a slant.
- Build floor joists. The floor joists are 2x4s cut to fit width-wise between the front wall’s bottom board and the back wall’s bottom board. Attach the joists narrow side down. Put plenty of joists in, because fully loaded, 3 cords can weigh more than 15,000 pounds! We placed 14 joists in our shed, starting with one directly on the inside of the posts and then every 16 inches.
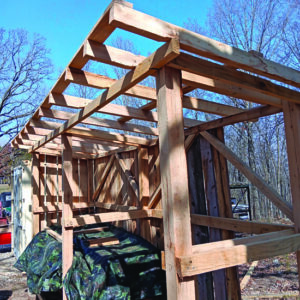
- Build ceiling trusses. The roof has 10 trusses, made from 6-foot-long 2x4s. The size allows for an overhang on both the front and back. Lay the boards on the supports with the narrow (2-inch) sides down. Run a full-length 2×4 across the entire front, middle, and back of the trusses, on top of the truss boards. While not absolutely necessary, we also ran bracing with 2x4s on the back wall diagonally – in the shape of an “M” – secured on the top half of the wall. The easiest way to ensure the proper angle is to hold your board up where you’ll be attaching it and mark the angle on the 2×4.
- Place the siding boards on the frame. Measure each board needed, and cut the length using a chop saw. For optimal airflow, leave a gap of 1 to 1-1/2 inches between each siding board. Fasten the boards onto each part of the frame. The ends are the trickiest if you have a slant, so it may be easiest to place the board up on the frame and mark the exact angle you need to cut on each board.
- Build the floor. Run your floorboards opposite of the floor joists. Ours is a solid floor. Mark out the posts on each corner in your boards. Start at one corner, and measure each board individually. This step is especially helpful when working with home-milled lumber, because your lumber will be unique. Use a chalk line to mark the joists on top of your floor to help you accurately nail the floor to the joists without accidentally missing them.
![]()
- Install the roof. Pick one edge to start from. Be sure to get your edge as square as possible (if you’re off by any amount, it’ll grow with each piece you put on). Mark the supports you’ll be screwing your metal to with a chalk line on top of your metal. Use specialized metal-to-wood screws for the best outcome. Overlap the edges to make a good, watertight seal. Continue until all roofing sheets are attached.
Best Portable Sawmill for the Money
A few manufacturers are out there making quality portable sawmills – Hud-Son Forest Equipment, MechMaxx, Norwood Sawmills, Peterson Portable Sawmills, TimberKing, Wood-Mizer, and more – so, we studied the features and prices for each, which range from $3,000 to $8,000; more with attachments. For our needs, we went with the HM126 Woodlander by Woodland Mills.
Consider purchasing any items you might need to go with a sawmill, such as a cover, trailer, and extra blades. Your sawmill and some of its add-ons are likely to be delivered on a large truck, so you may need to have it delivered to a parking area if your driveway isn’t easily accessible or big enough.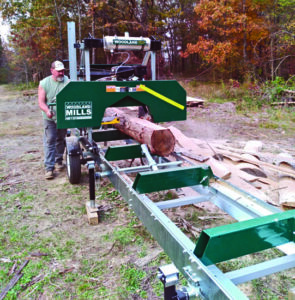
Portable sawmills require assembly but come with detailed instructions. I recommend watching online videos to guide you. The model should be one with enough features andd add-ons that’ll grow with you and your needs.
Home Milling Tips
- Be careful with trees sourced from a home woodlot, because they’ll often contain metal (fencing or nails) that can ruin a blade.
- Have a plan for what you’ll do with the sawdust and slabs that come off the logs. These can become a fire hazard.
- You’ll need a way to move your logs. I highly recommend a tractor with a bucket or grapple.
- Be cautious when working with a sawmill and logs; one foolish mistake can get you severely hurt in a hurry! Keep your blades sharp, and take your time when sawing. Wear eye and ear protection. Don’t allow small children or pets to be around the sawmill unattended, and minimize any distractions while sawing.
- Always check your fluid, and make sure all parts are well-maintained. Keep your sawmill under a roof or tarp when not in use.
- Be sure the sawmill is level before sawing.
- Keep an eye on the metal wedges that hold the logs in place, and adjust to make sure they’re well below the saw blade. One mishap with a wedge could ruin your blade immediately.
Jenny Underwood is a homeschooling mom of four who lives on a fifth-generation homestead in the Missouri Ozarks.
Originally published in the March/April 2026 issue of Grit magazine and regularly vetted for accuracy.


