Learn how to build a bookshelf step by step for a small, versatile, and customizable shelf perfect for any collection.
As the months and years roll on by, my hair grows thinner, the books pile high, and the surplus hardwood from past projects cobwebs over.
What better way to use up that idling maple and walnut, and to stash those past Farmers’ Almanac issues, Jim Harrison paperbacks, and Calvin Coolidge biographies, than a handsome bookshelf? Plus, those leftover mahogany sticks can make a door for the front, complete with a couple of rustic hinges. Go all-out for old Thoreau or clever Twain and their stories of pastoral ponds and rickety riverboats.
This double-shelf bookshelf, with a fancy little door on the front, is a quaint way to give that stack of hardwood and pile of literature a new two-story bungalow where they can weather in unison.
The measurements and recommended hardwoods for this bookshelf are all flexible. Any and all of this can (and should) be customized or altered, depending on your space, your needs, and your liking.
Also of note, if you want to shove those books aside and turn this bookshelf into a dapper little liquor cabinet, do so by all means. Or, if you’ve got trinkets from your travels, make it a sundries shelf. Better yet, make it a combination of all three.
Get that dust … er, book collection fired up … and off we go!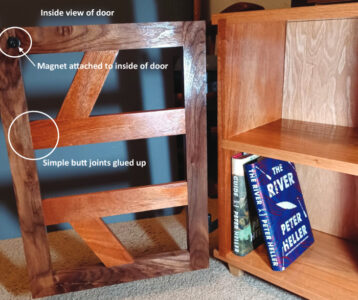
Tools and Materials
- Saw
- Planer, or orbital sander and 120-grit sandpaper
- Router
- Dao blade
- Clamps
- Cabinetry router bit, or Roman ogee
- Miter saw, or tapering jig
- Carpenter’s square
- Cabinet magnet
- 5 boards
- Wood glue
- Wood stiles
- Rails
- 2-to-3-inch-tall scraps, square if available
- Hinges
- Shellac finish
- Gloss polyurethane finish
- Plywood board (optional)
- Matching handle (optional)
How to Build a Bookshelf Step by Step
This is essentially an open box, but a few extra details (the dados especially) make it perfect for a lot of heavy, leather-bound books.
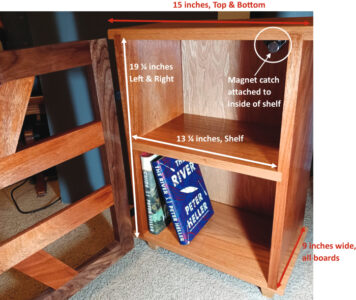
1. Rip-cut the top, bottom, left, right, and shelf boards to 9 inches wide, all the same width (most paperbacks are about 5-1/2 inches tall, hardbacks 6 to 7 inches, magazines 8 inches, so I went with 9 inches to cover most bases).
2. Crosscut the top and bottom boards to 15 inches in length.
3. Crosscut the left and right boards to 19-1/4 inches in length.
4. Crosscut the shelf board to 13-1/4 inches in length.
5. Run each board through a planer if possible; if not, give the boards a pass with the orbital sander and 120-grit sandpaper.
6. Give the top edge a nice round-over with the router; it’ll look charming and eliminate those sharp edges.
7. Dado-cut the top and bottom boards. If you don’t have a dado blade or you’re a novice dado-er, simply try a butt joint, where one edge is glued or screwed into another edge.
8. Dado-cut the shelf into the left and right boards, 3/8 inch deep into the board and 3/4 inch wide.
9. Measure and cut a piece of plywood for a backboard. The back can be left open as well – your choice.
10. Sand everything.
11. Grab your clamps, glue everything, and voilà, your bookshelf is ready for a cute little door!
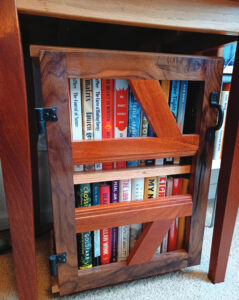
Add a Door
This is simply a frame for the front, though it gives off just a hint of a, say, debonair quality.
1. Measure the opening of the bookshelf and cut your doorframe stiles to fit.
2. Add a couple of rails to the frame for a little character. A fancy cabinetry router bit will help add some further detail, but a simple Roman ogee will look nice too.
3. Grab your clamps again and glue the stiles and rails; simple butt joints are fine here. And voilà, your bookshelf door is done!
Don’t Forget the Legs
These are stubby to no end. Give them a taper, and show off to your woodworking compadres. Make the legs short and stubby with whatever hardwood ends you have lying around.
1. Tapered legs look a bit more stately. Use a miter saw with a clamp (watch your fingers!) or a tapering jig (my choice) on a table saw for this.
2. Glue the legs to the bottom board, and use a carpenter’s square to make them all uniform. Voilà, the legs are on!
Finish the Look with Hinges
These complete the ensemble. They say, “We appreciate the handmade and the pastoral, but we also appreciate the finer things in life, like this chic little bookshelf to which we’re now attached.”
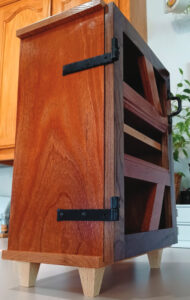
I love rustic-looking hardware, including hinges, either in black or nickel. Simply search “rustic hinges” on Etsy, and the choices will seem endless; just make sure the hardware measurements will fit your piece. A little handle to match will look suave as well.
1. Attach the hinges to the door and cabinet.
2. Use a cabinet magnet on the inside to give the door a secure closure. Line up the two pieces well so the magnet will catch. You can skip the magnet, but when you close that door and that magnet catches, it’ll feel like a little bit of magic you’ve created!
3. For the finish, I like to do one or two coats of shellac and two or three coats of gloss polyurethane, with a light sand in between each coat.
At Home in the Workshop
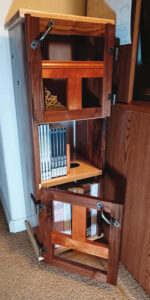
Customization is always welcomed for this handsome little bookshelf. To that end, I’ve altered the measurements and made a triple-shelf bookshelf in the same style. I’ve filled that one with books and magazines, but the middle shelf is calling for a nice bottle of Scotch.
I’m in the woodshop each Thursday evening, and after my time there concludes for the week, I find myself asking, “Is there nothing better than nightfall at the woodshop, sawdust in every fold of my flannel and working its way into every crevice of my pockets, and smelling of walnut, maple, and oak?”
A cold beer is then often in line, and after a few deep gulps, I find that my mind begins to wander back to the table saw and what’s next on my punch list. What needs ripping and planing and jointing and routing next? Surely, there’s plenty enough to do.
Sean Stiny grew up in Northern California. He’s a writer, woodworker, and owl-box maker, and lives in Petaluma, California. He frequently writes about the landscapes of the West and our place in them. His writing has appeared in Grit, Catamaran Literary Reader, The Los Angeles Review, Bend Magazine, True Northwest, Kelp Journal, Wild Roof Journal, California Fly Fisher, Whitefish Review, and Outside.
Originally published in the March/April 2026 issue of Grit magazine and regularly vetted for accuracy.


