
Learn how to build a plant stand out of wood and update the top with a tile centerpiece to showcase your houseplants on a beautiful tabletop.
Here’s the quintessential beginning of another woodworking project:
“Hey, honey, know what we need?” my wife asks. She gives me the side-eye for this most rhetorical of questions. “A cute little side table for my succulents,” she says.
And so commences another woodshop adventure, another woodworking goose to chase. A table that will stand tall enough for her succulents to catch the morning sun is indeed a fine requisition and an excellent project to endeavor toward.
Thus, I set out to build a table precise enough for her most miniature of terra-cotta pots, but sturdy enough for the most herculean of her houseplants. And most of all, a table chic enough to be the apple of her eye.
Having added to the never-ending punch list of woodshop tasks, I look around to see what hardwoods I have on hand for legs (long ones), a top, a table skirt, and a little shelf to give it a bit of personality. I also get the idea to incorporate an 8-by-12-inch rectangular piece of porcelain tile on the top of the table as the centerpiece.
As it turns out, I have a large chunk of 5/4 walnut (1-1/4 inches thick) in my leftover pile, replete with some swell-looking knots and other peccadillos that add character to the dark grain. This will be the long legs.
Some heartwood maple (the darkest inner part of the tree) will make a good skirt and shelf, and a couple of pieces of mahogany will spotlight the top.
What a dandy of a woodshop request! And, once complete, if my handiwork is admirable, it won’t be the table alone that’s the apple of her eye.
So, in no time, I hatch my plan, and we’re off and running … the table saw.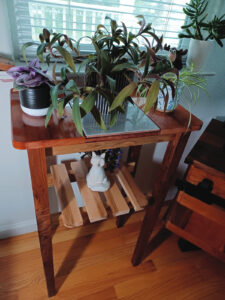
Tools and Materials
- Table saw
- Planer
- Tapering jig
- Roundover bit
- Sander
- Bandsaw or jigsaw
- Spindle sander
- 4 roughly equal table legs
- Boards
- Screws
- 2 rails
- 4 stiles
- Porcelain tile
- Shellac finish
- Gloss polyurethane finish
- Wood glue (optional)
How to Build a Plant Stand Out of Wood
Carve the Legs
The legs are the first things that will catch your eye. In walnut, they’ll certainly add a bit of dashing elegance to any room.
1. Rip-cut four somewhat-equal legs on the table saw. These can be rough at this starting point.
2. Mill the four legs using a planer so they’re all the same width on each side, 1-1/2 inches in this case.
3. Crosscut the legs to their final length. I went with 32 inches to match the height of our windows so the plants can soak in that morning sun.
4. Taper the legs with a tapering jig on the table saw. This will give them a nice little detail that will catch your eye, but if you want to leave them square, route the edges or give them a curve. These legs were made for a tad bit of showing off, so whatever you choose will delight.
Prepare the Table Skirt
The table skirt will give the table structure and stability.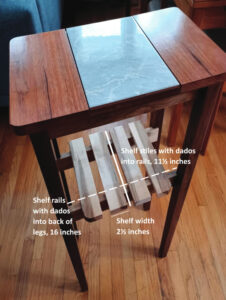
1. Rip-cut your boards to a 2-inch thickness.
2. Crosscut them to the final length: 15 inches for the long side of the skirt and 7-1/2 inches for the short side.
3. Run the boards through a planer for an even thickness.
4. Route the bottom edge with a roundover bit to knock down the sharp edge.
5. Add pocket holes, and attach the boards to the legs with screws.
6. Sand up, and then the skirt is complete and ready to attach.
Assemble the Shelf
A shelf will provide the table with character, practicality, and further stability.
1. Rip-cut the boards to 2-1/4 inches wide.
2. Crosscut the two rails to a final length of 16 inches.
3. Crosscut the four stiles to a final length of 11-1/2 inches.
4. Run the boards through a planer for even thickness, if needed.
5. Attach the two rails to the front and back legs using pocket holes or glue. I cut a rabbet (a groove or a space at the end of a board) out of the ends and glued those to the legs.
6. Dado cut or glue down the stiles into the rails.
7. I routed the outside edges of the outside stiles and gave the corners a slight curve for added character. Various designs can be used here according to your preference and creativity, so make it your own.
Create the Top
With its porcelain-tile centerpiece, the top is the crown jewel of the table. It will display your succulents and indoor plants while also giving them a bit of height to catch some rays.
1. Rip-cut the boards to a final width of 6 inches.
2. Crosscut boards to 12 inches long, or simply match the width of the piece of tile you’ve chosen.
3. The thickness of the boards is crucial to match the tile thickness and create an even surface. My tile was much thinner than the boards, so I planed a center board for the tile to sit on to make the entire surface even.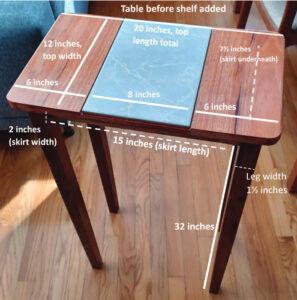
4. Route the outside edges of boards for added detail and to break the sharp edge. I chose a simple roundover bit.
5. Cut curves into the outside corners using a bandsaw or jigsaw.
6. Sand up everything, including those curves (a spindle sander works well).
7. Attach with glue or screws. I added a couple of rails to the underside (attached to the skirt) to secure the top boards. Voilà! Your table awaits a finish, but your build is fully complete.
8. For the finish, as always, I like to do a coat or two of shellac, and 2 to 3 coats of gloss polyurethane, with a light sand in-between each coat.
All in the Details
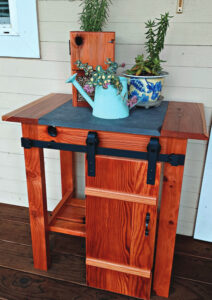
I liked making this table out of hardwood for inside the house. But an outdoor table made out of spare redwood (which is usually on hand after a deck or fence project) with a bluestone paver would be a superb addition to any deck or porch. Perhaps it could even be made of leftover redwood from the very deck on which it sits. I’ve also added a sweet little barn door to my table.
Regardless of where you choose for your table to live, it will turn out splendidly, especially if you decide to customize some of those smaller details.
It’s certainly the apple of my wife’s eye. But more importantly, I’m the woodworker of her eye. At least until her next woodshop request comes in.
For more woodworking project ideas, Things to Make Out of Scrap Wood and Scrap Wood Projects Woodworking.
Sean Stiny grew up in Northern California. A writer, woodworker, naturalist, and owl-box maker, he lives in Petaluma, California. His writing has appeared in Catamaran Literary Reader, Bend Magazine, True Northwest, Kelp Journal, Wild Roof Journal, California Fly Fisher, Whitefish Review, and Outside Magazine.
Originally published in the May/June 2026 issue of Grit magazine and regularly vetted for accuracy.


