Follow our gravity irrigation system design, with a tank mounted on a stand, to build your own garden irrigation when rain is scarce.
For the past few years, we’ve been growing large gardens away from our house, and we don’t have a reliable water source. For us, this became unsustainable, so my husband began researching gravity-fed drip irrigation.
You might ask, what is this? Well, first, “gravity-fed” and “drip irrigation” are two separate things. Drip irrigation simply consists of plastic hoses with tiny emitters every foot or so that gradually drip water. Gravity-fed means you don’t use electricity for pressure to release your water. Here’s what we did to build our own. It was pretty simple, cost-effective, and durable.
Gravity Irrigation System Design
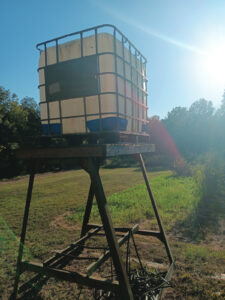
First, we set up water tanks. These were repurposed food-grade 275-gallon IBC (intermediate bulk container) totes. Ours had held cane syrup for a beer factory. We bought them for $60 each. You can get chemical tanks much cheaper, but cleaning them out may be expensive and, in some cases, not completely effective for safely watering your gardens. I wouldn’t take that chance, personally. We bought three of the totes: two for our stands and one to fill them with.
If you have a way to fill your tanks on your stands without hauling water, it will drastically reduce your workload. For example, you can fill the tanks from a water hose or even build a water-catchment system that diverts water to them. If you’re filling your tanks from a pond, lake, or creek, install filters at multiple locations to prevent debris from entering the tank and clogging your drip irrigation.
For the drip system to work with gravity, you’ll need to elevate your stands. This will provide you with the pressure that will force the water out of the emitters. If there’s not enough pressure, your water won’t come out efficiently. Even a small elevation (1 to 5 feet) may provide enough pressure for short hose runs. However, if you have long crop rows, you’ll need to go higher. Ours are placed about 10 feet off the ground. This gives excellent pressure for our large gardens. For optimal use, place your tanks at one end of the garden. This will allow you to make one run down each row. We have a tank in the middle of one garden, and this creates problems when tilling. Because of this, we’re moving it to one end this winter.
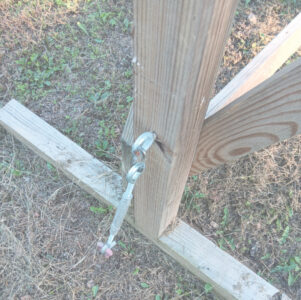
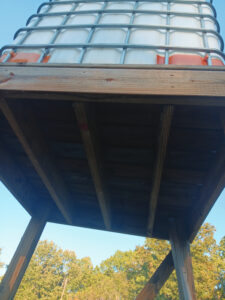
One tank is set up on an old diesel-tank stand that we anchored and built a platform for. The other is on a stand we built ourselves from treated lumber, which we anchored into the ground. In addition, we anchored all tanks to their stands. When full, these tanks weigh over 2,000 pounds, so whatever you build for them must be sturdy. Where we live, we get windstorms, especially in spring, so they needed to be anchored deeply in the ground. You can use mobile home anchors for this. The water in these tanks lasts roughly a week in our gardens during dry weather. Our gardens are approximately 70 by 90 feet, so if you have a smaller garden, your garden is fully mulched, or you get supplemental rain, the tanks might last longer. You can also use smaller food-grade 55-gallon barrels or even 5- or 15-gallon barrels for smaller raised beds.
Before you order your drip line, sit down and map out the garden rows that need watering. Add together the distance of your rows, plus several extra feet per row to account for repairs. Count all the joints, shut-off valves, and filters you’ll need. Then, buy a few extra to have on hand for repairs. Animals like to chew through the hoses to get to the water. We’ve had this happen about four times this summer already. I’ve read that burying the water line reduces the likelihood, but we haven’t done that yet. Order from a reliable company that provides high-quality hoses that will last multiple years, so you don’t need to reorder every year. Many of the companies say the hoses last 6 to 10 years, which is a pretty good investment.
You’ll need a more flexible hose that goes to your rows and a stiffer hose that comes from your tank, as well as a filter that removes very fine particulates from the tank and directs them into the hose. These can be taken off and cleaned as needed.
After your tank has been set on the stand, install your main hose onto the valve from the tank, filter, and shut-off valve. Run the main hose down to the ground and all the way to the end of your garden. The flexible hoses will plug into this main line. We installed individual shut-offs at the start of each row so we could choose which row to water. You’ll need a special punch that punches the hole to fit your flexible hose to the more rigid one.
Unroll enough hose to go the length of each row (plus 1 foot or so extra) and plug them into your main hose. At the end of each row, roll a section of hose over and fasten it to itself. You can use the clips from the supplier, duct tape, rubber bands, or zip ties.
Go down your rows and place dirt over the top of the hoses every 10 feet or so. While you can buy special clips to anchor these to the ground, the dirt actually works much better and is free. If you have a ground cover cloth on, then you’ll need to order the anchor clips. Get the long ones for loose or sandy ground, and the shorter ones for harder soils.
Check your lines each time you run a tankful of water through them. Doing this will ensure you don’t have any blowouts and that everything is getting watered properly. It’s pretty simple: Just walk to the ends of your rows and make sure the water is coming out where it’s supposed to.
If you notice a huge area of water in one location, turn off your water to that row and investigate. More than likely, something has chewed through or otherwise damaged your hose. Repair the hose by splicing in a new section. Keep a close eye on your lines so you aren’t wasting your precious water!
After your system has been set up, consider how often you water. For us, a full tank once or twice a week (think sweet corn) is plenty. During really warm weather, don’t let water sit in the clear tanks, as this can encourage algae growth. To help combat this problem, many people will paint the tanks a dark color.
We find that at the beginning of the year, it’s necessary to bleach out the tanks, as there will be a mineral and algae buildup to some extent, which can easily clog your hoses. To do this, stretch your hose to an area or low-set tank to be disposed of where bleach residue won’t be harmful. Turn off the line, add bleach, fill with enough water to touch all the buildup, put the lid on, and allow it to sit for a day. Then, take a mop and go around the inside as best you can. Open the hose valve and dispose of the water. Rinse inside and out to remove any residual bleach. Clean all the filters.
To prepare the tank for winter, store your filters, shut-offs, and other accessories by cleaning them thoroughly, drying them, and placing them in containers. Label them so it’s easier to set up your system next year.
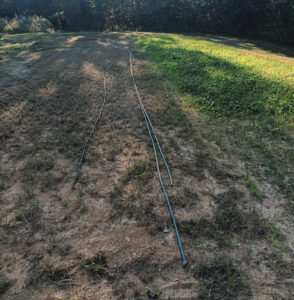
Storing the water lines for winter can be a bit trickier. For optimal longevity, you can set up a storage rack under a roof. To do this, attach arms made of wood or metal that extend 2 to 3 feet from the wall. Place several of these along the wall every 6 to 8 feet. Then, place your hose on these arms to keep them cleaner and in better shape. If you can’t do this, then gather the hoses from the gardens and keep them in a straight row, somewhere out of the way. This can be a bit of a pain, but if your hoses are long like ours, it may be your only feasible option. The important thing is not to kink or fold the hoses, so regardless of how you store them, make sure they stay straight or gently curved.
One consideration for your tanks is how you’ll fill them. We don’t have a well available at our home, so we must fill an IBC tote from our outside hydrant and bring it to our water towers. Then, we use a portable water pump to transfer the water from our hauling tote to the water tower. This can be a little hassle, but the improvement to our gardens is definitely worth the extra time!
Our costs for our entire system and enough hose for 20-plus years were right around $500. Everything we purchased was reusable for many years and has more than paid for itself in our increased vegetable production during the first year.
Build Your Own Tank Stand
If you’d like to build your tank stand yourself, you’ll need these supplies to build one 4-by-4-foot platform that’s 10 feet tall:
- 6 treated 6×6 posts, 10 feet long
- 12 treated 2×6 boards, 8 feet long
- 4 treated 2×4 boards, 8 feet long
- Nails
- Screws
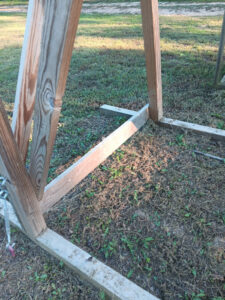
1. Begin by building the stand’s base. To do this, first cut three of the 2×6 boards in half to make 4-foot-long boards. Next, lay two 8-foot 6×6 posts on the ground, and nail one 4-foot-long 2×6 to the tops and bottoms of the posts. Repeat with two more 6x6s. Now, you have two sections.
2. Attach these sections to the 6×6 posts that will lie horizontally on the ground.
There are a couple of ways to do this, and your level of experience will most likely determine which one you choose. The easiest way is to fasten L-brackets to the bottom of the vertical post and to the horizontal post. More experienced carpenters could cut an inset the size of the bottom of the post into the horizontal post exactly where it needs to be placed. Then, using long screws, go up through the bottom into the upright post from the horizontal post.
Whichever method you use, measure accurately. You could also set your posts permanently into the ground or into concrete, but this isn’t as good if you ever need to move your tower. If you do decide to set your posts permanently, you’ll need 12-foot posts.
3. At the top, connect the two sections with two 4-foot 2x6s.
4. It’s time to build the joists in your tower floor. To do this, measure the inside dimensions of the top opening from the outside walls. Cut 2x6s in this length. Turn on the narrow side and nail from the outside board into this joist. Repeat every 12 inches for a total of three joists.
5. Before you place the floorboards, measure along the opposite side of the joists, from outside to outside. Cut 2×6 boards to fit and then nail them onto the joists. To make this easier, pop a chalk line on the center of each joist.
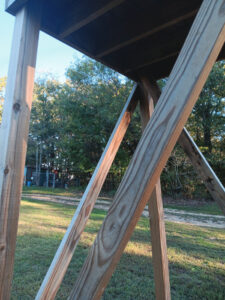
6. Optional but recommended bracing will go from the top corner to the opposite bottom corner at an angle. Nail these on the outside of the posts.
You’ll need a tractor to move your stand, so if you don’t have that capability, build your tower where you’ll need it. If there’s no tractor bucket available to help you stand these towers up, then you’ll need several strong helpers! You’ll definitely need a way to lift your tanks onto the tank stand, so plan accordingly; you may need to borrow or rent a tractor.
Watch out for wasps on these towers! They love to build nests on these, as we’ve experienced multiple times. Also, you’ll need a ladder to access the tanks for filling, so either build a permanent ladder or keep one available. Another consideration is leveling the ground where the tower will be placed to make sure the water flows well. If the tank must tilt at all, make sure it tilts toward the garden, but preferably has a level spot. This will also make your stand much more stable.
I hope this helps take much of the guesswork out of setting up this system. We’ve been abundantly blessed in our gardens since switching to our gravity-fed system, and we hope you will be too!
Jenny Underwood is a homeschooling mom to four lively blessings. She lives on a fifth-generation homestead with her family. You’ll often find her in the garden or curled up with a good book and a great cup of coffee.
Originally published in the May/June 2026 issue of Grit magazine and regularly vetted for accuracy.


