The honey harvest is an exciting — and sticky — time for beekeepers. As we anticipate that first bite of homemade biscuit drenched with unbelievably sweet honey, we know it’s well worth the work it takes to get to that point. Yet, golden honey isn’t the only valuable product produced by industrious little bees. Intoxicatingly fragrant beeswax — begging to be turned into candles, lip balms, and more — awaits the frugal beekeeper. Fortunately, only a bit of time is needed to harvest this invaluable wax. The tricky part, though, is finding an easy, simple, and inexpensive method to separate the wax from the honey in a manner that allows the beekeeper to retain the highest proportion of both. Fortunately, you can build an uncapping tank that’ll do the job for a fraction of what you’d spend to buy one. Assembling an entire honey-extraction setup takes time and, unfortunately, more money than most of us really want to spend. Yet, as with most homesteading endeavors, costs can be cut along the way while ensuring the quality of our products doesn’t suffer. Costing less than $40 in materials and taking about 20 minutes to build, a DIY uncapping tank will have you ready for the honey harvest in no time. And the money you save can be put toward something else, such as an extractor, a hot knife, or that next package of bees.
Track Down Totes
Used during the extraction process to capture slivers of wax removed from the honeycomb surface, a well-designed uncapping tank should include a few key elements. First, and most importantly, your tank needs to be the correct size. Too often in our desire to cut costs in an already expensive endeavor, the uncapping process is delegated to the nearest 5-gallon bucket or kitchen stockpot. While these will get the job done, the lack of workable space between the comb, the uncapping tool, and the sides of the container can cause problems. These tight quarters often result in capping wax landing on the table or floor — a recipe for an unpleasant cleanup experience, plus lots of wasted honey drippings. To avoid this, build your tank out of two sturdy, rectangular totes. Both totes should be the same size, with the ability to nestle securely inside one another. This way, the bottom tote will hold all the honey that drains from the frames during the uncapping process.
Select totes at least 24 inches long by 15 inches wide and 3-1/2 inches deep. Ensure they have a weight capacity of at least 40 pounds. It’s amazing just how heavy a few frames of uncapping wax and the retained honey can be! Select thin, flimsy totes, and your wax and honey drippings will land on the floor, despite your best efforts.
In addition to the correct size, you may also want to consider food-grade totes over more standard utility-style totes. While the honey and wax won’t be in the uncapping tank for more than 48 hours, many beekeepers prefer food-grade totes for health purposes. Inexpensive food-grade totes are readily available online and from many restaurant supply stores.
You’ll also want to select a tote material that allows for a few holes to be drilled into the sides and can withstand a bit of cutting along the bottom without structural failure. And finally, you’ll want totes that can be easily cleaned after the harvest.
Add a Drain Screen
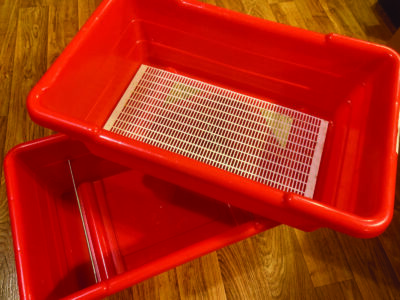
While many beekeepers enjoy the ritual of taking the capping wax and smashing it repeatedly to release each drop of honey, others find it much too tedious and time-consuming. To avoid this timely process, add a draining screen to the bottom of your uncapping tank. To do so, cut a hole nearly the full length and width of the bottom of the first tote. Then, insert a screen onto which the pieces of wax and honey will rest for a day or two. During this resting period, gravity will do the work of removing the sticky honey and collecting it in the bottom of the second tote, ready to be added to the filtering tank. Easy peasy.
You have a few options when it comes to screen material. Perhaps the simplest is a plastic queen excluder. Cut it to size, and use heavy-duty staples to secure it over the hole. We’ve used this option successfully many times. The one drawback is that plastic excluder can warp and sag as wax piles up. A less expensive option is to use the same #8 hardware cloth that many of us use in other beekeeping applications, such as bottom boards and hive body ventilation holes. Again, heavy-duty staples work well for securely attaching the screen to the bottom of the tote. A third option that doesn’t require staples is to cut a metal queen excluder (or similar metal grate-style item) to the size of the entire bottom of the tote, and allow it to rest inside with no attachments. Because metal queen excluders are rigid, warping isn’t usually an issue. However, the cost of metal excluders will increase the overall expense of the uncapping tank.
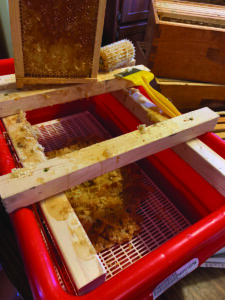
Fashion a Frame
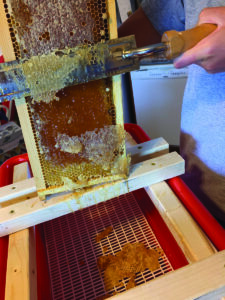
Aside from the screening and totes, you’ll also need to devise a frame on which to rest a honey frame during the uncapping process. This can be as elaborate or as simple as you choose. We used inexpensive lumber and a few screws to create a frame that rests easily along the top of the screened tote. This allows the honey frame to rest on its end and be held with a single hand while the second hand wields the uncapping tool. Cappings drop easily into the tote, the comb structure is protected because it isn’t resting on any container edges, and the cold knife or other uncapping tool can rest on the uncapping frame when not in use.
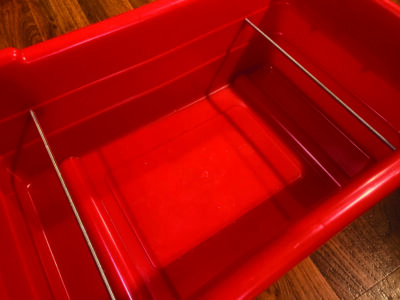
Elevate the Top
Finally, you’ll need to elevate the top tote above the second tote by a few inches. When nestled together, most totes won’t leave sufficient space between the underside of the screen and the bottom of the second tote to allow for drainage. You can use kitchen bowls or blocks of wood set down in the four corners of the bottom tote to provide elevation. This works well enough, but a simple rack inside the bottom tote is more stable. To make a rack, drill two holes, directly across from each other, in one long end of the bottom tote, and then slide a wooden or metal dowel into the holes. Repeat on the other end of the long sides for a total of two rods to support the top tote. We chose metal rods and secured them in place with wing nuts. The rods are easy to remove when we clean the tank, and they can be stored inside the bottom tote year-round when not in use.
Optionally, you can also include a gate valve mounted to one short end of the bottom tote to make draining honey easier. Any gate valve, plastic or metal, will work. Most beekeeping catalogs carry these valves in the extraction section. They range in price from a few dollars to $20 or more. However, the least expensive options work just fine for an uncapping tank, as they aren’t opened and closed repeatedly over long periods of time.
Once you’ve gathered all the items, it takes just a few minutes to assemble your DIY uncapping tank. Even better, each component can be removed when not in use, allowing the totes to be nestled snugly together to reduce storage space.
Kristi Cook and her family have been building their homestead for many years. Kristi shares their vast experiences through her articles, workshops, and her blog.


