The importance of saving money in these hard times is a sentiment many of us can agree with. The dollar certainly ain’t going further, and the animals still need to be fed and sheltered. With that in mind, we made some notes on things we’ve done around our homesteads to make feed dollars stretch. Whether you’re new to homesteading or looking for fresh ideas, these notes are meant to offer practical solutions for anyone managing livestock. We hope you’ll discover something here that can make a real difference.
How to Grow Fodder for Livestock
You might be downright surprised at how many people simply don’t think to grow their own supplemental feed. As Audra points out, it’s not that most people don’t know how; it’s more that they’re unsure where to start and what to start with.
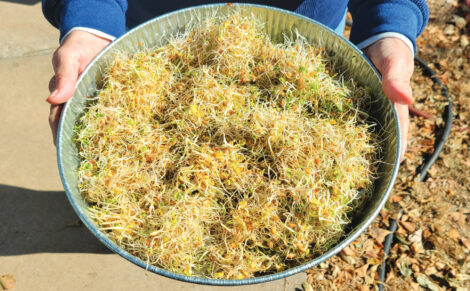
First on any list of supplemental feed is usually bean and grain sprouts. They’re easy to make, and it only takes a few days to prepare them for your livestock to eat. Simply rinse your beans and grain seeds, and then place them in a bucket that has a screen in the lid or in jars with screened lids. Cover the beans and seeds with water, and let them soak overnight. The next morning, dump the water out, rinse and drain the beans and seeds well, and set them aside. Rinse twice a day, draining them well each time, until they’ve reached the desired size. You’ll want to keep a rotating system of sprouts; start a new batch every day for 5 to 7 days to keep a steady amount on hand.
Keep in mind that some fodder, such as mung bean, needs to sprout in the dark. Don’t go overboard when adding seeds to your container. A small amount will go a long way: A couple of tablespoons of seeds will fill a quart jar. A single quart jar filled the pan in Audra’s photo (right).
Dry beans usually cost about $1 for a 1-pound bag, so even if you aren’t growing your own beans (which, arguably, would save even more money in the long run), it’s a fairly cheap option. Starting your fodder doesn’t cost much more than that overall, so your biggest challenge here will be space. You can easily build a rack system for a small operation, like Karmin did for her small flock. She happened to have space on the side of her DIY coop, to which she added some shelves with scrap 1x6s and a couple of L-brackets for each shelf. For the sprouts, she set covered pans of beans on the shelves and rotated through the pans daily.
Another option to consider is to let (some of) your smaller livestock into your garden – mostly poultry and rabbits. Few people would be okay with their pigs or cows traipsing through the garden. (But it’s definitely worth remembering that pigs make great tillers and can dig stuff up for you at the end of the season if you aren’t keeping a year-round garden.) Poultry – from chickens to guinea fowl to geese – and rabbits are great for keeping pests at bay and fertilizing the land, and they’ll get a nice snack, saving you money. Beware: Chickens and rabbits will happily tear up all of your plants and nibble at your produce, so supervise them or turn them loose in the garden at the end of the season.
If you don’t want animals in your garden, you can always plant a special garden just for them. Seeds are cheaper than the finished product, so if you’ve got the space and time, plant! Mostly, whatever produce you eat, your livestock can also eat, with a handful of exceptions. The most common exceptions include onions, soybeans, avocados, potatoes, and most things in the nightshade family. Always read up on foods before you feed them to your animals to ensure you don’t accidentally poison them.
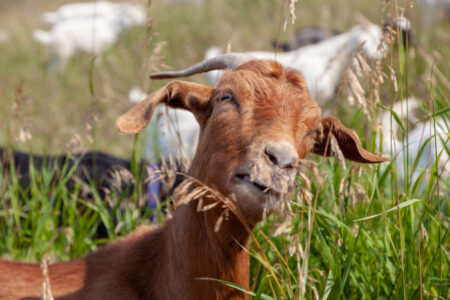
While beans, alfalfa, and grain sprouts make a great addition to goat feed, treat them as a supplement only, as too much can cause digestive issues. Goats still need the rough, long-stemmed forage of hay or trees, shrubs, and grasses to maintain their rumen health.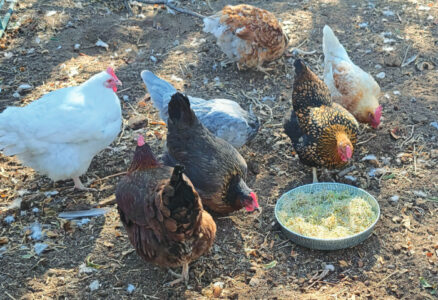
Growing for Goats Growin’ for Goats
- When I gardened a desert sand dune in Nevada, we could legally use domestic wells for up to 1/2 acre of garden grown for “human” consumption. My kitchen garden consisted of 1/5 acre, so I planted more for the goats and chickens, but I sowed “human” crops and shared the bounty. I also pulled weeds and gave specific plant cuttings to the animals.
- Most “weeds” can be highly nutritious: purslane (Portulaca oleracea), redroot pigweed (Amaranthus retroflexus), lambsquarters (Chenopodium album), Russian thistle (Salsola kali) when young and supple, and most grasses. Toxic weeds shouldn’t be composted and include hemlock (Conium maculatum), which can look like wild carrot. If you don’t recognize a weed, compost it instead.
- When cold-weather leafy greens turn bitter in the heat, offer them to livestock and make room for your next planting.
- Thin your crops with intention. Beet seedlings work great as salad microgreens for humans, while larger plants, such as young sunflowers or wimpy carrots, will delight animals.
![Goats eating up weeds in a Calgary park as part of the city's targeted grazing…]()
- Trim corn plants above the top ears after silks begin to dry. The corn will continue to mature, and the ungulates can enjoy the plant while it’s still green and nutritious.
- Livestock can eat all parts of beets, carrots, and brassicas (turnips, radishes, broccoli, cabbage, etc.), even when overmature and withered. Introduce brassicas slowly and in limited quantities.
- After picking off beans and field peas, cut the plants at ground level, leaving roots in the ground to decompose and fix nitrogen. Throw spent plants to livestock, but keep the beans and peas to yourself or sprout them, as uncooked legumes could cause issues.
- If crops go to seed, livestock may love the flowers and seeds, especially those from amaranths, sunflowers, carrots, pumpkins, and melons.
- Herbs, including dill, bolted parsley, and basil trying to bloom, are good for livestock too. I had a goat that loved garlic scapes!
- Don’t give livestock any parts of potato plants, garden huckleberries, or anything that humans are advised not to eat.
- If the crop has decomposition of any sort, especially mold, feed it to your compost instead!
– Marissa Ames
Sturdy Chicken Coop Building
Much like Karmin’s coops, animal shelters don’t have to be pretty, brand-new, or magazine-worthy. (She refuses to share pictures, saying, “They ain’t all that cute and definitely look more like a lean-to with a door and a weird chicken office space.”) What they do have to be, however, is sturdy and safe. She built hers almost entirely from scrap and salvaged materials of plyboard, roofing metal, hog paneling, and 2x4s.
It’s easy to get tempted by the quick fix or that super-cute prefab at the farm supply store. Sometimes that works – until the first hard wind, a curious goat, or a determined raccoon tests every weak point at once. A sturdy structure isn’t about looks; it’s about keeping animals alive and comfortable and preventing you from rebuilding the same shelter three times in two years.
Start with where you’ll locate it. If you build in a low spot, water will always win. A shelter that stays damp will rot faster, smell worse, and invite parasites and respiratory problems. Even a simple run-in does better when it’s on slightly higher ground, angled away from prevailing weather, and given some sort of base – skids, gravel, pavers, or posts – so the wood isn’t sitting in mud and moisture isn’t wicking up into every board.
After that, sturdiness is mostly geometry and good habits. Keep the frame square-ish (it doesn’t have to be perfect, just sturdy), add diagonal bracing so it doesn’t get wiggly, and don’t rely on one “hero” screw to hold a whole corner together. A small shelter becomes a sail in a storm; the difference between “it shook but stayed put” and “we found it in the tree line” is often a few braces and a little attention to how the load travels from roof to wall to ground.
Connections matter more than most folks think. Nails, screws, and bolts aren’t all interchangeable. Use exterior-rated fasteners, washers where needed, and metal brackets at stress points – especially where rafters meet walls and where walls meet the base. Wind doesn’t just push; it also lifts, and a roof that isn’t secured well can peel back like a sardine-can lid.
Then, there’s the “daily abuse” factor. Livestock will lean, rub, chew, climb, headbutt, and generally behave like the quality-control department you didn’t hire. If a panel flexes, they’ll find it. If a latch is weak, they’ll work it. If there’s a gap big enough for a paw, a predator will test it. Sturdy shelters use the right materials in the right places: strong corners, protected edges, tight seams, and barrier choices that match the threat (for example, use hardware cloth, not flimsy wire that gives up after one midnight visit from your friendly neighborhood bobcat).
A sturdy build will save money in the boring ways: fewer replacements, fewer emergency runs to the hardware store, fewer vet bills from preventable stress and exposure, and less wasted feed from rain-soaked bags or rodents moving in. You don’t have to build fancy or expensively – but build like you don’t want to build it again. Check it often, tighten what’s loosened, replace what’s rotting, and fix small problems before they become the kind you only notice when something is already gone.
Even though they may look more like a lean-to, Karmin’s coops have plenty of space for plenty of birds to support her large family. What surprised a friend, however, is that she can’t let her birds free-range. She lives in the woods and has way too many predators (coyotes, mountain lions, black bears, raccoons, and so on) to which she’s accidentally sacrificed a flock before. So, she spent roughly $50 on hardware cloth and snake netting and did the bottoms of the pens in hardware cloth and threw the netting over the sides. She’s had an EF1 tornado touch down in the backyard within feet of the structures and they’re still standing (the tornado very kindly knocked down a 60-foot tree instead). She simply had to redo the netting.
That said, we put together a quick rundown on options for sourcing materials for cheap.
- Social media. It can be a bit of a pain to scroll through the marketplaces and groups, but in the end, it’s often well worth the time. One such find on Facebook Marketplace was 10 free floor trusses, which were used for a shed build.
- Take-back services. Many cities have mandatory “take-back” services you can contact to get surplus and reclaimed materials for cheap or even free on occasion.
- Local businesses. Small construction businesses, especially, tend to be willing to let go of extra materials when projects are complete (often, it saves them extra cleanup time).
- Community. Your circle of friends, family, and neighbors can be your greatest resource. Karmin’s neighbor from across the street works in construction and is how she got the roofing and siding for her coops, as well as about 20 leftover 2x4s and scrap from one of his projects for free. Never underestimate the power of asking, “Hey, know where I can find [insert material here]?” You won’t know if you don’t ask.
Karmin Garrison and Audra Trosper have been tag-teaming words for nearly 20 years. In that time, neither of them have gotten any saner, but they’ve certainly had a multitude of adventures in (mostly) imaginary worlds.
Originally published in the July/August 2026 issue of Grit magazine and regularly vetted for accuracy.


