
Learn how to make Monterey Jack cheese with instructions from work area prep to cheese cave recommendations.
My cheese-making journey began almost 20 years ago with a couple of online resources, a few informative recipe books, an abundance of fresh milk from my goats and cows, and a desire to figure it all out. Of course, I made some mistakes along the way, but with time and practice, I began to make a consistently delicious product that I was able to share with my family and friends.
Making aged cheese doesn’t have to be intimidating. With a basic understanding of the process and a little practice, you’ll soon be making delicious cheese in your own kitchen. I’ll get you up to speed on the basics of cheese-making. You’ll need a clean work area, the right equipment, the ingredients, and enough patience to wait until the cheese has aged!
Prioritizing Cleanliness
From the collection of milk to the aging process, cheese-making requires a clean environment. Most often, the failure to produce an edible product is due to contamination. If you’re using unpasteurized milk, make sure it’s from a clean source. Additionally, sterilize all equipment and countertops. A mixture of 2 tablespoons of household bleach to 1 gallon of water will kill unwanted bacteria. However, if not thoroughly rinsed, bleach can inhibit the growth of the beneficial bacteria needed for making cheese. To avoid this, I prefer to wash in hot, soapy water and use boiling water for the final rinse. Air-dry your equipment and utensils instead of drying them with a towel. Never make anything with yeast on the same day as you make cheese, since the yeast in the air can contaminate the cheese.
When you make your first aged cheese, block off half a day free from interruptions. Later, when you’re more comfortable with the process, you’ll be able to multitask.
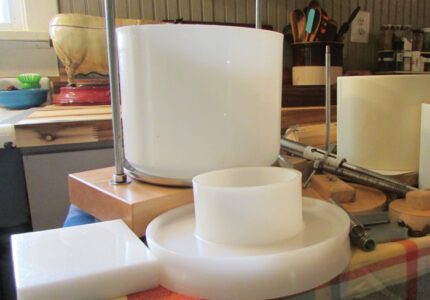
Tools and Materials
- Stainless-steel pot
- Liquid measuring cup
- Measuring spoons
- Kitchen thermometer
- Timer
- Long-handled, stainless-steel spoon
- Stainless-steel colander
- Cheesecloth
- Cheese mold, follower, and press
- Drying rack
- Wax
- Cheese cave (or dedicated area to age cheese)
Gathering the Ingredients
- Milk. The cheese-making process begins with milk, and the most common milk used is cow or goat milk. Milk can be pasteurized or unpasteurized. Unpasteurized milk is commonly referred to as “raw milk.” Ultra-pasteurized milk is unsuitable for cheese-making.
- Calcium chloride. If you’re using pasteurized milk, adding calcium chloride will help restore the calcium balance of the milk. Without it, the curd will be too weak to cut. Calcium chloride has an indefinite shelf life. It’s typically added at a rate of 1/2 teaspoon diluted in 1/4 cup of cool water for each gallon of milk.
- Cultures. Cultures are introduced into the milk to increase acidity and prepare the milk for the coagulation process. This is known as “ripening” the cheese. Cultures can be divided into two basic types: mesophilic (for cheese cooked at lower temperatures) and thermophilic (for cheese cooked at higher temperatures). A few recipes call for both. If you’re just getting started and only want to invest in one culture, choose mesophilic, as it’s the most common culture used in popular cheese varieties.
Cultures are usually added at the ratio of 1/8 teaspoon per 2 gallons of milk, but your recipe should give you clear direction as to how much culture to use. A direct-set culture is easier to use and provides consistent results. Direct-set cultures can be purchased online from cheese-making suppliers and should be stored in your freezer. - Rennet. Rennet helps set the cheese curds, and it comes in animal- and vegetable-derived varieties as liquid, powder, or tablet. Most recipes are written for regular-strength liquid rennet. Liquid rennet must be stored in the refrigerator. It begins to lose some of its strength after about 8 to 12 months, but if your rennet is older and has lost some of its strength, you can use a little extra. Aged cheese made with vegetable rennet has been known to sometimes develop a slightly bitter taste, especially in cheese that’s aged for longer periods of time.
- Salt. Salt enhances the flavor of cheese, and without it, the curds are bland. Salt also helps the whey drain from the curds and aids in the fermentation process. If you don’t have cheese salt, any noniodized salt can be used. Avoid using iodized salt, since it’ll inhibit the aging process.
Understanding the Process
- After measuring and pouring your milk into the stainless-steel pot, warm it to the correct temperature per your recipe’s instructions. Then, mix your direct-set culture with 1/4 cup of cool, unchlorinated water and add that to the milk. Allow the milk to ripen for the time designated in the recipe.
- After the milk has ripened, add the rennet. Measure the rennet according to the recipe’s instructions, add it to 1/4 cup of unchlorinated water, and then mix it into the ripened milk. Follow the recipe instructions on how long it should take for coagulation. If the milk hasn’t coagulated in the designated amount of time, give it a few more minutes. Sometimes, it takes a bit longer if your rennet is weak.
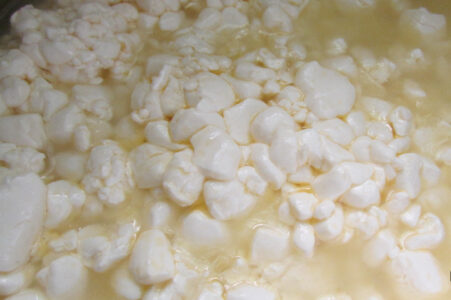
- After the curds have set, cut them into equal sizes as instructed by the recipe. This will help the curds heat more evenly. Closely monitor the temperature of the curds as they cook, and adjust heat as needed. Some people find a double-boiler method works well for cooking the curds. When cooking curds, err on the side of heating too slowly rather than too quickly.
- As you stir the curds, break up the larger pieces with your long-handled, slotted spoon. Be gentle with the curds, and lift them from the bottom of the pot to the top. Overhandling or rough handling can cause the curds to express too much whey and become dry.
![]()
- When your curds have cooked, drain them through a large colander. I collect the whey to make ricotta cheese or to feed it to the chickens and pigs. It’s also a good fertilizer for the grass or garden. Some recipes call for salting the curds directly before pressing, while others give instructions for a saltwater brine to soak the cheese in after being pressed. Follow your recipe on whether to salt the cheese before or after pressing.
- Place the curds in a cheese mold lined with cheesecloth, and follow the recipe’s instructions as to how many pounds of pressure to use. The recipe will often instruct you to start out with less pressure for a period. Then, flip your cheese before continuing with a greater amount of pressure. Don’t be tempted to skip this step, since doing so could give your cheese an inconsistent texture.
![]()
- Once your curds have been pressed, remove the cheese and place it on the drying rack. Special racks or cradles can be purchased from suppliers, but I use a stainless-steel baking rack. Flip the cheese approximately every 12 hours until it develops a rind. This may take 2 to 5 days.
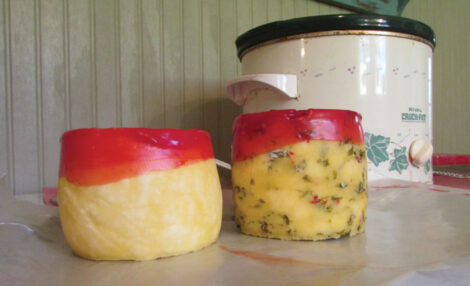
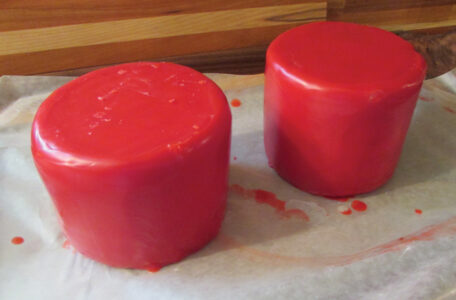
- When the cheese has developed a sufficient rind, it can be waxed. I use an old crockpot to melt the wax. You can use a designated brush with natural bristles to paint the wax onto the cheese, but I prefer dipping the cheese in the wax. I’ll coat half the wheel in wax, let it dry, and then coat the other half. Apply at least 2 to 3 coats of wax on the cheese so it’s completely sealed. Always use caution when working with hot wax. Cheese wax can be purchased from a cheese-making supplier and is reusable. When I’m finished, I’ll unplug the crockpot and store it with the remaining wax still in the pot.
![]()
- While somewhat controversial, some people vacuum-seal cheese for aging. Some experts say the flavor and aroma of the cheese may be compromised with this method and that vacuum-sealed cheese may not reach its fullest potential. I’ve successfully sealed and aged my cheese using both methods. If waxing cheese seems too time-consuming or messy, try vacuum-sealing it.
- Before you set your cheese in the cheese cave, label it with any pertinent information, such as the date. Turn the cheese once a week so it ages evenly. Wine coolers make excellent cheese caves, or, in a pinch, you could use the bottom drawers of your refrigerator.

You can easily make a designated cheese cave with a working refrigerator and an external thermostat controller, which you can purchase through your cheese-making supplier or through any major company that sells refrigeration controls. If you want to be precise with humidity control, you can also buy a hygrometer. However, I’ve had good success with making aged cheeses, such as cheddar, colby, Monterey Jack, jalapeño Jack, Parmesan, and Derby, without one.
Consider keeping a notebook on the cheese-aging process, your results, and any notes to spark your memory. You could also jot down notes in the margins of your recipe books. After 20 years, I’ve continued to keep notes and observations on any subtle changes from different approaches when I make cheese.
Practice Makes Perfect
Now that you’re familiar with the basics of making aged cheese, it’s time to find a good recipe and practice what you’ve learned. The slow, meditative process of making aged cheese is satisfying and rewarding. In addition to the feeling of self-sufficiency in having the ability to make one’s own dairy products, it’s fun to see the astonishment on the faces of those who sample the cheese and to hear them say, “You made this? It’s good!”
Tammy Cupp and her husband, Mike, raise and train dairy cattle on 50 acres in the Blue Ridge Mountains. Follow them on Instagram (@Maplelawn_Farm) and Facebook.


