
What are the benefits of soil sprouts vs microgreens, and what are shoots? In his revolutionary book Year-Round Indoor Salad Gardening, Peter Burke proves that you can grow salad greens throughout the entire year with little more than a cupboard and a windowsill. This book is an inviting guide for both first-time and experienced gardeners in rural and urban environments. The book offers detailed step-by-step instructions to mastering Burke’s method, including tools and accessories to have on hand, soil and compost, harvest and storage, recipes and much more. This excerpt highlights the distinctions between soil sprouts and microgreens.
You can purchase this book from the GRIT store: Year-Round Indoor Salad Gardening.
The Difference between Soil Sprouts and Microgreens
Teaching workshops on indoor salad gardening has been a great way for me to learn from the questions folks ask during and after the sessions. I have heard a lot of confusion in terminology. This section expanded from a conversation, a series of e-mail conversations really, with my editor. I had planned to add a section on definitions of terms anyway, but our conversation highlighted the need for clarity. At one point when I said I was not going to include a chapter on microgreens, she replied, “Isn’t microgreens a huge part of the book? I’m confused . . . .” After a few more e-mails I finally got it. We were using the same word for two different things. In this case she was using the word microgreens as a general term for growing greens, and I was using it to refer to a specific way to grow greens.
The essence of the issue is that there are a number of techniques for growing immature greens. Sprouts, bean sprouts, shoots, microgreens, baby greens, and soil sprouts are all immature greens. Each one is distinct in how it is grown and at what stage of growth it is harvested. Still, the terms are often used interchangeably to label any immature green we use for salads. I will frequently hear people say things like “Oh, you’re the sprout guy!” and it would be lost on them if I corrected them by saying, “No, I am the soil sprout and shoot guy.”
Just so we are all on the same page through the rest of the book, I’m going to make an attempt to clarify terms, realizing that these are my definitions only and not an official certified definition. I have witnessed this confusion of terminology in all types of media–radio, television, magazine articles, online articles, and even dictionaries like Wikipedia–so it stands to reason there is confusion. Let’s try to clear things up.
I’ll start with the basics: When a seed sprouts, it sends out a root and a stem with a seed leaf. The seed leaf is the two halves of a seed when it opens and becomes a set of leaves. Once the seed leaves spread out the first true leaf appears in the crotch of the two leaves. The true leaf resembles the leaves of the mature plant both in look and flavor. Each of the parts of a plant can be encouraged to grow in different ways using different techniques that I’ll explain below. At the end of each section I’ll list a few of the pros and cons. I’ll compare each of these different traditional methods to growing soil sprouts, the subject of this book. Growing soil sprouts is my yardstick.
Microgreens
Microgreens are grown for the first true leaves of a plant instead of just the stem and seed leaf. It is not a distinction without a difference. The first true leaf takes a little longer to develop. The tray of sprouting seeds is introduced to a light source as soon as the seeds begin to sprout and root. When you introduce light the seed leaf spreads out near the soil and sends up the true leaf. The first true leaf looks like the plant. The seed leaf, by contrast, is not as distinct to the variety and resembles the shape of the seed itself. The flavor of microgreens is more characteristic of the mature plant. Microgreens require full sunlight, a fluorescent lightbulb, or LED grow light to grow properly; you will not be able to get a good crop with just sunlight from a windowsill.
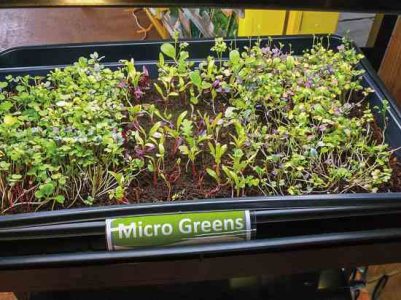
There are a wide selection of seed varieties that can be grown for microgreens. The most commonly used varieties are arugula, broccoli, beets, cabbage, Swiss chard, kale, kohlrabi, komatsuna, mizuna, mustard, radish, basil, cilantro, celery, dill, fennel, fenugreek, salad burnet, shiso, and sorrel.
The Pros and Cons of Growing Microgreens
The pros of growing microgreens for salads are the wide variety of flavors available and the custom mixes of seeds that are unique and fun. There are a number of colors and textures as well as flavors that make a great palette for the creative cook.
The downside of growing microgreens is really a list of things. It starts with the need for lights or a greenhouse. In the winter, when you need greens the most, you need a heated greenhouse. The trays are large trays and need a lot of space to grow enough for a salad every day. It takes at least 2 weeks to grow a crop, some take longer–up to 4 weeks until harvest. Microgreens are usually grown in a standard 20-inch by 10-inch (50.8 × 25.4 cm) black plastic tray or something similar to that.
By my measurements it would require a tray per day to harvest a salad bowl of microgreens. That would require the home grower to have fourteen trays growing at all times. You would need seven 4-foot (1.2 m) fluorescent light fixtures or a heated greenhouse to provide a steady supply of greens. It would be very expensive to heat a greenhouse for the winter, and it would require a lot of precious indoor space to house fourteen trays.
Sprouts
Sprouts are simply seeds grown for the root, stem, and seed leaf. The most well known of all the sprouts are alfalfa sprouts. Sprouts are commonly grown in a quart Mason jar with a screen top. Seeds are soaked overnight, rinsed, and drained, then set up to allow the remaining water to drain. The jars of soaked seeds require rinsing three times a day. After the first day you can see the tails of the root appear. Within a few days the root lengthens and the seed becomes yellow leaves. Sprouts are ready in about 7 days.
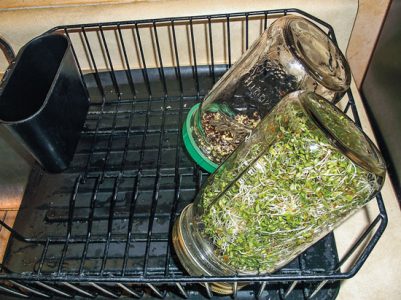
The home gardener can grow sprouts using stacked plastic trays that rely on gravity to rinse the seeds. When water is poured into a top tray, it rinses and hydrates the seeds as it flows down through the trays. The bottom tray is a reservoir for the rinse water. These appliances are usually limited to three or four stacked trays.
The harvest is the root, stem, and seed leaf about 3 or 4 inches (7.6-10.2 cm) long. They can be used with the seed leaf still yellow, although if grown in a kitchen there is usually enough light to green the tiny seed leaves. Alfalfa, clover, broccoli, radish, arugula, cress, and mustard are the most common seeds grown for sprouts.
The Pros and Cons of Growing Sprouts
The most appealing aspect of sprouts is the downright simplicity in getting started. A jar, seeds, and a piece of screen is all it takes to grow sprouts. The simplicity stops there when you consider both rinsing three times a day and a place to put all the jars for the 7 days it takes to mature to a usable size. Rinsing takes a lot of fresh water and is required morning, noon, and night, so it is a significant time commitment.
Another drawback of growing sprouts is the unforgiving nature of this technique; miss a rinsing and you have mush in a jar. The entire jar full can be lost to rot, just like that. I have verified in my classes that this is a common experience and not just my problem. It is tough to be that diligent with our busy lives.
What I use as a gauge to measure a growing technique is how much it will take to produce a salad every day that will feed four people. That is about 12 to 16 ounces (340.2-453.6 g) of finished greens. For sprouts a salad every day requires three to four jars a day times 7 days. Finding space for between twenty-one and twenty-eight jars is complicated in a small kitchen. What I hear in my classes is that most people grow a few jars of sprouts and add them to their regular salads rather than trying to find space for twenty-eight jars. Another drawback to sprouts is washing the seed hulls off the greens. I have done a lot of this, and even though I am good at it, it does take a lot of time, not to mention a lot of fresh water.
Shoots
Shoots usually describes pea shoots. They are essentially grown the same way as soil sprouts, but with peas there is no seed leaf; there is just a stem and side branches of tiny leaves. French lentil and adzuki beans are similar and can be called shoots, too. Sometimes you see corn listed with shoots in seed catalogs, but they do not make a good salad green.
The Pros and Cons of Shoots
Shoots share the same set of pros and cons as soil sprouts. One additional advantage to shoots is that they will regrow after the first cutting, although each successive cutting is smaller than the first.
Baby Greens
Baby greens are grown for full-sized true leaves of the plant but are cut before the main stems develop. They fall within the group of immature greens that fit our general description of microgreens. Lettuces are good candidates for baby greens, as are any variety of beet or Swiss chard. The hands-down favorite baby green in the United States is baby spinach. Baby greens are seeded closer than normal plantings but not as close as microgreens. They need about 40 days from planting to harvest. They are grown in greenhouses, in a raised bed in wide rows, and can be grown indoors but require lights. Just about any seed variety that works for a mesclun mix will produce baby greens. Timing a harvest is critical, so I would not recommend growing a mix of greens but instead growing each seed variety separately. That way as the baby plant grows you can cut it at just the right stage for a salad. Because of the long growing time make sure you have a deep tray of rich soil if they are grown indoors.
The Pros and Cons of Baby Greens
Baby spinach is like the Holy Grail of fresh greens. You should be able to get two cuttings from a bed or tray. For the home gardener trying to grow fresh greens in the winter is not a good choice. Baby greens require either a heated greenhouse or shelves with grow lights. To grow enough for the salad every day, about 12 to 14 ounces (340.2-396.9 g) of cut greens, the gardener would need to have about twenty 20-inch by 10-inch (50.8 × 25.4 cm) trays and ten 4-foot (1.2 m) grow lights. That’s a big commitment of space and resources in a home. If it was necessary I might consider it, but the fact is, you can grow that amount of greens in a much smaller space with shoots and soil sprouts.
Soil Sprouts
Soil sprouts, as you already know by now, is my own descriptive term for sprouts grown in soil. They are grown in soil versus in jars. They are grown for the stem and seed leaf, like sprouts, but not the root. The trick to getting a productive crop is forcing the seeds in the dark for 4 days. This encourages a long stem. Once the stems are about 1 inch tall, the tray is ready to come out of the dark and into the light. The stems will continue to grow, and the seed leaves will mature for another 3 to 5 days until they are ready to cut. They are cut just above the soil line, leaving the roots in the soil. Once the greens are cut they will not grow another crop.
The Pros and Cons of Soil Sprouts
The upside of soil sprouts is the lush greens that you can harvest in a short growing season. You can grow large seeds like sunflower with the hulls or small seeds like broccoli using the same technique. Soil sprouts are very productive for the time and space involved. Watering is only once a day, and if you miss a watering, they will not rot and die. Of all the ways to grow immature greens or microgreens, this is the easiest and most productive technique.
The cons of soil sprouts are having trays and soil ready and the time it takes for the daily plantings ….
Making a comparison of methods of growing immature greens is useful to us not only in highlighting my decision to grow soil sprouts, but also because it helps to define the methods and match them to what you want from an indoor garden. If you are like me and want a big pile of fresh greens every day, then growing soil sprouts is the answer for you, too.
More Year-Round Indoor Salad Gardening:
• All-Star-All-Sprout Salad Recipe
Reprinted with permission from Year-Round Indoor Salad Gardening by Peter Burke and published by Chelsea Green Publishing, 2015. Buy this book from our store: Year-Round Indoor Salad Gardening.


