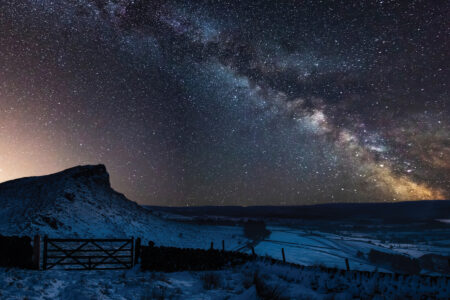
Learn how to find Polaris to illuminate your path with navigation by stars while using moving markers in the sky to get your bearings.
As I write, I’m listening to the song “Stand” by R.E.M. The lyrics include, “Stand in the place where you live/ Now face north/ Think about direction, wonder why you haven’t before/ Now stand in the place where you work/ Now face west, think about the place where you live/ Wonder why you haven’t before.”
I live in northeast Kansas. For my daily commute, I travel east in the morning and west in the evening. On many mornings, I see the sunrise, and in the evenings, I watch the sunset. Each morning, the sun rises at a different point on the eastern horizon, and each evening, it slips below the western horizon at a different point.
What causes the sun to travel across the sky and along the horizon? This is important to understand when we use stars, including our sun, to navigate. Because the Earth is spinning on its axis, the sun, stars, and moon appear to travel across the sky from east to west. The Earth isn’t straight up-and-down on its axis; it has about a 23-degree slant. In addition to spinning, the Earth also travels around the sun once a year. So, each day, the Earth is in a slightly different place in relation to the sun and other more distant stars. The combination of the Earth spinning on its axis, the tilt of the axis, and the daily change in the orbit around the sun causes the sun and stars to appear in different places at different times. (For more information, see “A Lengthy Lineage.”)
Before we look at navigation methods using the stars and sun, there are a few things to understand. First, all the methods in this article only work in the Northern Hemisphere. Second, the sky needs to be clear or partly cloudy for them to work. Third, these techniques will only provide general directions. If you’re lost and know that a road or river that leads to rescue is to the west, for example, these methods will get you headed in the right direction. Finally, practice the techniques before you need them. By practicing, you’ll become proficient at getting your bearings and avoid getting lost. In other words, you’ll “think about direction, wonder why you haven’t before.”
Navigation by Stars: How to Sight a Star
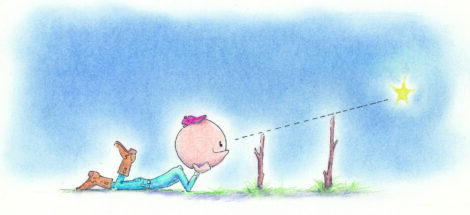
This is one of the easiest ways to find direction at night. It works best with a bright star near the horizon. Since it requires just one star, it works on partly cloudy nights, or in places where only a small portion of the sky is visible, such as under a forest canopy.
Find a star and sight it (line it up) with two fixed points. One of these points needs to be close to your eye (within a few inches), and the other should be at least 5 feet away. These sights can be natural features, such as rocks or trees, or they can be artificial, such as two sticks you place in the ground. Once the star is sighted with the two points, you’ll need to watch it for at least 15 minutes. (See illustration, above.) It should move. The direction it travels will determine the direction you’re facing.
Here is where the acronym LURD (left, up, right, down) is useful. Picture a compass oriented north. Go through the cardinal directions as you travel clockwise around the compass dial. Those directions are north, east, south, and west. If the star moves to the left, then you’re facing north. If it moves up, then you’re facing east. If the star moves right, you’re facing south. If it moves down, you’re facing west. If it doesn’t move, you’ve picked Polaris, the North Star, and you’re facing north. (See “How to Find Polaris,” below.)
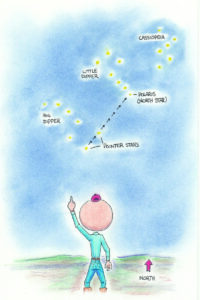
How to Find Polaris
Polaris, also called “the North Star,” always marks north. This is because it’s part of the cosmos far above Earth’s northern axis, so it appears stationary in the sky as the planet spins underneath. All the other stars appear to rotate around Polaris.
When practicing this method, it’s best to be in a rural area, away from light pollution. You’ll be looking for groups of stars, called “constellations,” in the northern sky. Use a compass to face north until you can recognize the constellations. (See illustration, opposite.) Polaris is the star at the end of the handle of the Little Dipper. This little group has seven stars: four in the dipper and three in the handle. The handle bends upward. To help me distinguish the Little Dipper from the Big Dipper, I imagine that if I had to use the Little Dipper, I would spill water out of the end.
Contrary to many poems and songs, the North Star isn’t the brightest in the sky. The Little Dipper isn’t the easiest formation to locate either. The best way to locate Polaris is to find the Big Dipper and use the pointer stars at the end of its dipper.
The Big Dipper is made up of seven bright stars: Four form the dipper, and three delineate the handle. The handle of the Big Dipper has a slight downward bend. Because it moves in the sky, the Big Dipper can be seen right-side up, upside down, or sideways. But no matter its position, those two stars opposite the handle always point to Polaris. (Hence, they’re called “pointer stars.”)
To use these pointer stars, start an imaginary line at the star that marks the bottom corner of the Big Dipper, and extend the line through the star that marks the rim. Extend this line away from the rim about the distance of three hands across the palms. Polaris will be in that area. To confirm you’ve found Polaris, make sure you see the rest of the Little Dipper.
Depending on where you are in the Northern Hemisphere, part of the Big Dipper may be below the horizon. To help determine its location, it’s also good to recognize the constellation Cassiopeia, the queen. She’s found opposite the Big Dipper, with the Little Dipper in between. Cassiopeia is a series of six bright stars that form a misshaped “W” or “M,” depending on its position in the sky. If you’re having trouble locating the Big Dipper, find Cassiopeia and look for the Big Dipper in the opposite portion of the sky.
House of the Rising Sun
In my opinion, the most important star for navigation is the sun. Fortunately, the sun always rises in the eastern horizon and sets in the west. If you’re awake before sunrise, you can watch it rise over the horizon and know that’s generally east. If you face the rising sun, west is to your back, north is to your left, and south is to your right. If you’re not an early riser, then watch the sunset. If you face the setting sun, east is to your back, north is to your right, and south is to your left. The moon is also helpful in finding direction. Like the sun, it rises from the eastern horizon and sets below the western horizon.
Stick and Shadow Method
This method works in the Northern Hemisphere, because at midday, when the sun is at its highest point in the sky, it’s due south. To get the most accurate reading with this method, you must start a few hours before midday and continue a few hours after. (You can also use this method when the moon is full, or nearly full.)
To start, find a sunny spot where the ground is free from tall grass and other debris. Poke a stick into the earth, so it’s straight up-and-down at a 90-degree angle to the ground. Every 15 or 20 minutes for the next few hours, mark the end of the shadow cast by the stick with small rocks or twigs as it moves across the ground.
Once you’ve marked the end of the shadow for a few hours, find the place where the line made by your markers is closest to the base of the stick. Draw a line between those points. This is a north-south line. The base of the stick is south and the opposite point is north.
If you’re in a pinch and you can’t wait several hours, the following method will give an approximate east-west line when the sun is high in the sky. Set up the stick and mark the end of the shadow. Wait as long as you’re able, then mark the new position of the shadow. The first mark is approximately west, and the second mark is generally east.
The moon is also helpful in finding direction. Like the sun, it rises from the eastern horizon and sets below the western horizon. When the moon is full or nearly full, the stick and shadow method will work.
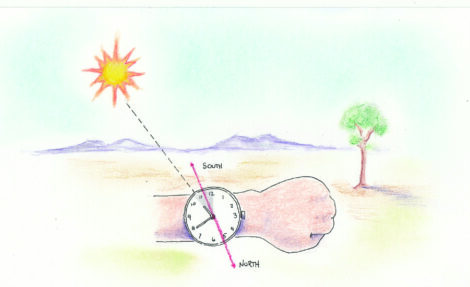
Analog Clock Method
This method requires a wristwatch or clock with hour and minute hands set to the correct time (subtract an hour during daylight saving time). It works because when the sun is high in the sky, it’s to the south. With the face of the watch level to the ground, turn it so the hour hand is pointing at the sun (see the dotted line in the illustration above). Now, imagine an angle, like a slice of pie, on the watch face. One ray of the angle is the hour hand to the center of the watch. The other side is a line from the 12 o’clock position to the center of the watch (the shaded area in the illustration).
Imagine a line that cuts this slice of pie in half. It starts at the spot halfway between the hour hand and the 12 o’clock mark on the rim of the watch face, and runs to and through the center (the red line in the illustration). This is a north-south line. North is the point of the angle through the center of the watch face. South is the point between the hour hand and the 12 o’clock position at the rim.
Moving Landmarks
When looking at the stars, be aware that airplanes and the International Space Station also share the sky. Airplanes travel quickly across the sky, and they have red or green blinking lights. Because airplanes travel in every direction, don’t use them for navigation.
The space station is also bright and visible in the night sky, but it doesn’t have flashing lights. It orbits the earth about 16 times each day, and moves quickly across the sky from west to east. If you happen to see it, you can use it for a general west-to-east line.
Track Your Steps
People naturally walk in a circle. In a survival situation, it’s discouraging to walk for hours only to realize you’re back where you started. To avoid walking in a circle, choose a landmark on the horizon as far away as possible in the direction of travel, and walk toward it.
It’s also helpful to know the length of your stride to estimate distance traveled. Before you get into a survival situation, use the step counter on your smartphone, or walk a known distance, such as a high school football field or track. Divide the distance walked by the number of steps to get your stride length. For example, if I travel 100 yards in 100 steps, my stride length is 3 feet.
In a survival situation, you can keep track of your distance traveled by tying a knot in a string, counting with your fingers, or dropping a small, lightweight pebble in a pocket for every 100 steps you take. Choose an analog step-counting method that works best for you. Finally, memorize distances, such as 5,280 feet or 1,760 yards in a mile, so you can estimate distance traveled.
A Lengthy Lineage
I’m just one in a long line of humans who’ve followed the sun and stars as they move through the sky. Ancient people tracked and marked their movements too. For these people, the most important annual events were the equinoxes, when the sun rises directly east (which occurs near March 20 and September 22), the summer solstice, when the sun rises northeast (about June 21), and the winter solstice, when the sun rises southeast (about December 20).
The ancient ones left behind evidence of their understanding of the sun’s travels, visible in places such as the Anasazi observatory in Chaco Canyon in the southwestern United States; Stonehenge in England; Angkor Wat in Cambodia; and the Mayan El Castillo pyramid in Chichen Itza, Mexico. The people who built these structures knew where the sun would be at different times during the year, and they knew how to orient large stones or even buildings to create dramatic effects.
The night sky is no exception. We inherited the constellation names from the ancient Greeks. They created stories as they tracked the constellations’ travels through the sky. Egyptologists point out that the layout of the great pyramids mirrors the positions of the stars in the constellation Orion’s Belt.
Each equinox, as I’m driving directly into the rising sun, I think about how awesome it would’ve been to be on the teams that designed and built these ancient observatories, and to experience the excitement they felt as the sun created effects on those special days.
An avid outdoorsperson, Dennis Biswell has taught primitive outdoor survival skills for many years. He believes it’s important to learn survival skills instead of relying on modern technology.


