Learn how to tan a sheep hide with the wool on to create practical objects with these ancient skills.
No matter our backgrounds, we all carry the legacy of our ancestors who lived in rhythm with the Earth’s cycles, honoring resources and ensuring nothing went to waste. In today’s world, where thousands of animal hides are discarded in landfills each day, the old craft of tanning sheepskins offers a potent opportunity to combat waste, reconnect with ancestral wisdom, and create something beautiful and useful. The process can feel intimidating, and it’s not without challenges, but it’s a deeply rewarding skill that you can acquire.
As a “recovering city dweller” settling into the Sierra Nevada foothills, I embraced my new life by seeking deeper connections with my local community. I also sought out intentional ways to engage with the world around me. Confronted with the problems of industrial animal processing, I wanted to do things differently. Inspired by the beauty of handcrafted sheepskin rugs, I found an incredible teacher, Uma Luna, and gathered a group of women for four days to learn this craft together. Tanning hides became more than a skill – it became a way to rebuild ties with community and old traditions. Now, I’ll share the steps I’ve learned with you. I hope you can bring this meaningful practice to life in your own community.
Preparing Your Workspace
Creating a suitable environment is key to preserving hides effectively. Start by stocking up on non-iodized livestock salt, easily found at local feed stores (a 50-pound bag costs under $10). Then, select a workspace that’s shielded from sunlight, well-ventilated, and safe from wildlife.

Initially, I dried hides on pallets in an open garage – until our local bear neighbor found them an irresistible snack. It was a humbling reminder of the abundant life we share these mountains with. We lifted the hides to the ceiling rafters to avoid future temptations. If a garage that can close isn’t an option for you, a shed with a window (for airflow) will work just as well.
Sourcing Your First Hide
The next step is to find a reliable source for hides. Start with an online search for local butchers. Make a list and call to inquire about upcoming slaughter dates for sheep. Prices can range from $30 to $50 for premium breeds, though many butchers will be happy to give the hides away for free and avoid the cost of disposing of them in the dumpster.
Butchers often skin for efficiency, which can leave nicks and holes. If possible, request the more precise casing method, though it may cost extra. Ask for the sheep’s head for brain tanning. Building a relationship with a local mobile butcher has been essential to my hide-tanning journey. It’s not just about sourcing hides – it’s about fostering support and contributing to a cycle of sustainability within my community. Pro tip: A fresh-baked sourdough loaf is always a welcome gift when you pick up free hides!

Embracing Imperfection
When starting, don’t worry about finding the perfect hide. Mistakes are part of learning; each hide will teach you something new. Over time, you’ll develop preferences for specific types of fleeces and hides you want to invest in.
Weather Considerations
Over this past year, I tanned hides in summer and winter. In hotter weather, hides dry faster and may need to be consistently rehydrated, but they stay softer and easier to work with. In cold weather, I found that hides needed to be taken indoors and heated up by the fire. They took longer to dry and were more challenging to work with. Consider these instructions in relation to the season and climate you’re working in.
Handling and Salting the Hide
Once you’ve sourced your first hide, preparation must begin almost immediately. Bring the following to your butcher:
- Thick, black trash bags
- Latex gloves (if you’re squeamish)
- Extra bags and tape for transporting the head (if you’ll be brain-tanning)
Prep your hides as soon as you can, either at the butcher shop or at home, especially in hot weather. They deteriorate quickly, which can result in your wool starting to detach from the skin. Use a razor blade to trim excess fat and flesh, and remove the cartilage from the tail to prevent spoilage. This should be a quick cleanup. Remove what you can, but it doesn’t have to be perfect. Next, lay the hide wool-side down and generously rub in 1 to 2 pounds of salt, covering all areas. Check the hide after 24 hours. The salt will absorb moisture and expand in volume. Discard the wet salt and reapply a fresh layer, paying close attention to creases and folds. Inspect the hide carefully for missed areas or maggots forming on the flesh. This only happened to me once, in very hot weather, and a light sprinkle of diatomaceous earth worked well to treat it. Once salted hides are dry, they’ll harden and they can be stored until you’re ready to work with them.
Debraining
There isn’t one way to do this. One method that worked for us was to use a Sawzall with a multi-material blade to cut open the skull and access the brain. With one person holding the skull securely in place, run the blade down the front of the skull. (The brain is located directly behind and between the horns.) Once opened, it can be carefully scooped out by hand and stored in a (labeled) glass jar in the refrigerator or freezer. Afterward, we choose to bury the skulls as a respectful and natural way to compost them.
Tools and Materials
Items to Source Around the Home
- Plastic tub
- Tarp
- Natural degreasing dish soap
- Hose
- Brush (metal bristle or animal hair)
- Rope (I use 1/4-inch polypropylene diamond braiding, 50 feet per rack)
- Utility or pocket knife with a razor blade
- Drill and screws
- Wet, decaying wood
- Firepit or woodstove
- Heavy-duty metal clips or clamps
- Blender
Specialized Tools to Order Online
- Fleshing tool
- Dry scraper
- Pumice stone
DIY Tools to Build
- Fleshing beam: Use a 5-foot log and two 3-foot pieces of wood to create crossbeams to support the log.
- Stretching rack: This is an A-frame design for two hides to be done back-to-back. You’ll need four 8-foot 2x4s for the verticals, four 5-foot 2x4s for the horizontals, and eight 30-inch diagonals to stabilize the corners.
- Softening stick: This is a 2×4 cut at a 45-degree angle.
Brain-Tanning Solution
My mentor, Uma Luna, shared this recipe. Process all ingredients in a blender set aside for this purpose. Store the solution in a jar in the fridge, clearly labeled “not for human consumption.”
- 1 animal brain (or substitute 2 egg yolks)
- 4 egg yolks
- 2 tablespoons lecithin granules (soy or sunflower)
- 2 tablespoons neatsfoot oil
- 1⁄ 2 gallon warm water
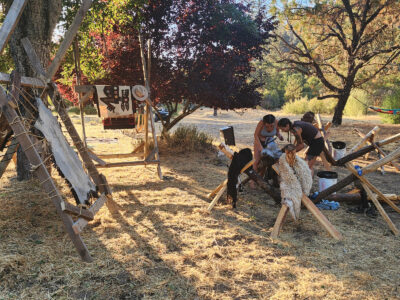
Day 1: Fleshing and Racking
Longest day; plan for 4 to 7 hours.
Give yourself 3 to 4 dedicated days to work on the hides. You’ll need an outdoor space where you can have a fire and have access to water.
Soaking the Hide
Begin by soaking the salted hide for 2 to 3 hours to rehydrate it. I start with a plastic tub and scrub the skin side with my hands to remove the salt and soften the hide. Once the salt is off, if you’re near a natural water source, such as a river, you can use that to rehydrate the hides – just weigh them down with heavy rocks to keep them submerged.

Setting Up the Fleshing Beam
Lay the 5-foot log between the two 3-foot support pieces in an X shape to create a stable base. Use the ground or a stump for resistance. You could use rope or screws to stabilize everything in the right spot, but that’s generally not necessary.

Fleshing the Hide
Once the hide is soaked and softened, drape it over the fleshing beam, skin side up. The goal here is to remove any residual flesh and membrane from the skin. Use your body weight to stabilize the hide as you hold the fleshing tool with both hands. Scrape downward, applying balanced pressure and force with both hands. You’ll have a learning curve as you figure out how to soften the flesh. You’ll need to apply pressure, but not so much that you tear the hide.

A hole this early on can present challenges down the road, especially when you’re trying to soften. This part can feel challenging at first, but you’ll develop a rhythm with focus and practice. If the hide begins to dry out, rehydrate it by soaking it in water or spraying it down as needed to keep it workable.
Don’t worry about Perfection It’s okay if you don’t remove every last piece of flesh on the first try – you’ll have another chance to clean up during the dry-scraping process once the hide is stretched on the rack.
Clean the Hide
Once you’ve finished fleshing, resoak the hide and lay it flat on a tarp. Spray it down with a hose and generously apply natural, biodegradable dish soap. Thoroughly scrub both sides of the hide to clean the wool and skin, using your brush to work out any remaining fat or vegetative matter tangled in the wool. Take your time with this step to ensure the hide is as clean as possible.

Assemble the Stretching Rack
Build the two rectangle pieces that’ll form your A-frame. Use screws to attach the vertical sections to the horizontal ones, and add in your corner diagonals to stabilize the whole thing. Don’t attach the two big rectangles together into an “A” quite yet, as you’ll want to have your frame lying flat on the ground while you rack your hide.

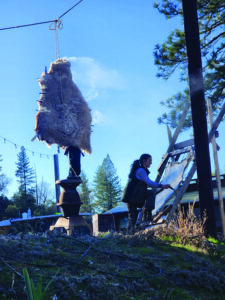
Racking
Lay the stretching rack on the ground on top of a tarp. Use a knife to carefully poke holes along the edges of the hide, spacing them 3 to 5 inches apart. These holes will be trimmed off in the final process, so place them close to the perimeter. String rope through the holes in the different sections – each side, top, and bottom – and loop the rope around the frame.
Pull the ropes tight to stretch the hide fully. As the hide dries, it’ll contract, so tie the knots loosely to allow for adjustments later. Once secured, pour one layer of brain solution onto the hide and rub it in. Leave it to dry overnight. At this point, you can connect your two racks and stand them upright.
Day 2: Brain Tanning and Softening
Plan for 2 to 4 hours.
As the hide dries, it’ll reach a point where it feels damp but not completely dry – this is the perfect stage to apply more brain tanning solution. Begin by massaging the tanning solution into the hide, ensuring it’s being evenly absorbed across the surface.
Next, use your dry scraper to break open the skin cells. Hold the top of the tool against the hide and move it firmly in downward motions. Apply enough pressure to work the fibers without tearing the skin. This step requires patience and consistency, as the goal is to soften and stretch the hide while keeping it moist. Add additional tanning solution as needed. You’ll hear a satisfying sound as the membranes open and stretch. Tighten and adjust the ropes when the hide feels loose.
This process can feel labor-intensive, but it’s also meditative, connecting you physically and mentally to the transformation of the hide. Once you’ve worked the hide thoroughly, leave it on the rack to rest and dry overnight.
Day 3: Final Scraping and Preparing to Smoke

Plan for 3 to 4 hours.
The next day, there may be some parts you want to work and soften. Each hide is different. Continue with a dry scraper and an angled 2×4 as a softening beam to transform the skin into a soft, supple material. The hide color will change to a soft white.

Next, use a pumice stone in a circular motion to buff off dried spots and inconsistencies. By the end of the day, the hide should be soft, supple, and clean. Don’t worry about edges or small areas that are difficult to soften – these will be trimmed later. Undo the rope and carefully remove the hide from the stretching rack. Give it a thorough brushing. Your hide is now ready for the final step: smoking.
Day 3 or 4: Smoking the Hide

Setup and smoking takes a couple of hours.
You can use an old cast-iron stove or a firepit for the smoking process. Get creative and use what you have. The goal is a source of smoke on the skin side of the hide. Build a fire and burn until it’s reduced to hot coals, and then add wet, decaying wood on top to produce thick smoke. The goal is to generate consistent smoke, not fire. This is especially important, as fire can scorch the hide.
When the smoking is complete, remove the hide and trim the edges with a razor blade. Cut your finished piece to the desired size. At this point, your hide is “naturally tanned” and you can wash it gently in a warm-water bath to reduce the smoke smell. You now have a beautifully tanned and preserved hide ready for use!
Keep Your Fire Smokey and Not too Hot
My mentor taught me the brilliant tip of cutting an old pair of jeans, wetting them, and attaching them to the stovepipe to help direct the smoke flow. Hang the hide above the stove, pinning the edges together to trap the smoke inside. Allow the hide to smoke for about an hour. Keep a close eye on it so the fire doesn’t get too hot.
Monique Wildbloom lives sustainably off-grid in Northern California. For questions on tanning or future gatherings, email AlpenGlowOffGrid@gmail.com.
Originally published in the May/June 2025 issue of Grit magazine and regularly vetted for accuracy.


