Choose from four different hoop house plans to build from and extend your gardening season into the colder months.
You don’t have to have a big, expensive greenhouse to extend your garden’s growing season. Thanks to a lovely invention called the hoop house – and its varying styles – gardeners and farmers all over can enjoy homegrown fruits and veggies well after the growing season ends without spending a lot of time or money.
When you begin researching hoop houses and how to build one yourself, it might seem like all the designs are the same. At a glance, they have the same basic frame, but don’t be fooled. One hoop house design might be perfect for one gardener, while it doesn’t work at all for the next.
To help you sort through all the designs and options out there, I’ve put together instructions for four different hoop house styles, all tried and tested. One design takes minutes to set up, while the others are a bit more involved. All of them can be scaled to fit the available space.
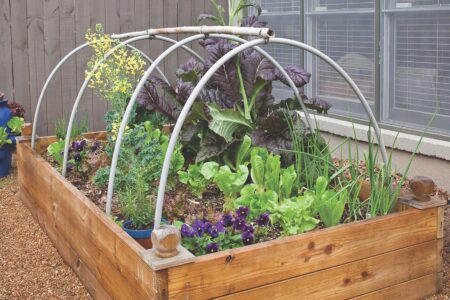
The Traditional Hoop House
Bonnie Plants, based in Union Springs, Alabama, is one of the largest vegetable and herb producers in the United States. Freeman Agnew is horticulturist and head grower for Bonnie, and he says hoop houses help them extend their growing season, and he uses them in his own backyard gardening. He shares easy hoop house instructions from Bonnie, along with a few tips of his own to save money.
“For your hoop house cover, you can use old blankets, sheets or drop cloths,” he says. “You can also check with a nearby greenhouse facility in your area. If they are re-topping their houses, they will often give you the plastic tarp they removed.”
Materials
- 1/2-inch flexible PVC pipe
- Rebar stakes, 10 inches long
- Row cover material
- Twist ties or twine
- Bricks or heavy rocks
Instructions
- Lay out the design of your bed, determining the desired length and width.
- Space sections of the PVC pipe a couple feet apart, and lay them across the bed. Cut the sections of PVC pipe to length (depending on width of the garden bed and preferred height) using a pipe cutter or hacksaw.
- Hammer a rebar stake into the ground at each end of the PVC sections, on both sides. Leave 4 to 6 inches of rebar sticking out of the ground.
- Place one end of the pipe over one of the stakes, and gently bend the pipe enough to slip the other end of the PVC over the opposite stake. This creates the hoop frame. Repeat until all the hoops are in place. If you’re having trouble bending the PVC, try applying heat, but be sure to research the proper way to do it safely and without kinking the PVC tubes.
- To add support, cut a piece of PVC the length of the bed and tie it to the top of each hoop, making a ridge pipe, using twist ties or twine.
- Drape your row cover material over the structure, leaving enough excess around the edges to place bricks on the material.
These same basic instructions can also be applied to raised beds. To harvest or ventilate the plants inside, simply remove the bricks from both ends of the hoop house, and roll the cover back.
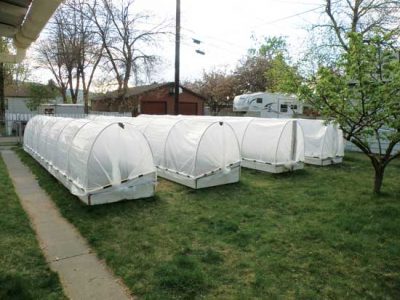
Hoop House Extreme
Jarren Kuipers really knows how to take a basic hoop house to the next level. He lives in Cody, Wyoming, which can have a short and challenging growing season – around 120 days. He estimates his hoop house extends his season by nearly 60 days.
Kuipers used a traditional hoop house design to start with, but made several modifications to strengthen it overall. He also got lucky recently when the local baseball field was replacing the wooden bleachers, and he offered to take them off their hands. By upcycling the wood, he constructed a huge 4-by-28-foot greenhouse space for under $200.


Materials
- Wooden stakes, 3 feet long
- Baseboards
- 2-by-4, 4 feet long
- 1/2-inch PVC pipe, sold in 10-foot lengths
- PVC T-connectors
- PVC elbow connectors
- Adhesive suitable for outdoor use
- Wood screws
- Aluminum channels
- Garden plastic
- Staples
- Galvanized electrical conduit
Instructions
- Level the ground as much as possible in your garden bed. This is an important step for long-term success of the hoop house, so don’t skip it.
- Drive 3-foot-long stakes 2 feet into the ground at every corner of the bed, and every 10 feet along the perimeter.
- Attach your boards to the above-ground part of the stakes to create walls, stacking them one or two high, depending on what works best for you. Two boards will provide extra wind protection, if needed.
- Once the baseboards are fastened and leveled, attach one 4-foot-long 2-by-4 upright at each end of the bed.
- Create the “ribs” of the hoop house with the PVC, placing one section every 4 feet. On the end of each rib, attach a T-connector for the interior ribs and an elbow for the ribs on each end.
- Cut PVC to fit between each of the ribs. (This is a good time to exercise the “measure twice and cut once” rule.) Glue the joints together, and attach PVC structure to the top of the bed boards with wood screws.
- Run one long pipe the length of the bed down the middle for the “spine” or “ridge.” Drill holes through the top of each 2-by-4 and run the PVC spine through.
- Attach aluminum channels around the perimeter of the bed with wood screws, and use wiggle wire to secure the plastic in the channels down the long sides of the bed.
- Stretch garden plastic over the bed. Close the ends by stapling the corners of the plastic to the corners of the bed walls. Attach a rubber tarp strap between them on the short ends of the bed. Then twist the garden plastic on the ends, closing it like a huge loaf of bread. Use wiggle wire to fasten everything down the rest of the way.
- To make it easier to roll the plastic back, I use a length of galvanized electrical conduit along one side of the bed, and roll it up in the loose plastic, then clip it with a 1-inch binder clip that you find at office supply stores. With the conduit connected to one side of the plastic, you can easily remove the clips before attempting to roll up the plastic.
- The length of galvanized conduit is 6 inches longer than the beds. At each end, attach an elbow and a 6-inch length of conduit to form a crank. That way you can leave the plastic connected to the wiggle wire on one side of the bed and roll it up and over the hoop house ribs using the handles on each end.

The $10 Hoop House
Halle Cottis of WholeLifestyleNutrition.com tells people she can extend their growing season by up to four months, for only $10, in less than 10 minutes. She was living in Wisconsin when she came up with this design, and now she’s sharing her step-by-step instructions on how she did it, using PVC pipe, cement pavers and plastic sheeting. I used one piece of 3 millimeter clear plastic sheeting, and it only cost me $3.
Editor’s Note: The prices listed above reflect 2016 costs.

Materials
- 1/2-inch PVC pipe
- Clear plastic sheeting
- Cement pavers
Instructions
- Cut your PVC to 7-foot-long sections, give or take, depending on the size of your garden. Place them every few feet down the length of the bed.
- Push the ends of the PVC about 4 inches into the soil on opposite sides of the bed.
- Drape plastic over the PVC to create the domelike structure.
- Place cement pavers around the perimeter of the bed to securely hold down the plastic. Be sure to leave enough plastic around the edges to keep cool air out, so the air inside can create the proper humidity. While cement pavers are less than $1 each, you could also use rocks you might have lying around.
Umbrella Hoop House

Stephanie Rose is a clever gardener based in Canada and the voice of Garden Therapy. She understands what it means to have a short growing season, which is why she came up with a miniature greenhouse idea to get seeds started early in the season. You don’t even need a yard to pull this off. A patio will work just fine for this umbrella hoop house.
Instructions
- Choose a large wooden container or planter, like a wine barrel planter or something similar.
- Fill will a good mixture of soil and compost. Cover the top with a light, moisture-retaining material, like seedling mix, peat moss or coconut coir.
- Plant your seeds. If it’s early in the season, plant them densely.
- Here’s where you turn it into a greenhouse. You can either use an old see-through umbrella, or search online for “umbrella greenhouse cover.” The best designs can fold up when not in use.
Stacy Tornio is a freelance writer and nature advocate based in Milwaukee, Wisconsin. She wrote Project Garden, a children’s gardening book, and she enjoys gardening with her own two children.


