Learn how to build an inexpensive DIY hay feeder designed to store hay for your goats and sheep, giving easy access for all.
Goats, sheep and other small livestock often require special consideration when it comes to hay feeders. Cattle rings and standard bunk feeders are too large and cumbersome to be practical for the small-livestock farmer. Special hayracks and bunk feeders designed for such creatures are often hard to find — and very expensive. Using these simple instructions, you can build a 4-foot hayrack with bunk-type feeder for less than $80 with all new material. Dig through your scrap pile and repurpose materials for even larger savings. This hayrack will accommodate up to 1-1/2 square hay bales, and is designed for easy accessibility for both lambs and adult sheep. It’s also the perfect size for goats, ponies and minis.

We will break down this hay feeder into three main sections, detailing the individual steps along the way. First you will construct the top hayrack, then the bunk feeder, and finally the foundation — with runners for easy moving.
Tool List
Materials List
(6) 8-foot-long 2-by-4 boards cut as follows:
- (3) 4′
- (2) 2′
- (2) 17″
- (2) 3’6″
- (2) 4′ 1-1/2″
- (2) 4’3″
(1) 4″ x 4″ x 6′ beam cut as follows:
- (2) 2’6″
1/2″ thick plywood cut as follows: 20″x4′
- (1) Standard 50″ cattle panel
Hayrack
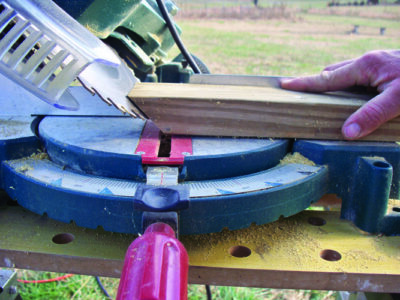
- While wearing safety glasses, use a miter saw to cut your wood boards into designated sizes. Cut 4-by-4 beam into 2-foot-6-inch sections using a reciprocating saw. (Tip: For easier cutting, mark two adjacent sides with chalk or pencil to guide you while cutting. This helps keep your edge straight.)
![Miter Saw]()
- Use a circular saw to cut the plywood into a 20-inch-by-4-foot sheet. Make sure to use sufficient support underneath the plywood while cutting to prevent running your saw blade into the ground if you are not using a table. To ensure your own safety, adjust the blade depth to no more than 1/8 to 1/4 inches deeper than the plywood. When a saw blade hits the ground, it can kick back on the operator causing serious bodily injury.
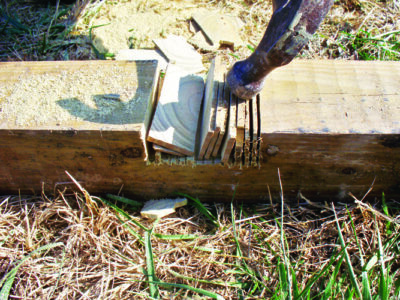
- Find the center (lengthwise) of a 2-foot 2-by-4. Measure and mark 1-3/4 inches from your center line on both the left and right side. Make a series of cuts 3/4-inch deep with a circular saw between these two marks. Knock out these scored pieces with a hammer until clean. This area should measure 3-1/2 inches wide and 3/4 inch deep.
![Notching Boards]()
- Using bolt cutters, cut cattle panel to 46 inches. Panel should still be a closed square with no protruding edges. Now cut the panel into two sections, each measuring 2 feet by 46 inches. Be sure to nip or grind the tips down to prevent sharp edges.
![End Supports]()
- Find and mark the center of each end on a 4-foot-long 2-by-4. Remember, the center of a 2-by-4 is actually at 1-3/4 inches. Line up one panel piece on the center marks of your 2-by-4 and attach with staples, leaving it slightly loose. Use one staple approximately 4 inches from each end and one in the middle. Panel should move freely within each staple.
- Flip the board and attached panel over. Align the other side of the panel on the center of a second 2-by-4. Attach the panel on top of this board the same as the previous board. The panel should now be attached to the top of Board 2, and beneath Board 1.
![Hayrack Top]()
- Repeat Step 4 on remaining panel piece. The bottom of the second panel should be stapled to the outside of the bottom board used for Panel 1. The 2-by-4s on top of both Panel 1 and Panel 2 should be on the outside of the panel.
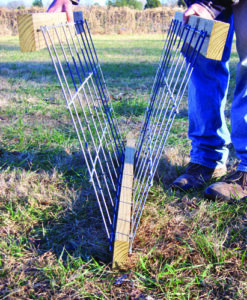
- Set hayrack on its end to form a “V” shape. Find the 2-foot 2-by-4s previously notched, with the notched side facing out. Align it with the outside corners of your hayrack 2-by-4 and secure with 3-inch wood screws on top of both sides. Make sure the top of the 2-foot piece aligns flush with the top of the 4-foot section. To make the corners flush, align the bottoms of both the 4-foot and 2-foot 2-by-4s. Secure at the bottom with 3-inch wood screws. Flip onto other end and repeat. (Tip: It is easier to finish assembling the hayrack and feeder upside down, using the top of the hayrack to stabilize the structure.)
- Measure 3-5/8 inches down from one end of a 3-foot-6-inch board. Using the same notching method you used on the 2-foot 2-by-4s, use the circular saw to notch this section 3/4 inch deep all the way to the end. On the other end of this board, measure and mark from 6-7/8 inches to 10-3/8 inches. Notch and knock out this section with a hammer, making it as smooth as possible using the claw of your hammer — or use sandpaper. Repeat on other 3-foot-6-inch board.
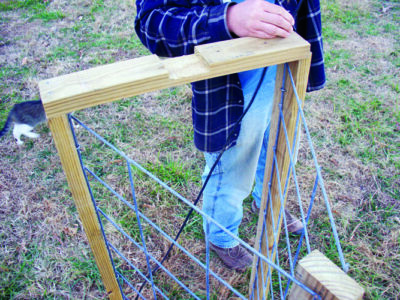
- Place 3-foot-6-inch board flush into position on the notched 2-by-4 to create a vertical support beam for the hayrack, secure with 1-1/2-inch wood screws on top. Center the bottom board of the hayrack and attach it to the support beam using two 3-inch wood screws. Flip over and repeat on other side.
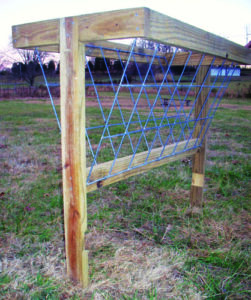
![Hayrack Frame]()
![Goat Hayrack]()
Bunk Feeder
- Using 3-inch wood screws, fasten a 17-inch 2-by-4 piece to inside of a 4-foot 1-1/2-inch board. Repeat on other side. Attach another 4-foot 1-1/2-inch board to other side of 17-inch sections to form frame of feeder.
- Center the plywood onto the rectangular frame, leaving 3/4-inch space on both 20-inch ends. Nail with 2-inch nails every 8 to 10 inches all the way around. Flip right-side-up. Using a 3/4-inch bit, drill a hole in each corner of the plywood for water drainage.
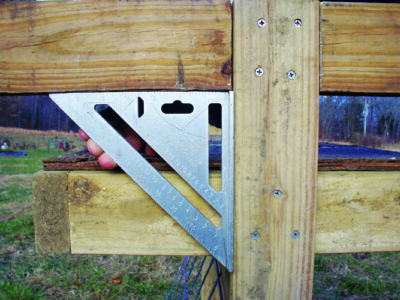
- Fit feeder into notches of the 3-foot-6-inch support beams. Using 1-1/2-inch wood screws, put 3 screws in a triangular pattern through the 3-foot-6-inch beam and into the frame of the feeder. Repeat on other side.
![Squaring Beams]()
Foundation
- Find the center of one of the 4-by-4 beams, measure over 1-3/4 inches (this is half the width of a 2-by-4). Using the speed square, make a straight line across beam. Holding the square firmly in place, put a 2-by-4 flush against it. Mark a line on the other side of the 2-by-4. Repeat with other beam.
- Adjust the depth on the circular saw to the depth of a 2-by-4 (1-5/8 inches). Use the saw to repeatedly score one beam between your marks. Repeat with other beam. Using the hammer, knock out the scored wood on both beams.
- Fix beams onto bottom of the 3-foot-6-inch vertical supports. Align them flush on the bottom, and secure in place with four 3-inch wood screws in a square pattern. Repeat on other side. Make sure the beams are square on the bottom to prevent rocking when right-side-up.
![Running Boards]()
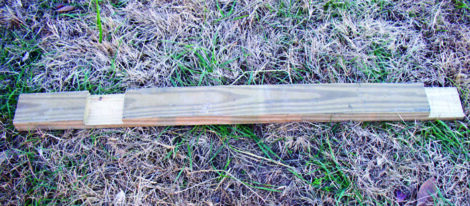
- To make this project easier to move in the field, we will attach skids onto the bottom. Locate the two 4-foot-3-inch boards. Lay one board flat, on its 4-inch side. Using the miter saw, cut each board end at a 45-degree angle. Repeat with other board. Now you should have a matching set that resembles snow skis.
- Using 3-inch wood screws, attach each running board to bottom frame. Use two screws on each side to secure the runner to each 4-by-4. Now you are ready to flip it right-side-up! (For added ease, simply add a bolt to the bottom of each side, with a ring on it. When the ground around your feeder gets messy, simply thread a rope through this ring and drag to new location.)

Andrew and Suzanne farm with their three children in Smithville , Tennessee . After encountering several hay feeders that weren’t just right, Andrew dreamed up a design perfect for their sheep.


