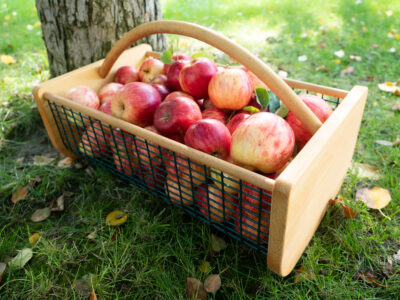
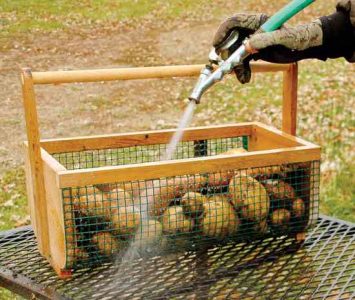
These garden harvest basket DIY plans will allow you to rinse vegetables (or eggs!) immediately after gathering.
After several years of hauling our beautiful homegrown produce from the garden to the kitchen in grubby old plastic buckets, my husband and I decided it was time to up our game a bit by treating ourselves to a new harvest basket. After an extensive search of local shops and internet sources failed to turn up exactly what we were looking for, we decided to build our own.
The one we built is based on the Maine clam hod: a wood and wire basket used by clam diggers, which allows the clams to be rinsed right in the basket, with dirt and water running out through the sides and bottom. Although not traditional, we chose to use green vinyl-coated hardware cloth to construct our basket simply because we had some small pieces of it on hand, but plain galvanized hardware cloth would work just as well.
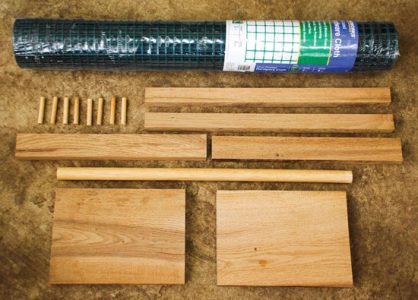
Materials and Cut List
If purchasing lumber, a 3-foot-long piece of 1-by-6-inch board will be sufficient. From it, or from scraps, cut the following pieces (all measurements in inches):
- (2) End pieces (A1 and A2) 1-by-5 1/2-by-16
- (2) Side rails (B1 and B2) 3/4-by-7/8-by-16
- (2) Handle supports (C1 and C2) 1/2-by-1-1/2-by-12
- (1) Wood dowel (D1) measuring 3/4-by-17
- (8) Wood pegs measuring 5/16-by-1-1/2 (cut from a piece of 5/16-inch wood dowel)
- (1) Piece 1/2-inch hardware cloth measuring 16-by-17
- Wood glue
- (14) 18-gauge 1/2-inch crown staples (longer crown staples can be cut to length with a side cutter)
- (2) 1-inch brads
- Wood preservative (optional)
Tools
- Saw
- Staple gun with 1/2-inch staples
- Wood glue
- Small flush-cut saw, or other small saw to cut wooden pegs to fit
- Sandpaper
- Pencil
- Two small wood clamps
- One 18-inch bar clamp
- Hammer
- Tape measure
- Drill
- 5/16-inch drill bit
- 3/4-inch drill bit
Instructions for Garden Harvest Basket DIY Plans
1. Gather materials and cut wood pieces to size.
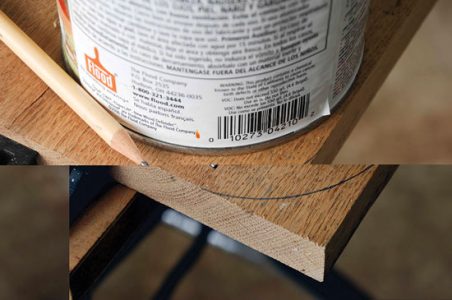
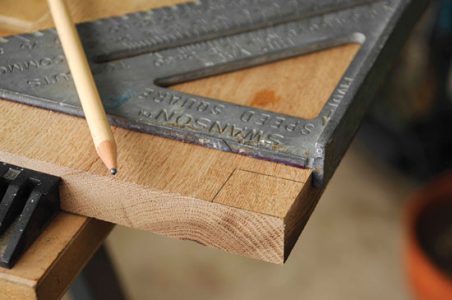
2. Mark lines for radius cuts on bottom corners of each end piece (A1 and A2) using a quart-sized paint can. Make radius cuts to end pieces. Smooth any rough edges.
3. In each end piece (A1 and A2), cut a 3/4-by-1-inch notch in each top corner. See Photo 4 for end piece detail.
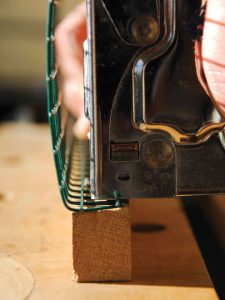
4. Make a 90-degree bend 3/4 inches from the edge of the wire, along the 16-inch end. Repeat on opposite edge. Using the staple gun, attach one of the bent edges of hardware cloth to one of the side rails (B1).
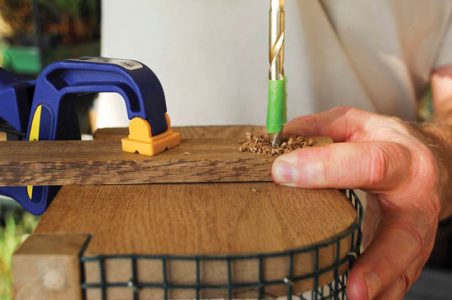
5. Place side rail (B1) in notches on both of the end pieces (C1 and C2). Drill 5/16-inch hole for wooden peg in one of the end pieces (Photo 5). Coat peg with glue and insert it into the hole. Repeat for the notch on the opposite end piece. Drill the holes to a depth of 1-1/4 inches. There will be 1/4 inch of peg left to use for handling. The excess can be trimmed flush with the side rail after the glue has dried.
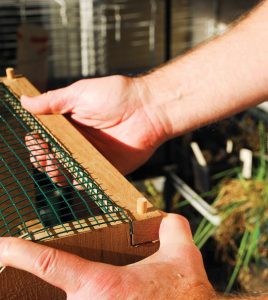
6. Wrap the hardware cloth around the end pieces (A1 and A2), following the contour of the wood.
7. Position the second rail (B2) in the notches, drill holes, apply glue, and install wooden pegs.
8. Place a large clamp across the side rails and allow glue to set for an hour.
9. Remove clamp.
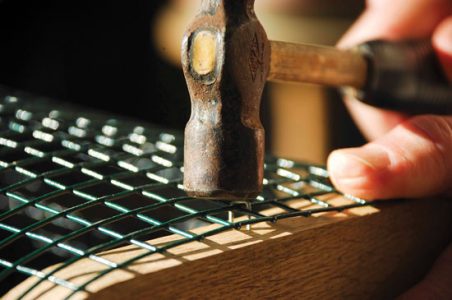
10. Use the hammer and crown staples to attach the hardware cloth to the bottom and sides of the end pieces (A1 and A2): Start on the bottom of the end pieces, in the center, and work out toward the sides, smoothing the hardware cloth as you go. Use 7 crown staples per end piece. Complete one end piece first, then repeat for the remaining end piece.
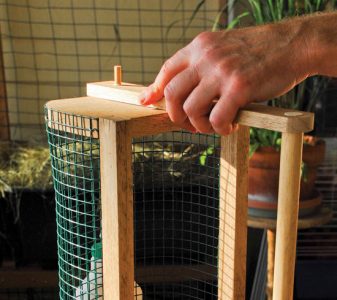
11. Drill a 3/4-inch hole in each of the handle supports (C1 and C2), centered 3/4 inch from one end — this will be the top of the handle support. Radius the tops of the supports to form a half-round.
12. Stand the basket on one end piece. Center one of the handle supports (C1) on the end piece so that the bottom of the support is flush with the bottom of the end piece.
13. Drill a 5/16-inch hole 1-1/2 inches from the bottom of the handle support, and a second hole 1-1/2 inches from the top of the handle support.
14. Apply wood glue to the back of the handle support and to a wooden peg, and install it in one of the holes. Repeat for the second peg. Once the pegs are set, the excess length can be trimmed flush with the handle support.
15. Flip the basket over onto the other end, and repeat steps 10 thru 12.
16. Install the handle (D1) by sliding it through the holes on the handle supports. Secure handle with wood glue, and nail a 1-inch brad through the side of each handle support into the handle.
17. Set the 18-inch bar clamp across the two handle supports and leave the basket overnight so the glue can dry thoroughly.
18. After the glue has dried, remove the clamp. Your new harvest basket is ready to use! If you wish to use a natural wood preservative, it can be applied at this point. This little basket works great for vegetables as well as egg collection.
Check out Elizabeth’s ingenious design for a backyard chicken tractor.
Elizabeth Williams, her husband, Craig, and their daughter, Claire, live on a 240-acre farm in rural northern Minnesota, where they enjoy the pursuit of self-sufficiency. Gardening, canning, keeping bees, hunting, foraging, and hiking around the farm with their Rhodesian Ridgeback dogs are favorite family activities.


