When I was learning to read, my mom gave me a copy of Little House on the Prairie, which I credit as the beginning of my fascination with all things homesteading. The Ingalls family made their own soap, and stuffed their attic or cellar with produce, salt pork, and grain for winter. Laura Ingalls Wilder’s descriptions of the seasonal foods they enjoyed and the clever ways Ma stretched their money to clothe and feed everyone engrossed me. Even as a child, I was deeply fascinated by the handwork involved in making clothes; Farmer Boy, which is about Laura’s husband Almanzo Wilder’s childhood, specifically mentions his mother weaving cloth from handspun wool, inch by inch. With cloth made so painstakingly, darning also features often in the books, especially as a winter activity.
Darning is a particular type of cloth mending where you use a needle to weave a little patch of new fabric directly onto the torn garment. You can make a nearly invisible darn if you happen to have the same yarn or thread the cloth was made from, or if you can find something that matches.

Historically, invisible darns were preferred around the world; in India and Kashmir, professional darners made repairs to treasured garments with threads carefully pulled from the seam allowances and hems. When heavy taxation threatened to put Kashmir weavers out of business, they began weaving half-sized shawls, which merited lower taxes. Kashmiri darners would then join the halves into a single, full-sized shawl, often making the join so perfectly that it couldn’t be seen with the naked eye. Nowadays, visible mending is becoming more popular, and some textile artists use bright colors and flashy patterns to draw attention to their darns.
Darning Tools
As with many mending techniques, neither the tools nor the skills you’ll need are difficult to acquire. A needle, thread or yarn, and scissors are the only essential tools, and if you can work a running stitch, you can darn. A few other tools will make your job easier too.
Most craft stores sell special darning needles, which may have angled or slightly flattened tips to allow them to pass through fabric more easily. The idea isn’t to stab the needle through the threads of the existing fabric, but rather to pass through the spaces between the threads. Modern darning needles are designed mainly for hand knitters working with heavier yarn; if you plan to darn lightweight fabrics with thread, you might want to use a long sewing needle or a beading needle instead.
You’ll need to choose the color and weight of your darning thread according to the effect you want. Color-wise, the sky’s the limit for visible darns! You can choose a single contrasting color, or a rainbow of shades. For an invisible darn, find matching thread; if you can’t find an exact match, a slightly darker shade will blend better than a lighter shade. The most invisible darns are made by pulling threads from the seam allowances, hems, or scrap pieces of matching fabric. This last technique is easiest on handmade garments, which tend to have larger and more accessible seam allowances than store-bought clothes. In all cases, choose thread or yarn of a similar thickness and fiber content as the garment you plan to darn. The darn will feel and wear better if it matches the original fabric. A bulky darn on a fine fabric looks clunky, and a delicate darn on heavier fabric won’t do its job for long; neither outcome is desirable.

For scissors, any sort that cut cleanly will do. Darning mostly requires cutting thread and trimming rough edges on the torn fabric, so you don’t need special sewing scissors.
That’s all you really need to darn. Optional tools are a thimble and a darning egg or mushroom. I don’t often work with a thimble, but they can be handy, especially if you’re working with fine thread and a sharp needle.
Darning eggs and mushrooms are slightly different shapes, but they serve the same purpose. They’re used to stretch the fabric at the toes and heels of worn socks into the correct shape; while knitted fabric is stretchy, darning makes a patch of woven fabric, so it needs to be done over something that imitates the shape of a foot inside the sock.
Darning eggs look like, well, eggs, and are most often made of wood, though ceramic, stone, and even silver darning eggs also exist. Some darning eggs have a protruding handle for the darner to hold while they work. Darning mushrooms look like broad-capped mushrooms, with the stem serving as the handle.
Many other rounded, smooth-surfaced objects would work as substitute darning eggs. Dried, shellacked gourds work well, and come with built-in handles; see “Gritty’s Tips” for more details about growing and harvesting your own. Some folks might remember learning on burnt-out lightbulbs — they’re the right shape, but there’s a chance the bulb could break. I recommend choosing a sturdier item. Even a smooth river rock, fist-sized or a little smaller, would make a fine darning egg in a pinch.

Basic Running Stitch Darn
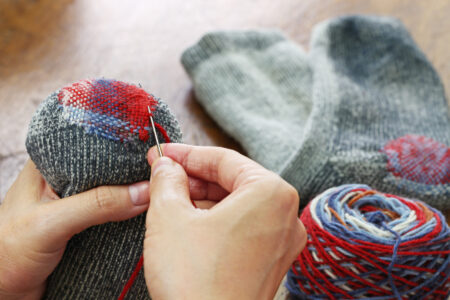
This is the simplest and most-used darn in my mending toolkit, and I’ve worked it in everything from sewing thread to lush knitting yarn. Essentially, you weave a tiny patch in place on the torn garment. If you’re mending socks, remember to stretch them over a darning egg so your darn ends up the right size for the foot that goes into the sock. Just keep woven garments flat while you work to avoid puckering the fabric.

Anchor your thread on the inside of the garment, a few stitches away from the hole to fill. Work running stitches until you reach the hole, and then jump across to work a few running stitches on the far side. Turn around, and come back the same way, placing the new thread just next to the first, so you start building a set of parallel threads spanning the hole.

When you’ve gone from one edge to the other of the hole, start working perpendicular to your existing work, weaving the needle over and under each thread crossing the hole as you go. Alternate overs and unders with each pass, and pack the threads as close together as you can by sliding the needle sideways against the last pass before you pull it through. Tighter darning will be a little stiff to begin with, but will wear better than loose work. After you weave the last thread you can possibly fit into the space, anchor your thread on the inside of the garment, and cut the tail short.

For a variation on the basic darn, try working different woven patterns into your darn. A basic twill weave (the structure that makes denim) is composed of staggered rows of an over-1, under-3 pattern. If you play with the basic pattern, you can get zigzags and diamonds pretty easily — a dramatic look for a visible darn, or a subtle detail in a nearly invisible one.

Ladder Stitch Darn

This is the variation I use when I’m short on time. It’s slightly less stable than a proper running stitch darn, but for garments that don’t take a lot of hard wear, or garments that you find a hole in half an hour before you need to wear them, it’s perfectly practical.

The process is almost identical to the running stitch darn, but instead of working a few running stitches at either side of the hole, you work a line of backstitches around the hole to stabilize it, and make a single perpendicular stitch at the end of every pass across the hole, just to the outside of the stabilizing stitches. The motion is very similar to ladder stitch, though you leave the “ladder” lying open across the fabric, rather than cinching it up to close the hole, which would pucker the garment.


Blanket Stitch Darn
The blanket stitch darn is really only appropriate for darning socks, as it tends to make a small “bubble” of thread — perfect for sock heels and toes, but clumsy on flat surfaces. Continue using a darning egg when you work this darn. In this case, the egg will help you maintain just enough tension on the stitches to make the darn follow the shape of a heel or toe perfectly.

Anchor your yarn on the inside of the sock, and come up just outside the edge of the hole. Work a single blanket stitch over the edge, moving clockwise or counterclockwise as you prefer. Continue working blanket stitches over the edge of the hole, until you’ve come back to your first stitch. Now, you’ll start working blanket stitches through your first row of stitches, building the new fabric toward the center of the hole. If you crochet, this process may seem familiar; in fact, you can crochet to mend a hole in your socks, too. Keep working blanket stitches in a spiral until you reach the very center of the hole, and then run your needle through a few stitches in a tight circle, pull tight, and tie off your yarn on the inside of the sock.

The tricky part of this darning technique is keeping the spiral of stitches at just the right tension to make a cupped heel or toe shape, without letting them get so loose that you end up with excess fabric where you used to have a hole. Cinch up each stitch just until it lies smoothly against the surface of your darning egg, and then work the next stitch. It may help to use your thumb to anchor the previous stitch as you work, to keep from inadvertently pulling it too tight.

Once in a while, you might also remove the darning egg and try on the sock to check that it’s still fitting the way you want it to. It’s easier (and less frustrating!) to change course midway than to have to tear out your brand-new darn and rework it.

Darning is unquestionably a slower process than pulling a fresh pair of socks out of the drawer, or buying a replacement for your favorite shirt, but I find it pleasantly meditative. Whether you’re salvaging a beloved garment from the garbage for a few more months, or simply saving a bit of money by making do with what you have, you’re reducing waste in your lifestyle and practicing a valuable skill. Don’t fret over torn clothing — just darn it!

Gritty’s Tips

Smooth-surfaced gourds with long necks, such as ‘Golden Cushaw’ winter squash or a fully mature crookneck squash (typically grown as a summer squash), make lightweight darning tools — and you could grow enough in a single season to have a gourd for every pair of socks you darn!
Squash prefer fertile, well-draining soil, and need plenty of space whether they’re bushy or vining. Direct-sow seeds after the threat of frost has passed, and water regularly throughout the growing season. Be mindful of common pests and diseases; in humid areas, powdery and downy mildew may appear, and squash bugs and vine borers must be eradicated quickly to save the crop.
Harvest fruits when the rind is hard to the touch and the vine has shriveled; mature gourds will survive a light frost. Leave 1 to 2 inches of stem attached when you harvest. Wash gourds gently with soapy water, dry, and place in a single layer in a warm, dry place, out of direct sunlight. Turn the fruit occasionally to keep it drying evenly. When the gourds are lightweight and you can hear seeds rattling inside if you shake them, they’re ready to be shellacked.
Caitlin Wilson is a GRIT editor with over a decade of textile experience and a lifelong interest in recycling and repairing everyday items. She blogs about her projects at Sunshine and Roses.


