Helping bees close up shop for the winter is one of my seasonal chores. This year my husband even helped! I am really proud of him; he has always been supportive of my bee habit and loves to sing the praises of bees, but never really wanted to get too close for fear of getting stung. He even winterized a hive all by himself! One step closer to being a big happy alternative beekeeping family.
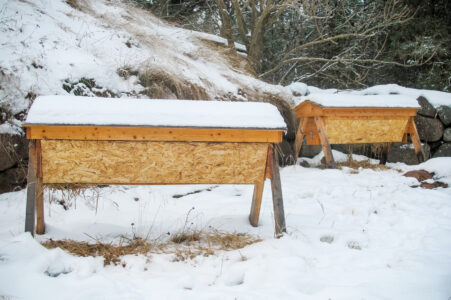
I have two Kenyan Style Top Bar Hives (or kTBH) at my parents’ house so we decided we should have taco night, the boys would get Gramie and Grampy time and I would get my bees hunkered down for winter.
Preparing Top-Bar Honeybee Hives for Winter
The process to do two hives probably takes a whole 30 minutes from start to finish. You need your hive tools, I keep them all in a tool box. Specifically, a hive tool or small pry bar (I used a flat head screwdriver since my hive tool grew legs and walked off), bee brush, stapler, 1/4-inch hardware cloth cut to the size of your TBH, a bowl, knife, and straw.

How do you know its time to winterize your hives? The flowers in your area will tell you when to close up shop. (Just as they tell us to open up for the season.) For those of us in Southern Michigan and surrounding areas the last big bloom of the year comes from the golden rod. Stinky stinky golden rod. Your hives might be a little putrid but still sweet smelling around this time of year. Start preparing your gear. The first frost will happen soon, so be listening to your local stations for frost warnings. After the frost hits, pick the next warm day and head to your hives and get to work.
You may be wondering what the deal is with the hardware cloth. Beehives tend to be an irresistible place for “visitors” to overwinter too. The bees keep their queen warm and toasty by clustering around her all winter long, moving along the comb eating honey. A warm place with easy food is the perfect place for mice to snuggle into, and when you have mice you can kiss your bees goodbye. The hardware cloth gets stapled to the lid and the sides of the hive blocking off any mouse sized entrances.
Start by removing your lids and stapling the hardware cloth around the rim so it will overhang onto the sides of the hive. I did this a year or so ago and I leave it on year round. Also remove your observation window to see how far the girls have gotten and where you need to start prying up the bars to slide in your follower board.

Remove any started or unfinished comb. The goal here is to have that follower board right up next to the last full bar of honey comb.
Move the follower board up to the last comb and be careful not to squish any of your ladies. Use your bee brush or a gentle hand. Neither my husband or I wore bee suits for this hive manipulation as our bees are docile.
The comb you collect here will most likely be full of uncapped honey. Cut it off the bars and place it in your bowl and share with your family. To be clear on one thing. We only harvest our honey once a year, in the spring time. NOT the fall. The bees eat their own honey all winter and in the spring we take what they didn’t use. We don’t need to supplement our bees with inferior sugar so they can make it through the winter.

Stuff the empty bit of the hive with straw. And I mean STUFF IT IN THERE! I used at least a 1/4 of a bale of straw just for this tiny little bit of empty hive. The straw acts as insulation. While you are at the straw stuffing, stuff a bunch into the underside of your lid. More insulation and it also helps to wick away moisture that the bees will produce keeping their queen warm.

Now simply replace your lid and staple down the excess hardware cloth around the outside of the hive. Replace your observation window and ensure that it is totally secure. It is not a good thing when your window blows off in a storm and its a few days or weeks until you find it has fallen off.
TA-DA! Bees are all cozy for the winter!
More bee posts to come so keep on the look out for them. Happy Beekeeping!

Rachel is a gardener, beekeeper, wife & mother of three wild and crazy boys, and lover of all things homesteading.


