
Use these simple tools and techniques to carefully whittle wood into beautiful products like spatulas and other utensils.
Sixty-five years ago, when I was a kid, I was a burgeoning bushcraft whittler. I don’t remember if I even thought of myself as a whittler. I just did it.
“I’m going to the bush with Sandy,” I’d tell Mom as I headed out the door. Sandy was my best friend who lived a block away. Half a block away was a big patch of forest – the bush. We had great times building “forts,” pretending we were Robin Hood or Davy Crockett, getting dirty, and just having as much fun as a couple of boys could.
Whittling with a knife, axe, or saw was always part of these adventures, and we often gathered materials in the bush and brought them home to continue our projects. We had no instruction. We just got an idea and tried it, and as we did, our skills grew, and our projects even started to look like what we’d envisioned.
It was great fun, and I never outgrew it. I always have at least one knife with me. Trees tremble when I approach – especially aspens. I indulge in this three-dimensional doodling whenever I can, and I’ve found that lots of other people, with a little instruction and encouragement, enjoy it too.
I hope to offer some basic information that will speed up the learning process. But more than anything, I want to give readers a little nudge to just get started!
Basic Cutting Methods
If you begin by learning to slide the edge of your knife through the wood – that is, slice and apply pressure at the same time – you can accomplish cutting while using a lot less pressure. For a basic cut, the edge of the knife first contacts the wood fairly close to the handle, slices through the wood, and finishes closer to the point of the knife at the end of the cut.


Thumb-Push Method
For another way to cut that’s precise, try the thumb-push method with a stop cut. All the power for a thumb-push cut comes from the thumb of the hand that’s holding the stick. Practice this cut on a scrap stick. The point of this cut is to avoid follow-through. However, even without follow-through, the knife acts as a wedge when you cut wood, and a split will develop ahead of the cutting edge. But if a stop cut is formed across the grain first with a knife or saw, and a controlled cutting method, such as the thumb push, is used, the split will be interrupted, and the element you don’t want to cut will be preserved.


When making stop cuts, put the wood down on a firm surface – not your leg! A piece of wood, a log, or a stump will work well. The ground isn’t a good option; cutting on the ground will result in dull knives. A controlled cut, such as the thumb-push cut, is necessary for a stop cut to be effective. Uncontrolled cuts will just barrel through the stop cut. Remove small pieces of wood, and deepen the stop cut as necessary until the desired depth is reached.
You can also use what I call “the potato peeler cut.” All the power for this cut comes from just closing your hand. Notice that the thumb in the photo isn’t in line with the blade.

Problems can occur with this cut when whittlers try to make cuts that are too big, and line up their thumb with the blade in an effort to put more power into it. Then, when the wood suddenly yields: injury! Remember, make small cuts.
If you’re a beginner, you may fear the blade. Go slowly, and try not to worry. The back of the blade won’t hurt you. To grip the knife for the potato peeler cut, nestle the blade in the first crease of your index finger. Then, close your hand to make the cut, and your thumb will naturally be out of the way. Some people have trouble with this, and tend to nick their thumb. If this describes you, some tape ahead of time might be useful. Duct tape, masking tape, hockey tape, or vet wrap will all work. The potato peeler cut is a useful way of cutting, and should be in the repertoire of every whittler.
Whittle a Spatula
To put your cutting skills to use, let’s start with the simplest project, a spatula, which is a useful tool at the campsite or in the kitchen.
Start with a little log, about 3-1/2 inches in diameter and 15 inches long. It’s best if the wood is fresh. If the wood has been down awhile, cut off the end well past any cracks in the end of the piece. Then, measure approximately 15 inches, and cut that portion off the larger pole.

Using a hatchet or axe, split the log right down the middle. The best way to do this – without wasting wood by making inaccurate cuts – is to start a split with the axe. Then, for accuracy, tap the axe with a hefty stick, not another axe! This may be enough to split the piece in half. If necessary, you can quickly make a couple of wedges to do the splitting.
I found a bent log that would facilitate the making of a spatula with a curve to it. Spoon-makers call this a “crank.” I split it with my pack axe (what some people call a “hatchet”). Try to use a log without any branches, which will produce knots. If branches are unavoidable, try to split the log in such a way that the part you’ll use for the project won’t have any of the knots.
Remember, don’t do any of this axe work on the ground. Always use a chopping block, the flattened side of a large log, or even a plank on the ground. If you split logs while one end is on the ground, grit will be pounded into the log, and that will dull your tools as you do additional work. Also, it’s easy to accidentally hit the ground with the axe, which will dull it. Keep your edges sharp. It will save a lot of time, and you’ll do better work.

Now, we’re going to “hew,” which is the word for axe whittlin’. Flatten the part of the log that was the center of the tree, and remove all traces of pith at the center of the tree. If you skip this step, cracks will form as the wood dries. Score the wood with the axe, and then hew the wood away between the scoring marks. You could also score with a saw. After you’ve scored and hewed one side of the log half, score and hew the other side, until you’ve produced a little board of an even thickness, about 1 to 1-1/2 inches. Square up the edges.


Then, you can sketch the shape of the project on the board’s top and sides to make the project easier. Once you’ve done a lot of this sort of thing, you can dispense with sketching, but at first, it will help quite a lot. You might want to strive for symmetry – or not. Either way will result in a functional tool.
Use the saw to put some stop cuts on the project, to help prevent splitting into or off parts that you want to keep on the project. Experts often don’t need these stop cuts, or might make them with their axe. Scoring, as mentioned earlier, is just creating stop cuts with the axe. But it will be a lot easier to get good results at first if you make them with your saw.

If you put enough stop cuts onto the blank, the rest of the shaping can be done with a knife. The more stop cuts you make, the less pressure you’ll need to apply, and the less likely you’ll be to make mistakes.
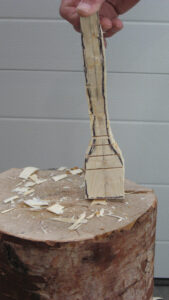
With the axe, hew out the pattern as close as possible. Then, use a knife blade to refine the shape. Thin the front edge of the spatula to facilitate flipping eggs and such. Round the edges of the handle to make it more comfortable to use. I find that spatulas with flatter handles are easier to hold and use than those with perfectly cylindrical handles. Make sure enough wood is left in the handle area. Made like this, the spatula will be strong enough to use, but not clunky.

Finally, put your hand-whittled spatula to work over your campfire or stove. Equipped with a bit of whittling know-how, you can turn a branch or log into a long-lasting, useful tool, and you’ll be able to see the potential in every felled piece of wood you find.
Excerpted from Bushcraft Whittling by Rick Wiebe (available now from Linden Publishing). Wiebe has been whittling for more than 60 years. He teaches whittling and carving to adults and children ages 9 and up. He lives in Westbank, British Columbia.


