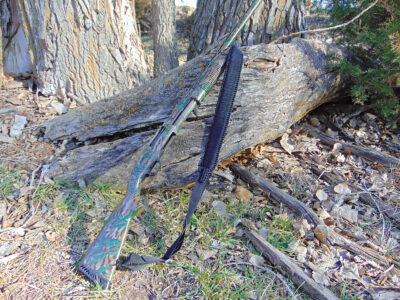
Don’t be caught unprepared; make a DIY paracord sling from a detachable paracord with this dual-purpose sling for your firearm.
I’ve always gravitated toward items that serve several functions. I also like making things, which is why I like assembling and using paracord firearm slings.
Originally designed for the military to be used as suspension lines on parachutes, parachute cord, or paracord, is made from nylon, with a braided outer sheath and several strands in the core. It has a breaking strength of 550 pounds, thus the name “550 paracord.” Because it’s strong, somewhat elastic, rot-resistant, and lightweight, it has a multitude of uses and can be very helpful if you find yourself in a survival situation.
With this homemade paracord sling, you’ll have nearly 100 feet of paracord attached to your firearm to use if the need arises. It’s comfortable, and it weighs the same as a manufactured sling. And, even after disassembling a portion of the sling, you’ll still have a functional strap to carry your firearm.
Tools and Materials
If you’re a DIYer, you probably already have most of the tools needed to build a sling. Specialized knotting tools can make some of the tasks easier, but you can get by with their common-tool counterparts.
- Jig (either homemade or purchased)
- Needle-nose pliers or hemostat
- Knotter’s tool or finish nail setter
- 100 feet of 550 paracord
- 4 feet of 1-1/2-inch-wide nylon strap
- 1-1/2-inch-wide rectangle D-ring buckle
- 2 sling swivels with 1-1/2-inch-wide loops (or whatever type of clips are needed to attach the sling to your firearm)
- 1-1/2-inch-wide tri-glide buckle
- Sharp scissors
- Tape measure
- Black permanent marker
- Lighter
- Masking tape
Know Your Knots
For this project, you’ll tie a series of knots that can be easily disassembled if necessary. The knots used are the cow’s loop, cobra knot, and king cobra knot. The same steps go into both serpent-named knots. The difference is the cobra knot spans a narrow core, whereas the king cobra spans a wide core. The king cobra knots form the padding of the sling, which is wide and flat — like the hood of a king cobra.
Typically, you’ll need 1 foot of paracord to make 1 inch of cobra knots, and 34 inches of paracord for 1 inch of king cobra knots. This sling requires 100 feet of paracord, which should leave some leftovers that you can turn into zipper pulls or use in other projects.
If you don’t already own a jig, you can make one using two pieces of 1×4 lumber, four finishing nails, and two C-clamps (Photo 1). Gather your tools and supplies, and let’s get knotting.
Knot the First Core Strand

1. The paracord portion of the sling is 18 inches long. Set up the jig so there’s an 18-inch gap between the ends of the jig. Cut a 20-foot length of paracord. Carefully melt the ends of the cord with a lighter to prevent fraying. (Don’t touch the melted ends until they cool, because molten cord sticks to skin and inflicts a painful burn.)

2. Place the cut ends of cord side by side, and then work to the opposite end until you find the center of the length of cord, which will form a loop. Secure the D-ring buckle to this looped end with a cow’s loop knot. To make the cow’s loop, pass the center loop of cord through the D-ring, expand the loop, and pass the D-ring through the loop. Pull the cord tight, and place the D-ring on one end of the jig (Photo 2, above). Check that the two lengths of cord coming from the D-ring are the same length. If not, loosen the cow’s loop knot, and pull the slack through until each side of the cord is the same length.

3. Mount a sling swivel on the opposite end of the jig. Pass both ends of the paracord through the sling swivel loop, and pull the cord tight. Make sure the two strands of cord between the jigs are parallel to each other and not crossed. If they’re crossed, make them parallel before proceeding. The two parallel strands strung in the jig are now the first core strand. Lay the right-side length of cord to the right side of the core. Lay the left-side length of cord on the left side of the core. Wrap a piece of masking tape on the right-side cord.

4. Begin the first cobra knot by passing the right-side (taped) cord over the core to the left side while leaving some slack in the cord on the right side of the core. Pass the left-side cord over the right-side cord that’s on the left side of the core, under the core, and then over the slack in the right-side cord, which is on the right side of the core (Photo 3). Pull both pieces of cord tight, cinching the cobra knot to the sling swivel loop (Photo 4).

5. The taped cord should now be on the left side of the core. Make the next cobra knot by passing the left-side cord over to the right side of the core, leaving some slack on the left side of the core. Now, pass the right-side cord over the left-side cord, under the core, and out and over the slack on the left side of the core. Pull both strands of cord tight, and snug the knot against the first one. Continue knotting in the same manner, always beginning with the taped cord as it alternates from the right to the left side of the core. After tying a few knots, the cobra knot pattern will emerge (Photo 4, right side).
Secure the Ends

6. Once you’ve knotted all the way to the D-ring, there are a couple ways to secure the ends of the cord. One way is to cut the cord about 1/8 to 1/4 inch from the last cobra knot, melt the cord, and, before it cools, flatten it against the knot with a nail setter or knotter’s tool. Once cooled, color the melted end with a marker. Another technique is to weave the end back through a few of the cobra knots.
The advantage of melting and pressing is that it’s a quick way to secure the end. The disadvantage is that it’s harder to take apart in a survival situation. The advantage of the weave method is that it’s easier to take apart. The disadvantage is that it leaves a bulge and doesn’t look as nice. In this example, the ends have been woven.
To weave the ends, force the nail setter or knotter’s tool under one of the last cobra knots to create a loop in the cord (Photo 5, above). Because paracord is somewhat elastic, the tool will stretch the cord to create the loop. Remove the tool, and use needle-nose pliers or a hemostat to pass the end of the cord through the loop (Photo 6, below). Then, pull the rest of the cord through the loop. Do this three more times along the strand. Snip the cord, and then melt and color the end. Turn the core over, and weave the other cord into the opposite side.
Knot the Second Core Strand

7. Cut another 20-foot length of paracord, and make a second cobra knot strand beside the first one. This time, make the cow’s loop at the sling swivel loop, pass the cord through the D-ring, and tie cobra knots to the sling swivel. This way, the two strands that form the core begin and end at opposite ends. Don’t forget to secure the ends.
Knot the Padding

8. Cut 60 feet of paracord, and then melt the ends. Place the cut ends side by side, and work to the opposite end of the cord to find the center. Tie a cow’s loop at the D-ring, mount both ends of the sling into the jig, and feed the ends of the padding cord through the sling swivel loop. Make sure these cords are parallel on each side of the core. In other words, the left cord runs along the outside of the left-side cobra knotted strand, and the right cord runs along the right-side cobra knotted strand (Photo 7, above).

9. Tape the right-side cord, and begin making king cobra knots to create the padding using the same technique as the cobra knots. When cinching the king cobra knots, pull the ends of the cords just snug enough to squeeze the core together, but not so tight that the core folds in on itself. As you create the king cobra knots, push each new knot up against the previous one (Photo 8, above).

10. To finish the sling at the D-ring, tie a series of cobra knots back to the D-ring and last cobra knot. Keeping with the serpent-naming theme, this is called a “rattlesnake rattle.” To do this, run the two strands of cord parallel to each other to about 3 inches from the last king cobra knot. Tie cobra knots back to the last king cobra knot (Photo 9, above). Finish the ends by melting and pressing, or weave them on the underside of the rattle (Photo 10, below).
Add the Strap

11. Now, add the adjustable strap. Gather the nylon strap, tri-glide, second sling swivel, and paracord section. Melt the ends of the strap to prevent fraying. Thread one end of the strap through the tri-glide, and pull plenty of slack so the strap forms a loop in the tri-glide. Pass the same end of the strap through the loop on the sling swivel, back through the tri-glide, and underneath the strap that’s already in the tri-glide. Pull enough strap through the tri-glide to make another loop under the first one (Photo 11, above). Pass the opposite end of the strap through the D-ring on the paracord section. Then, thread this end of the strap through the tri-glide underneath the existing loops (Photo 12, below).

12. Attach the sling to your firearm, and adjust the length of the strap by moving more or less strap through the tri-glide before tightening the loops of strap in the tri-glide. Once snugged into place, friction will hold the three layers of strap in the tri-glide.
Now, you’re ready for your next hunting trip, with the security of knowing you’ll be carrying a large supply of useful paracord to help you in a pinch. Once you discover how fun, easy, and practical a paracord sling is, you’ll be making them to replace the straps on all your firearms, go-bags, backpacks, and anything else that uses a padded sling.
Dennis Biswell is a frequent Grit contributor. He’s an avid outdoorsperson and DIYer, and he regularly presents on tanning, leatherwork, and outdoor skills at Mother Earth News Fairs. All photos by Dennis Biswell.


