Learn how to make sourdough starter from scratch, how to feed sourdough starter, and what makes it taste different depending on where you are.
Pulling loaves of homemade sourdough bread out of the oven is one of those timeless homestead experiences many of us yearn to recreate in our own modern lives. Whether you live off-grid in the mountains or in a 15th-floor apartment, it’s a skill you can readily learn, even if you’re just getting started with baking. All you need to do is give yourself a bit of time to learn how to team up with one of humanity’s oldest allies: wild yeast.
Yeast is likely one of the first organisms ever captured and “domesticated,” so to speak, by humans. For thousands of years, we’ve employed it to ferment our food and drink, both to make it last longer and to improve its taste and digestibility. In the modern age, however, many of us have been raised with little or no knowledge of how to ferment, and we don’t know how to get started. In this article, I’ll explain how to capture wild yeast to make your very own sourdough starter, teach you how to maintain it, and share my homestead’s recipe for a satisfying whole-grain sourdough bread that’s easy to make and even easier to eat.
I hope you’ll notice that the tone of this article is decidedly relaxed in nature – that’s on purpose. I believe good bread is anyone’s inheritance if they just take the time to learn some basic steps. I know there are some specific dictates on how to churn out picture-perfect loaves, but sourdough bread can also be very forgiving, flexible, and adaptable. You just need flour, water, salt, and time.
How to Make Sourdough Starter From Scratch
When I first started learning about sourdough, I got the sense it was a difficult endeavor, and I was intimidated. I didn’t yet understand that many modern publications needlessly complicate the creation of cultured wheat batter. They say you need raisins, or juniper berries, or midnight deals with infernal supernatural powers to get a starter started. The truth is, capturing wild yeast is so simple that anyone with a bit of flour and water has already done the bulk of the work.
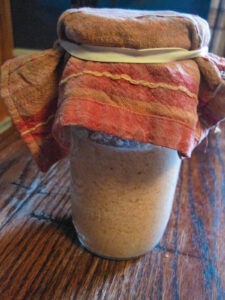
You’ll use a pint-sized canning jar – mix 1/4 cup whole-wheat flour with 1/4 cup filtered water in the jar. You don’t use straight-from-the-tap city water, as the chlorine added at the water-processing plant can kill off the bacteria you’re trying to culture. Cover your jar with a cloth or paper towel secured with a rubber band. That’s it! The starter is started.
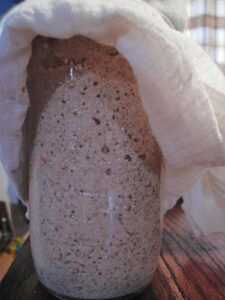
Now, every day for the next week, halve the fermenting batter. You’ll be able to use your “discard” in recipes soon, but for now, compost it. Next, “feed” your starter by mixing in fresh whole-wheat flour and water in the same 1-to-1 ratio you started with (1/4 cup flour and 1/4 cup water). Stir everything together and cover it up again. This step will fuel the growing population of wild yeast and acidifying bacteria, which will help them outcompete undesirable organisms. As everything starts to ferment, the populations of different bacteria will rise and fall. The batter will expand with aerated bubbles as it ferments, and the smell will shift to a pleasant, beery sort of aroma as everything equalizes. It usually takes about a week for the starter to reach equilibrium, and as long as you use and feed it regularly, your starter will continue on like a bubbly batter utopia.
How to Feed Sourdough Starter
To keep things healthy, feed the starter every day (or once a week if you keep it in the refrigerator). If you do store your starter in the fridge, feed it for a day or two to wake it up before using it for baking. To feed your starter, place 1/2 cup starter in a clean jar. Stir in 1/2 cup flour and 1/2 cup water. Once you have a baking routine down, you may want to bump this amount up or down based on the number of loaves you want to make. Everything left behind in your “original” starter jar is also available to bake with. This stuff may be termed “discard,” but it’s hardly waste, and it can be used to give rise to pancakes, crackers, brownies, and more.
Whole-wheat or rye flour are the best “foods” for your starter, and the only ones I recommend. Some people have success with white-flour starters, but if they ever start losing their oomph, you can reinvigorate them with whole grains (much like you can with yourself).
If you miss a day of feeding your starter, you can still salvage it. You’ll likely notice a wrinkly skin floating on top of your starter. This is called “kahm” yeast, and it indicates a hungry starter. A day or two of regular halving and feeding should get things back on track.
Neglect a starter too long, however, and you won’t be able to save it. If you find fuzzy mold of any color, pink slime, or maggots (fruit flies adore starter), the starter is unusable and needs to be composted. Once you work with sourdough for even a short amount of time, you’ll quickly recognize if your starter is “off.” Thankfully, now that you know the process, starting a new starter will be as simple as mixing up a fresh batch of batter (in a clean jar, of course) and letting it ferment all over again.
What Makes San Francisco Sourdough Bread Different?
Once you have an active starter, you can use it instead of yeast! Potentially, you’ll never need to buy a packet of mysterious yeast pellets from the grocery store again. The store’s yeast packets aren’t actually the same organisms as the ones you’ve pressed into culinary service in your starter. Researchers have checked out the DNA in sourdough starters and have found that more than 50 species of lactic acid bacteria and 20 different species of yeast can thrive in a sourdough starter. No sourdough starter is the same – they differ based on the locations where they were cultured. That’s one of the reasons why the famous San Francisco sourdoughs are different from the ones I capture in my Ozark kitchen, which will be different from one you can capture in your own.
Store-bought yeast, by contrast, is Saccharomyces cerevisiae. Originally a byproduct of the brewing industry, it’s been selectively bred in laboratories since the 1930s. This yeast shortcuts traditional sourdough’s long fermentation process in favor of quick gas production. Commercial yeast doesn’t form a relationship with any bacteria, which is why baked goods made with it lack acidity. Breads made with commercial yeasts also lack the predigestion afforded by the long fermenting process, leaving many nutrients inaccessibly bound up in the name of quick-rise convenience.
Bake Sourdough Bread with Your Starter
Read the ingredients on a typical bag of store-bought, presliced wheat bread, and you’ll often get an eyeful. Somewhere between being wheat grains and becoming that squarish loaf, dough conditioners, oxidizers, bleaches, additives, and preservatives are employed to produce perfectly predictable, preserved, and passably palatable pieces of bakery. None of that is actually needed to make a good loaf of bread. If anything, it stands in the way of it.
All you need is the following:
- 4 cups whole-wheat flour (or a mix of 3 parts whole-wheat to 1 part whole-rye)
- 1-1/2 teaspoons salt
- 1 cup recently fed or “active” starter
- 1 cup water, plus more as needed
- Cornmeal, for dusting
- In a large bowl, combine flour, salt, and starter. Mix
- in 1 cup of water, stir thoroughly, and then keep adding more water, 1/4 cup at a time, until you have a nice, soft dough.
- Let your dough rest for 10 minutes while the flours hydrate.
- Start to knead the dough – you’ll notice it’ll be very dry at first, as the flours soak up the water. Continue to add water 1 tablespoon at a time until the dough is easily kneaded. You want it to be as moist as possible without becoming unworkable. If you find the dough is sticking to your hands, dip your hands in a bowl of water and continue kneading.
- Shape the dough into a smooth round, and then cover and allow to rise in a warm place for 3 to 4 hours.
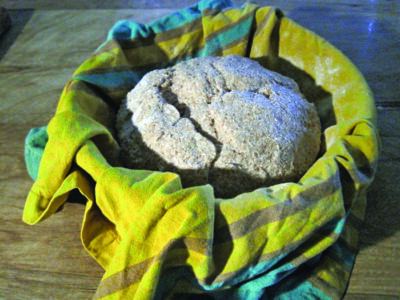
- Line a large bowl with a napkin and dust with cornmeal, or dust a cloth-lined banneton with cornmeal. Shape the dough into a round again and place into bowl. Allow to rise in a warm place for another 3 to 4 hours.
- Preheat oven to 475 F.
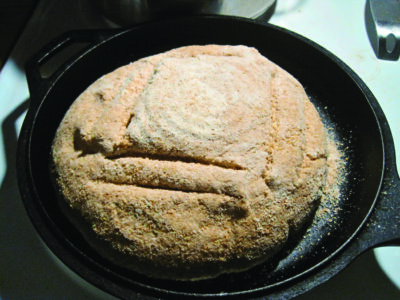
- Dust a baking sheet with cornmeal and turn the dough out onto it. Slash the surface with a sharp knife (or bread lame) to allow for expansion – do a pretty pattern if you’d like.
- Bake for 15 minutes, and then lower the temperature to 425 F and bake for 30 minutes more.
- Remove from oven and place on a cooling rack for at least 10 minutes before slicing (if you can – I won’t judge if you eat it early).
Starting your own sourdough starter isn’t a difficult or complicated process. It is, instead, the natural inheritance of anyone who has the time and desire to relearn forgotten skills and create one with the tools they have. And with that helpful culture bringing true culture back into your kitchen, a loaf of deliciously digestible sourdough bread is only an arm’s reach away.
Originally published as “Sourdough From Starter to Finish” in the September/October 2024 issue of GRIT magazine and regularly vetted for accuracy.
Wren Everett and her husband live off-grid on an Ozark homestead where they seek to live as sustainably as they can. In the cool months, Wren bakes sourdough bread every week with hand-ground flour in an old-fashioned, wood-fired cookstove.


