Learn metal casting at home without losing your cool (or your fingers), including how to make green sand to create art or tools that don’t exist.
My dad has this theory that every boy, at some point, heats a nail and tries to pound it into a knife. Today, it’s fueled by popular TV shows to the point that I’m waiting for Red Bull to sponsor a forge-off at the X Games.
Where most kids’ ambition falls short is not in pounding, but in not dialing the heat up to 11 so the metal becomes a molten puddle that feels alien in density. Pouring that shiny, glowing metal into a mold to create something that didn’t exist a few minutes ago isn’t an experience to miss. It’s also a path that’s riddled with peril and intricate enough that the practitioner has an opportunity to snatch defeat from the jaws of victory at every turn. Today, let’s talk about the ancient art of metal casting.
Rooted in History
The proverbial end of the metal-casting path is investment casting. Many of the cool old guys did this: the Egyptians, the Chinese, and the Greeks. Cultures that had frescoes also probably investment-cast something. They’d make jewelry, intricate urns, and statues by first making them from wax, coating the wax with a refractory (a heat-resistant material, such as ceramic), melting the wax out, firing the empty shell like pottery, and pouring molten metal in. We still make art like this today. More than that, though, we make thin walls, tight tolerances, and intricate passages required for the guts of lightweight turbines that make modern air and space travel possible. Investment casting has a ridiculous number of sub-steps, each of which can submarine the previous steps and can create defects that may not be discovered until you’ve spent the energy and time to do the subsequent steps to turn out a completely useless casting.
I was happy to have professional expertise in investment casting, but I really wanted to get out and make some parts on my own. I happened upon a copy of David J. Gingery’s The Charcoal Foundry, and I leaned into the refractory-lined, metal-trash-can furnace with the kind of enthusiasm that only comes with not knowing what you’re doing. The combination of these things creates a high-consequence environment. For example, spilling molten metal on wet concrete will cause the moisture in the concrete to flash boil and explode, spraying spalled concrete and furious, orange-silver murder drops everywhere. That’s better to learn by reading about, rather than experiencing it. That book and furnace focused on melting aluminum into green-sand cope (top) and drag (bottom) molds, but I should’ve been tackling tin.

Pick a Entry-Level Metal
Tin is a forgiving, entry-level metal. It has an even lower melting point (449 degrees F) than lead (621 degrees) and will liquefy your brain less. If there isn’t a ton of it, tin will melt in good ventilation with a small propane torch and, believe it or not, silicone rubber caulk will withstand molten tin long enough to get a small casting out of it. This means you can make a flexible mold of a complex shape from hardware-store caulk and pour hot tin right into it. It may have some rounded corners if you can’t configure the mold with enough head pressure, but it will still cast.
Gallium alloys will melt on a car’s dashboard in springtime. A mold for gallium can be a seashell pressed into Play-Doh or Silly Putty, then removed. The metal will shrink and crystallize as it cools, turning from the look of shiny mercury back to a dull gray. It’s a relatively nontoxic alloy, or at least there isn’t a lot of data suggesting it’s toxic … but since it’s a pretty uncommon bird, there might not be a lot of data, period. I wouldn’t try to bring it on an airplane, and I wouldn’t heat it with a torch. Nobody wants to be the first one to find out that the off-gas causes debilitating Dutch elm disease in humans.
Metal casting came to me backward. Gallium would’ve been the simple way to start. As it shook out, I started at the end of the path and only discovered gallium when I wanted to introduce my young kids to casting beyond decanting toxic lead into the bottoms of their pinewood derby cars.
Form the Caulk Mold
To make a caulk mold, I started with a bucket of water and added a little soap, as if I was going to do dishes in it. I squeezed that clear, 100 percent silicone caulk right into the water and worked it around in a glob with rubber-gloved hands. The water is actually the catalyst that vulcanizes this type of caulk into a rubbery set, so working the water into the silicone and kneading it will harden it when the water content is high enough. When you caulk a window or sink, the humidity in the air is sufficient to penetrate the thin bead of caulk, but your mold will need to be thick if it’s going to be rigid enough to hold molten metal. The soap is to prevent the caulk from sticking to things that aren’t itself, insomuch as it can be done.

Because silicone is ridiculously expensive, I like to contain it in something small so I can stretch out a tube over several projects. For this exercise, I used a little Lego figurine as the pattern and used the bottom of a soda can to keep it from blobbing out all over the place. The pattern and soda can are covered in “mold release,” so they separate easily from the rubber mold. Mold release is sold commercially, but a thin layer of brushed-on bacon grease, dish soap, or thinned axle grease will do nicely too.
I can’t just sink my figurine in some rubber and say it’s a mold, though. There must be plumbing, or the molten metal will never get where it needs to go. Before putting little Lego Emmet into the can, I made a cone out of modeling clay and stuck it on his back, the thickest part of the “pattern” (the thing that is to be copied). This is the “sprue” that will feed metal into him and act as a funnel when I pour the metal in. To keep little Emmet suspended, I stuck the big end of the cone to the bottom of the soda can, poured the clear silicone ichor over him (or you could also pack it around him if it would set up too much), and pretended he was Luke Skywalker’s X-wing getting subsumed by the swamps of Dagobah.
Then, I waited.
Eventually, the silicone hardened and came out of the can, followed by the clay. Then, I freed plastic-pattern Emmet by cutting the silicone with an X-Acto knife, being mindful that the silicone had to stay in one piece and be strong enough to support itself when I poured the metal in. The soda can helps with this: It will be used as a “flask” to support and collect the mold after it looks like it should go to the emergency room for knife wounds. If the pattern geometry doesn’t keep the rubber mold in one piece like a clamshell, carving it up with jagged joints will help it nest together in alignment. This is also a good time to wash any mold release out of the silicone mold so it doesn’t melt or boil during the pour. Then, put the mold back in the can, funnel-side up.
Safety First
For tin, a used soup can works as a crucible. I preheated my can with a propane torch in a well-ventilated area, wearing proper personal protective equipment before putting any tin ingots in. The plastic inner coating of the can comes off one way or another, and it’s best if it comes off before molten metal sloshes around in there. I used a can that didn’t previously house acidic contents, such as pineapple or tomatoes, as the zinc coating protecting the insides of those cans from corrosion isn’t to be trifled with when heated. I pinched one side of the can for a makeshift spout and gripped it with vice-grip pliers in gloved hands. Even when I don’t anticipate a memory lapse about the temperature of this stuff, I’ve learned that gloves are still a good precaution.

The same goes for redundant full-face protection. Years ago, on a tour of a nickel-cobalt foundry, I was watching an open-air induction melt when the upper remains of a hundred-pound ingot shifted into the bottom of the crucible with the sound of a golf ball dropping into a water hazard. A furious, white, quarter-sized blob of what was supposed to be part of an industrial component flew up into the air and over my head and landed 3 feet behind me. It most likely wouldn’t have outright killed me if it had hit me, but I’ve been pretty serious about protective equipment since then, headgear and foot protection included.
Mind the Temperature
A little heat applied with a propane torch to the bottom of the soup can will bring the tin ingots quickly into a molten state. It may take a bit more heating before the tin begins to evaporate or boil, and more heat isn’t necessarily better. Everything that isn’t water gets smaller when it freezes, and when you pour something into a mold, the thin parts and the cold parts touching the sides freeze first. So, imagine little Lego Emmet with a hard exterior but liquid metal inside. Furthermore, the liquid metal inside shrinks as it cools, but the rigid outside stays the same. The internal “shrink,” as it’s called, manifests itself in all sorts of inconvenient ways. Depending on the geometry and how good the “gating” (plumbing) is that feeds metal to the part, it may cause your casting to tear itself apart; to have big dimples where you don’t want them; to have external cracks, internal voids, or porosity; or to have no defects at all. Less heat equals less shrink, but there’s a fine line: If the metal is too slushy, it won’t fill the mold.
Another reason not to overdo it with temperature is that big temperature swings will affect the metal’s ability to hold gases in solution. Just like soda water, molten metal can hold dissolved gases. Hardcore metallurgists dealing with hardcore metals will purposefully tweak dissolved gas content to change material properties in their favor, but often the melting and pouring process has its own agenda, and accidental tweaking will overshadow those deliberate efforts and result in little gas bubbles frozen in time on your casting where you don’t want them.

Once poured, tinman Lego Emmet came out of the mold just like plastic Lego Emmet did. I hacksawed off the sprue and remelted it after a failed attempt where I just dropped the whole thing back into the soup for remelt.
How to Make Green-Sand Casting
There comes a time in every acreage-living person’s life when they need something that isn’t available. Maybe it’s a bracket from a 100-year-old tractor; maybe it’s part of a table saw that isn’t sold anymore. To fill this void of mine, I needed to up my game from tin poured into silicone molds and graduate to aluminum (1,221 degrees) or bronze (roughly 1,742 degrees) green-sand casting.
Green sand is a mixture of clay and sand that’s moist enough that when you squeeze it in your palm, you can see the details of your hand in it. When pressed together, it should crack apart instead of crumbling. Moisture is generally a big no-no in casting, but in the case of green sand, there’s enough porosity between the sand grains to let steam escape.

Just as with Lego Emmet’s adventures, there’s a pattern and sprues in green sand casting, with the caveat that the complexity of the shape is limited. In this type of casting, the mold is typically in two halves, a “cope” (top half) and a “drag” (bottom half). Each is an empty frame that’s packed with sand over the reusable pattern. A small rib around the inside perimeter of the frame helps keep the green sand in place, and alignment guides or pins ensure the two halves line up exactly once the pattern is manually extracted. There will be a notable line of finned metal, “flashing,” from the parting line between the cope and the drag once the pour is done. This is because the two halves of the mold are made at different times and are two distinct pieces with a small gap between them.
How to Make Casting Sand
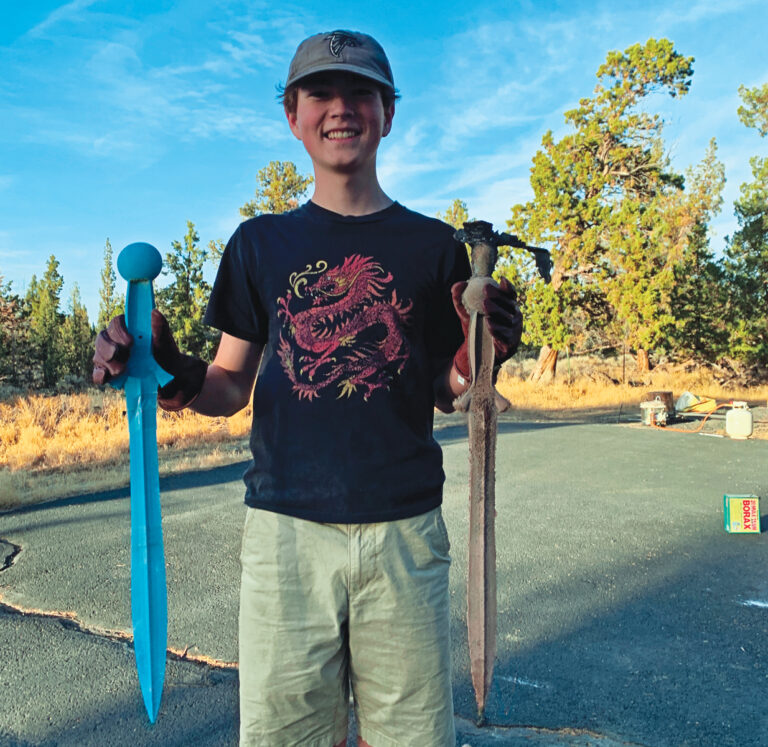
In the method I used, the pattern sits on a flat surface, and the drag is set upside down around it. A fine layer of mold release sprinkled on top keeps the green sand from sticking. In my case, my helper and I sprinkled a generous but thin layer of baby powder over a 3D-printed pattern of a Bronze Age sword, because what ranch doesn’t need a bronze sword? Next, we sifted our well-mixed and perfectly ratioed (about 10 percent bentonite clay by weight) green sand through a screen to land gently on and around the pattern. We tamped it into all the corners and crannies, carefully at first, and then pretty aggressively by the end. When we finished, we screeded off the excess sand so the tamped surface was flat, then carefully tipped the drag over to reveal the pattern. Next, we carefully removed sand from the perimeter of the pattern until the sand was even with the pattern’s middle. The finer the sand, the better the pattern resolution. I used Harbor Freight sandblasting sand in direct contact with the pattern, and playground sand after that. The bentonite came from a local farm and garden store, where it’s sold to help ponds hold water and as an equine diet additive.
Then, it was time to put the cope on the drag and fill it with sand. Again, we sprinkled baby powder all over before repeating the process with the sand, placing it on top of the exposed pattern with the cope and drag in place. This time we inserted a dowel to use as the sprue. This could also be carved out of the sand later, but the less we handle this fragile and heavy apparatus, the better. Once the sand was packed, I removed the cope from the drag, the sprue, and the pattern from whichever side it stuck to; poked a few vent holes into the top; gently cleaned up any rogue sand crumbles; and carefully put the (now very heavy) halves back together.
The mold was ready to rock and roll. In the case of a sword, the geometry lent itself well to a two-piece mold; both symmetry and shallow impressions are at play. With asymmetrical or complex pieces, deciding where the parting line should be makes the process spicy and more planning-intensive. With patterns that will penetrate deep in the sand, tall features may need a “draft angle,” a slight cone shaping to them, so they can pull free from the sand without taking the sand with them.

Melting Metal
Melting aluminum or bronze is a bit more involved than melting tin. I’ve struggled to get a charcoal furnace hot enough for bronze and opted for a refractory-fiber-lined (from a fireplace store; not fiberglass, which will just melt), stainless-steel vessel with an insulated, reinforced concrete top, fed by a propane burner. A garden torch was hot enough for a more patient version of me to melt a small batch of aluminum, but now I use a two-burner propane torch made for a forge. The burner is positioned so the flame swirls around the centrally located crucible (either clay graphite or silicon carbide) and out through the central hole in the lid. I use a thin metal fence post to poke at the metal throughout the melt to gauge its temperature and capture slag. The bronze will melt much like ice, starting hard all over, then dripping some on the outside, turning into slush, then finally fully fluid. When it’s ready, it will look like a glowing version of the T-1000 from Terminator 2: Judgment Day and will want to kill me just as much. A little boric acid sprinkled on top acts as flux to keep the melt cleaner.
Propane burns as a gas but gets stored as a liquid under pressure. It takes a lot of liquid propane to melt a big chunk of bronze. It can cool so much that it no longer wants to evaporate into gas at the pressure in the bottle. To give the evaporation somewhere to suck the heat from, I put the propane can in a trash can full of water; otherwise, the flame will slowly become smaller and smaller as I burn it. I also keep the rubber hose bits well-protected and away from the heat.
Fully suited-up and over a bed of dry gravel outdoors, I lifted the crucible out of the furnace with home-built tongs and transferred it to a crucible holder, which I used to pour the heavy liquid gently but quickly into the mold. For things like this, I’ll wear either wool, cotton, or leather (all of which tend to smolder and burn, not burn and melt and then burn some more, like synthetics do) and in several layers despite the heat. I’ve got on a full-face shield with safety glasses underneath and a thick but insufficient cotton baseball cap on backward over my head. I also wore welding gloves, a leather farrier’s apron, and thick leather boots.

If there’s leftover melted metal after the pour, I’ll “pig it off” by pouring it into antique cast-iron biscuit tins so it doesn’t freeze in the bottom of the crucible. For my project, I poured it into a tall mold with a questionable parting line, so I put it in a feed bag and poured sand around it, both to hold it upright and to contain any leakage. I might’ve gotten away with a more horizontal pour, but I wanted the head pressure of this orientation to vanquish any shrinkage in the metal. The part that results from this process will be slightly smaller than what you used as a pattern, so if you’re replacing something broken, it will need to be sized up slightly to account for the shrink factor of the process
The next part is the best. I waited patiently while the mold cooled, then pulled it apart to see if I’d just wasted an afternoon. If I had, I’d try again; if I hadn’t, I’d see where I should have taken more care in preparing the mold and reflect on all the work it will be to fix defects I could’ve prevented with a little more attention. Opening a mold like that feels like Christmas morning when you’re 6 years old, except that your present is both otherworldly hot and covered in razor-sharp, rogue splashes of metal.
Worth the Wait
If you’re trying to save time or money, you’re probably better off just buying a bronze sword. But if your goal is to try something new or create art or tools that don’t exist in the world today, metal casting is worth exploring. The satisfaction from forging something out of nothing is what you’ll cherish forever.
Josh Lau spent years leading engineering teams in the bellies of aerospace foundries all over the West Coast. He enjoys teaching his kids empirically about casting and other skills.
Originally published in the September/October 2026 issue of Grit magazine and regularly vetted for accuracy.