Indoor plants play a large role in the design and feel of a space. And for anyone without a yard or other outdoor space, indoor plants are a way to stay connected to nature. Living with indoor plants is a way to create a more calming and natural environment in your home or workplace, which can be beneficial to your mind-set, health, and overall well-being.
From the owners of the successful and stylish Sprout Home gardening stores comes Rooted in Design (Ten Speed Press, 2015), a full-color guide that focuses on the joy of choosing, caring for, and displaying indoor plants. Whether you like to grow in small containers, create vertical installations or make tabletop creations, experts and authors Tara Heibel and Tassy De Give provide readers with the means to create beautiful and long-lasting indoor landscapes. The following project is from Chapter 1: On the Wall.
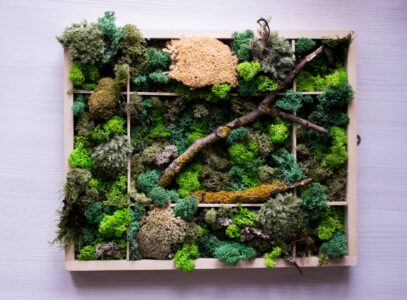
Faux Living Wall
At Sprout Home, we get a lot of requests from customers who want to install a living moss wall in their home. Because moss likes to be consistently moist at all times, it is very hard to keep it alive in a home environment. You would need to create a frame that would not only protect your walls, but hold the moss structure as well. For most homes, whether they’re apartments or houses, it’s not feasible to do this successfully.

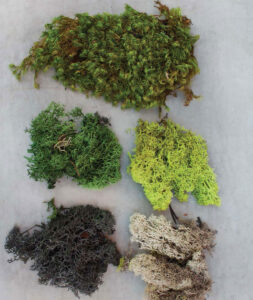
However, there is a way to create the same aesthetic resonance using dried moss. Creating a dried moss arrangement is all about combining various textures and colors to mimic a landscape. A variety of dried and preserved moss (which is simply moss that has been treated to enhance its color) is available at most garden centers and craft stores. A good selection for natural-looking carpet moss is mood moss or sheet moss; these can serve as the foundation for a wall planting. To create an undulating effect on your faux moss wall, use clumps of thicker dried moss with mood or sheet moss. Mixing the various types of moss, with their different proportions, creates crevices and dips on the mounted display. Use preserved reindeer moss to fill in the crevices or dips if you like, or use it for additional texture and effect.
This project is the perfect opportunity to take out that forgotten frame that has been sitting in your storage space or garage for the last few years. If the frame does not already have a back attached to it, attach one with a piece of wood cut to size and adhere it to the back of the frame with glue or nails. In addition to the frame and the dried moss, you will also need a glue gun and some sparks of creativity. The finished project has the same effect as a living moss wall, but without the maintenance. The added design elements elevate the planting to a complex and visually stunning landscape guaranteed to raise the question, “Is that real?”
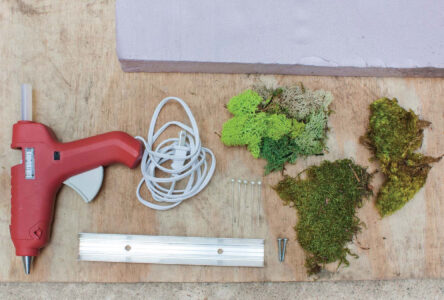
Materials
- Screwdriver
- Screws
- French cleat (choose the size appropriate for your frame or plywood)
- Frame with back side attached to it (or a piece of plywood cut to whatever size you want)
- Glue cartridge
- Hot-glue gun
- Floral pins
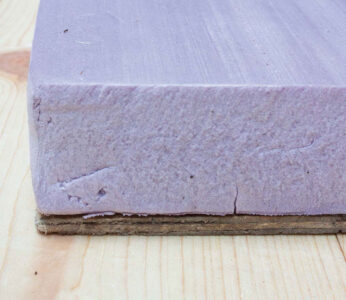
- 1″-thick pink insulation (available at most hardware stores)
- Mood moss
- Sheet moss
- Preserved reindeer moss
- Dried wood (optional): driftwood, dried bark, or kiwi vine
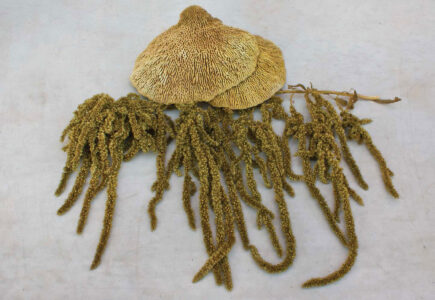
- Dried floral elements (optional): sponge mushroom, yarrow, Protea, or kale (available at most craft and floral stores)
- Tillandsia specimens (optional)
How to Build a Decorative Moss Wall
Attach the French Cleat
Using a screwdriver and screws, follow the manufacturer’s instructions and attach the French cleat to the back of the frame or plywood.
Attach the Pink Insulation
Using a hot-glue gun and floral pins, attach the pink insulation to the front side of the frame board (or plywood).
Arrange and Attach Your Primary Landscape
Using the hot-glue gun, glue pieces of mood and sheet moss to the pink insulation to create your primary landscape. Arrange the landscape as you see fit.

Attach Additional Elements
Once the landscape base is finished, add other elements to the base. Glue bits of colored reindeer moss to the base to create additional depth.
Add Optional Elements
If you’re using dried wood or floral elements, add them to the landscape using floral pins or the hot-glue gun.
Add Tillandsia, If Using
If you’re using Tillandsia, add them to the landscape using floral pins or the hot-glue gun.

Test Dried Glue
Once the glue is dry, do a wiggle test. Use your fingers to gently wiggle the elements. If they cannot be easily pulled off, they pass the test and the moss landscape is finished. Otherwise, use more glue and floral pins to secure the elements. Hang the frame.
Preserved and dried materials need minimal upkeep. You may need to replace bits of moss if they turn brown or fall off. If Tillandsias are incorporated into the piece, you will need to mist them three to four times per week. Keep out of direct sun as the color may fade.

Reprinted with permission from Rooted in Design by Tara Heibel and Tassy de Give, copyright (c) 2015. Published by Ten Speed Press, a division of Penguin Random House, Inc. Photography (c) 2015 by Ramsay de Give and Maria Lawson


