
Recently, the news about our economy has become rather grim. I suppose some economic experts would say we should all throw away anything worn or dull and buy new as a means of stimulating the economy. But I grew up listening to my elders’ gloomy accounts of the Great Depression. “Use it up, wear it out, make it do, or do without” was their mantra, and I guess it took with me. I’m more prone to think that our current economic woes have more to do with spending excess and waste than with too little buying and borrowing. Scissors and scissor-like devices are a good example of what we can continue to use and sometimes make better-than-new with simple sharpening.

Robert Hinchliffe, an Englishman, is credited with the manufacture of the first modern scissor in 1761. Whether they are called a scissor, a pair of scissors, shears, tin snips, pruners, loppers or trimmers, they have been around in one form or another since ancient times in Egypt, Rome and China. Where they originated is in question, but there is no question that they are some of our most useful devices and are certainly worth the little time and effort it takes to keep them in good cutting condition. As with knives (see “How to Have the Sharpest Knife in Your Drawer,” January/February), most can be sharpened with a combination bench stone. A few require a finer stone such as a hard Arkansas or fine sandpaper or emery cloth. The rest can be done with grinders improvised from sandpaper or emery cloth wrapped around objects of the right shape and size, usually cylinders such as dowels or pipe.
Old scissors are good practice
I found 27 scissor-like cutting tools around our place when I went looking for examples to use in this article. Let’s start with the old, beat-up scissors I’ve been using for rough cutting in my shop. These are my wife’s first sewing scissors. The tip of one of the blades broke off some time ago, so I ground the ends of both blades to a proper shape. This is the sort of scissor that would be good practice for a beginner. If you ruin them trying to sharpen them, you haven’t lost much.

If the blades are very dull, as these were, start sharpening with the coarse side of the bench stone. If they are not so dull, use the fine side. If they just need touching up, start with a fine stone or sandpaper. Open the blades of the scissors and place the edge to be ground (the bottom, shiny edge of the blade) against the stone. Rotate the top of the blade away from you until there is a gap between the bottom edge of the blade and the stone. Then slowly tip the blade back toward you until there is no longer a gap. Next, draw the blade from one end of the stone to the other, pulling it toward you so the entire edge is ground. Maintain the angle as you pull.

Curved blades need to be rocked as you pull. Long blades, or a short stone, require that the blade be ground in segments. As you grind, what is known as a wire edge will form on the cutting edge of the blade. Check for the wire edge by lightly pulling a finger at a right angle to the cutting edge. To avoid being cut, do not run your finger along the length of the blade. When you can feel the wire edge, grind the other blade in the same way. Make trial cuts in the material you will cut with the scissors. (The wire edges will be sloughed off as you make trial cuts.) If you are satisfied with the result, you are finished. If not, grind both blades again with the finer side of the bench stone. Test again, and grind with a still finer stone, if necessary, to obtain the results you like.
Scissors used to cut cloth require that you finish with a fine stone. I recommend that you get some practice before attempting to sharpen shears for your favorite seamstress or tailor. You can get in serious trouble with these folks when using their scissors for other than the intended purpose. Cutting paper is the usual offense. I think you could get into even more trouble by doing a poor job of sharpening them.

Pinking shears are no walk in the park
My next project was to take on the old, rusty pinking shears. In truth, I don’t know if I can make them usable again. Open the blades and position them on the stones as with the sewing scissors. I started with the coarse side of my combination stone because the pinking shears were so rough. Then I moved to the finer side of the stone, and finally to a hard Arkansas stone. Next I tested the shears on cloth. They cut poorly, so I tried grinding the individual teeth a little with the Arkansas stone. They cut worse yet. I made the top cut with old, obviously carefully crafted pinking shears. I made the bottom “cut” with the pinkers I attempted to sharpen. They will cut paper now, however.

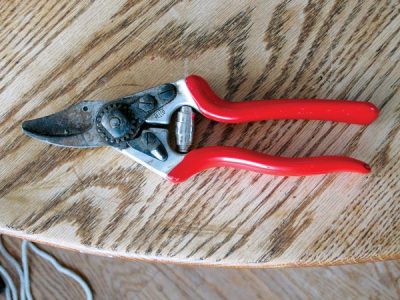
Tune up your pruners
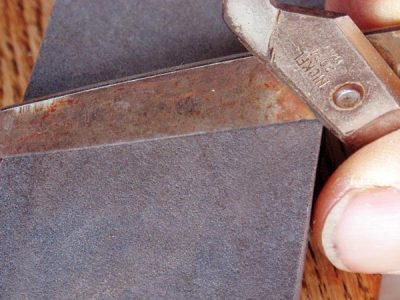
When sharpening most scissors (including pinking shears), it is important to remember not to grind the cutting blades’ sides (where they slide against one another). In fact, doing so will ruin some scissors (such as the pinking shears above). Other types of scissors and scissor-like devices require grinding on these facing surfaces. My pruners are of this type. Surprisingly, they still cut fairly effectively, but a lot of force was needed to cut a small branch.

To grind the four surfaces, first take the pruners apart. These are ground either on a flat stone, or emery cloth or sandpaper placed on a flat surface. My stones have not been anywhere near flat for many years, so I use emery cloth and sandpaper placed on one end of my jointer bed. Any flat surface (glass, granite, smooth plywood, chipboard or the like) will do. When the blades are dull, start sharpening with a coarse stone, sandpaper or coarse emery cloth. Work until the flat surface of each blade is uniformly ground. Then use successively finer grits. I finish with 600-grit, wet or dry sandpaper.

Next, place the blade with the concave cutting edge in a vise between pieces of wood. Wrap sandpaper (I started with 80 grit) around a dowel or other round object and grind the concave curve. Work down through finer grits of paper until a wire edge forms on the flat side of the blade. Next, the blade with the convex cutting edge is ground on a stone (it need not be perfectly flat), or sandpaper or emery cloth, again until a wire edge forms on the flat side. Remove the wire edge by grinding with the finest grit used on the flat sides of the blades. Coat with oil and reassemble. The procedure described above requires more time and elbow grease than does sharpening ordinary scissors, but smooth pruning cuts made with little effort make the work worthwhile.

Trim grass the easy way
Sharpening the grass clippers (Image 12) also is best done with the tool disassembled. Because the flat surfaces that slide against each other need to be ground on a flat surface, I prefer to do both the flat ground surfaces and the smaller bevels (Image 14) of both blades on coarse emery cloth on my planer bed. It is also effective to fasten the blades in a vise and grind the small bevels by moving a stone over them as shown in Image 15. Grass clippers don’t require a polished edge to cut effectively, so I just use coarse emery cloth for all four ground surfaces.

That’s about all there is to it. Once you figure out which surfaces to grind and which to leave untouched, it takes only a little practice to become an effective sharpener of scissors and similar devices.
I must add that I won’t immediately sharpen all the remaining scissors and scissor-like devices that I scrounged up. I did put a really good edge on two pairs of sewing shears. The rest I’ll leave to sharpen when I’m about to use them. Probably most of you will do the same.

An avid gardener and woodworker, Tom Larson combines these passions whenever possible. He keeps scissors and other cutting tools razor sharp at his home in Sioux Falls, South Dakota.


