
Learn how to wrap a gift in a creative way using stamps, stencils, and paint for an eco friendly alternative wrapping paper.
Christmas in our family and other Scandinavian-based families is bigger and more involved than Christmas in many other places. November, not December, begins the lead-up to Christmas, punctuated only briefly by Thanksgiving.
In November at our house, we take one evening or a Saturday morning each week for what we call November Program: The whole family works on pre-Christmas projects – one evening baking Christmas goodies; another working together on largish, homemade gifts for family; another writing Christmas cards; and so on.
But every year, no matter what, we spend one of these sessions making fun, pretty, and Earth-friendly gift wrap out of leftover paper. Why? You may well ask.
Throughout North America, holiday gifts are gussied up in pretty, themed gift wrap. This gift wrap may be: 1. designed by an artist and printed on the far side of the world on quality paper; 2. wound onto cardboard rolls, covered in plastic, and packed in crates; 3. transported by ship across oceans and then by truck or plane across a continent; 4. sold in rolls or flat packs in stores; 5. transported by car into homes; and then 6. used to wrap holiday gifts for family and friends. The gift wrap is then discarded as torn, shredded, or wadded waste. It may be composted or burned.
Vast amounts of energy and carbon spent. For what? A brief, attractive presentation that’s largely ignored and then discarded.
How to Wrap a Gift In a Creative Way
So, one day some years ago, I pledged never to buy gift wrap again. And I haven’t.
One session of our pre-Christmas prep is used to create gift wrap from leftover paper. We use any large, clean paper: tissue paper, plain newsprint, shelf paper, plain gift wrap, florist paper, outdated maps, or even brown paper bags from the supermarket. We use acrylic paint, brushes, stencils, and sponges, and we have fun. You can have fun too, and make your own unique gift wrap!
Reusing and Recycling
You can reuse gift wrap and gift bags from an earlier Christmas. Rescue usable pieces from the Christmas trash box, iron out any wrinkles, fold them flat, and stow until needed.
Often, the giver has written the names of the giver and recipient directly on the paper. That part is only useful if it’ll go on a gift to and from the same people next year. Otherwise, use the clear areas of that piece to wrap a small present, tuck that section out of sight in the wrapping, or cover the “to-from” with a great big sticker or a new tag. Small pieces cut into rectangles and folded in half make great to-from tags.
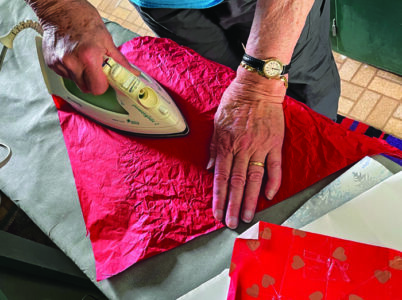
You can also use recycled paper of all kinds! Some folks use the Sunday comics section, unadorned, to wrap presents. Some use retired newspapers in different languages – but on the off chance something rude is expressed on that paper, don’t give it to anyone who knows that language. Some people even use unadorned outdated maps. Or, add stamped or stenciled designs to any of these. Sometimes, decorated tissue paper arrives with clothing or shoes or even a new laptop. Think before tossing any paper that could be used as wrapping. Again, most pieces will probably need to be ironed flat to look festive.
Alternative Wrapping Paper
Here are some ways to change plain paper into gift wrap. You don’t need any particular skills. The only limits are time, imagination, and supplies.
The wrap will serve its brief purpose and can be saved for next year or discarded if it’s beyond reuse. It’s glorious destruction art, like decorating hard-boiled eggs at Easter.
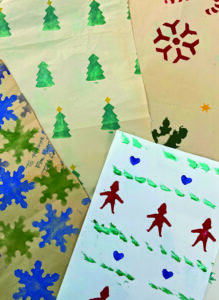
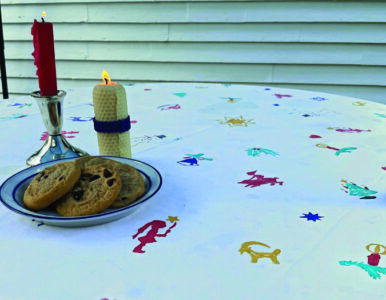
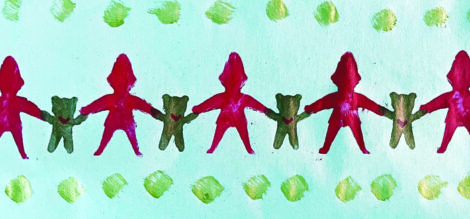
Gift wrap almost always incorporates stripes, colored dots, solid colors, and repeating small to medium motifs arranged across a sheet of paper. So for your homemade wrap, choose fun colors, repetition, and your favorite designs.
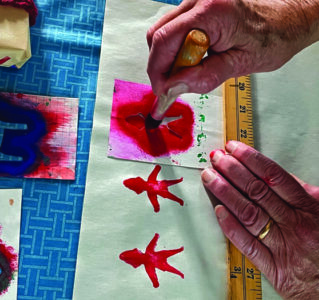
Cut Your Own Stencils
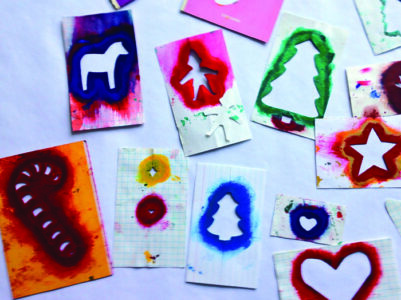
Small motifs mean small but stiff paper. I use 3-by-5-inch or 4-by-6-inch index cards. If you’re good at folding paper and cutting out shapes, you can do this directly with index cards. Iron the index card afterward, or simply bend it backward from your fold so it lies flat on the target paper. Plastic stencil sheets are also available, either pre-cut or cut-able with a craft knife, but they’ll cost more and are usually designed for larger projects, such as your kitchen wall.
If you don’t trust yourself to cut designs into stiff paper, cut the motif from notebook paper, trace around the figure onto an index card, and then cut with a craft knife (without folding) just inside your pencil lines. Make a second stencil for tiny balls (use a paper punch) or stars, or paint them on with a fine brush.
Once you’ve made your stencils, planned how you’re going to arrange the stenciled motifs on a sheet, covered your work area with a plastic covering, mixed a little bit of your paint in a small dish, and have a soft, damp sponge near your work, it’s time to stencil!
First, place the stencil where you want your first motif.
Next, dip the stencil brush lightly in the edge of the glob of your paint of choice, just getting paint on the ends of the bristles. Dot it on the damp sponge until no gloppy paint is left on the brush.
Brush the paint from the outside of the stencil inward, and proceed around the edges of the stencil. Some people (like me) like to leave the center covered only lightly or not at all, so folks can see it’s stenciled and not printed or stamped. The light center also creates depth that’s typically not present in prints.
You can probably create two or three images with the first dip of paint. Always brush with a fairly dry brush from the outside over the lip of the stencil and onto the paper. Doing this will help keep paint from running under the edge of the stencil and messing up your clean edge.
Repeat until you’re satisfied with the number of that motif on your wrapping paper. Use a straightedge to arrange motifs in even lines on your paper, if you desire that look.
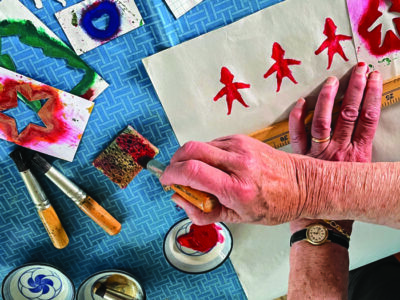
Check the back of the stencil from time to time to make sure paint isn’t accumulating on the back and messing up your image. If it does, wipe the back clean with a damp sponge and dry it gently with a paper towel.
If you need a second color in your image, cut a second stencil, carefully matching edges for complicated designs. Or, simply paint the second color on. Let your first color dry before adding the second, even if they don’t quite touch.
Negative stencils. The piece cut out of a stencil can be used as a negative (or reverse) stencil, producing, for example, a sheet of white Christmas trees, each surrounded with green. This works well with snowflake cutouts on white paper too, maybe with light-blue paint – but it could also give a little spookiness to images of trolls or elves, as if they aren’t really there.
To make negative stencils, place the image on the paper, and dip and “dry” the brush the same way as above, but work from the inside of the image outward over the edges. If using a snowflake cutout, iron it flat before stenciling, and stencil gently. Snowflakes cut from notebook paper have a short life span.
Paint Your Gift Wrap
To paint gift wrap, you’ll need one or two soft artist brushes in large, medium, or fine.
You can use the same little dishes of acrylic paint to run colorful lines between stenciled motifs, or simply to paint images. I like to line up big, red apples on one of my sheets, some with a single leaf, all with dark-brown or black stems.
Quite possibly, creating a painting on gift wrap is overdoing it, considering what’ll happen to most of it after it’s received. If you’re into destruction art, go for it. But you can make wiggly stripes, organized dots, a plaid pattern, or other designs without much trouble, and it’ll look good.
Note: You can purchase a textile medium to mix with your acrylic paints to stencil permanently on fabric, should you wish to make tablecloths, napkins, aprons, curtains, or baby bibs. Use the same application directions as for paper, but make sure your fabric is smooth and fastened down. You might want to do the stenciling or printing before you sew the item, which can give yourself a way out in case of blunders.
Stamping
For rubber stamps, you’ll probably need stamp pads rather than acrylic paints. Stamps were once the crafting rage; you can likely still buy a huge variety of both stamps and stamp pads at craft stores.
Homemade stamps or printing can use acrylic paints, and they have a lot of possibilities. To make your own stamps, you can cut designs into the sliced side of a potato. Dry the cut side with a paper towel, and then paint the color directly on the stamp, again with a damped-off brush. Use the end of a new pencil eraser for dots, cleaning it off between color changes. Slice open an apple, dry off the juice, brush paint onto a cut side, and make apple prints. (Don’t eat the side of the apple you used for printing, as some paints have toxic ingredients.)
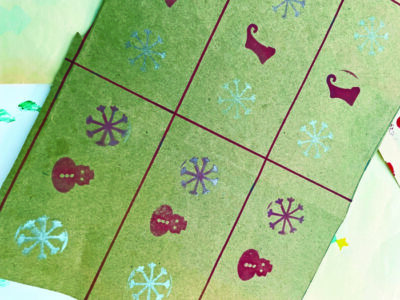
I did a gift-wrap session with my church’s Sunday school twice. The first time, we used stencils and stamps, and the children didn’t quite get it and put a couple of random motifs in odd places, coming nowhere near to covering the paper. The second time, the Sunday-school teacher carefully ruled brown wrapping paper into 2-by-5-inch rectangles and told the kids to put whatever stamps they wanted in each rectangle (see photo, below).
Good luck, have fun, and help the planet at the same time!
Tools and Materials
- Leftover paper of choice
- Plastic covering to protect tables and counters
- Stencils or index cards that’ll become stencils (Dover Publications’ themed booklets of stencils are available in bookstores and online. Their stencils are dye-cut into stiff, glazed paper and, if cleaned with a damp sponge after use, will last years.)
- Craft knife or scissors for cutting homegrown stencils
- 1 or 2 inexpensive finer artist brushes for smaller details
- Acrylic paint in colors of choice
- Small saucers for paint palettes, 1 or 2 colors max per dish
- Several stiff stencil brushes, 1 per color
- Small, damp sponges to dry brushes somewhat before stenciling (a cut cellulose kitchen sponge works well)
- Straightedge for laying out motifs
- Sponge (about 3 by 5 inches) for cleanups
- 1 or 2 inexpensive, medium-weight artist brushes for stripes, plaids, and dots
- Homemade or store-bought stamps of choice
- Water for rinsing brushes and saucers
- Table, clothesline, or clothes-drying rack to dry finished projects
Finishing Touches for Your Gifts
Ties
In my extended family, most of us knit and have a vast stash of leftover yarn from completed projects, so we usually tie up our gifts in colored yarn appropriate for the season. Brown-paper string or manila string can be decorative on a colorful wrap. Of course, you can save satin or fabric ribbon (and iron it too), but the crinkly, skinny stuff that curls when you run it over the blade of your scissors? Not really reusable.
Stickers and Tape
Stickers arrive in the average mailbox in sheets accompanied by requests for donations to various nature causes with pages of address labels. If you don’t want to tape your gifts with address labels, use the stickers, or buy plain or fancy tape.
To-From Tags
To make these tags, use 1-by-3-inch pieces of index cards with a stick-on stamp from an environmental organization on one end, or possibly a hole punched in the same end for threading on yarn. Some people just write the message on the gift wrap, which will limit who you can give it to the following year.
Robin Orm Hansen has written and illustrated handcraft directions for more than a decade, including projects in FACES, COBBLESTONE, Highlights for Children, FamilyFun, PieceWork, and Yankee magazines; and several books, most recently Ultimate Mittens (Down East Books), a collection of traditional mittens from around the world. She’s known for readable instructions and entertaining and useful commentary. With a doctorate in folklore and folklife from Boston University, she’s credited with bringing public attention to North American knitting traditions.


