
Learn how to build a survival shelter that’s simple, yet effective.
![]()
The first task you tackle in a survival situation should be building a bushcraft shelter because it’ll offer protection from hypothermia – one of the primary threats in a wilderness emergency. A well-built survival shelter will provide a good night’s rest and create a hub for your camp, helping you stay in place while waiting for search-and-rescue teams.
Additionally, building a survival shelter allows you to remain warm, sleep well, and avoid getting sick, so you’ll have the energy to tackle wild-food-gathering activities. No matter how warm the weather is during the day, or how practiced you are in survival basics, you should first and foremost take the time to appropriately address your bushcraft shelter before you do anything else.
Types of Heat Loss to Consider Before Construction
The key to wilderness survival is creating a bushcraft shelter that will reduce all types of heat loss. When our bodies are warmer than the surrounding environment, we lose heat through radiation. A good survival shelter will reduce this form of heat loss through insulation. You can achieve this by piling lots of dry leaves, grasses, and other debris inside the shelter, and by using lots of debris as part of the roof.
Heat loss through conduction occurs when heat transfers from one solid to another. When you sit or lie on the ground, heat transfers from your body into the colder ground. To reduce this form of heat loss, you’ll need to create a thermal break from the ground by piling up a mattress of debris in your bushcraft shelter into an insulating layer.
Convection is when heat is lost or gained by airflow. A good survival shelter offers protection from the wind. You can accomplish this by building in a naturally protected location; by creating a thick layer of debris the wind can’t penetrate; or by adding a layer of wind-resistant material to your bushcraft shelter’s exterior, such as slabs of bark or a layer of mud.
We all lose heat through respiration, because the air we breathe in is typically cooler than our body temperature, while the air we breathe out has been warmed by our lungs. A survival shelter can reduce this form of heat loss through a mostly sealed interior space. In a debris shelter, ensure the doorway is mostly sealed. By reducing the amount of air coming in and out of a shelter, your own body heat and respiration will help warm the interior and reduce heat loss, while still allowing fresh air to enter.
Body heat is lost quickly through evaporation when your skin gets wet. In survival situations, avoid sweating or wearing wet clothes next to your skin. To ensure dry clothing while building a survival shelter, work at a pace that’s below the sweating threshold, and shed layers when you get warm.
How to Build a Survival Shelter: Debris Hut
Because of its widespread usefulness, a debris hut is one of the most practical and versatile survival shelters you can learn to build. Effective in almost any climate, it’s suited to one or two people and can be warmed by body heat alone. This bushcraft shelter performs like a large sleeping bag, so keep the interior just large enough to fit your body. Its layers of debris will trap air and insulate you from the elements. Here’s a step-by-step outline on how to build one.
Step 1: Choose a Location for Your Survival Shelter
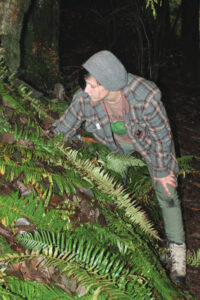
Search for a shelter location in or nearby a spot with an abundance of debris (such as dead leaves, grass, moss, and ferns), plenty of sticks of different sizes, and some potential ridgepoles. Your location should also be clear of hazards, such as large cottonwood, alder, and beech trees, which are known to drop large limbs (called “widow makers”); be away from the nests of ants and wasps; and be at a distance from creeks, riverbanks, and low points in the landscape where water can rise or pool during rainstorms.
To prevent drafts from entering the survival shelter, take note of the prevailing wind direction and plan ahead for the shelter’s doorway to be located on the opposite side. After you’ve found an ideal spot, start looking for a sturdy ridgepole.
Step 2: Find a Ridgepole
Find a strong, straight tree limb to use as a ridgepole – the supporting spine along which the rest of the bushcraft shelter will be built. The ridgepole should be about 8 feet long. It can be made from a downed log or branch, standing dead tree, or even a live tree you’ve cut down.
The ridgepole should be strong enough to support your entire body weight, so test it by hanging from it or by carefully standing on the pole while it’s leaning against something at an angle. If it passes the safety test, place the pole so one end is raised onto a nearby stump, a fork in a tree, or other similarly supportive natural feature. Position the pole’s highest end at about waist height, and the other end slanting down to and resting on the ground.
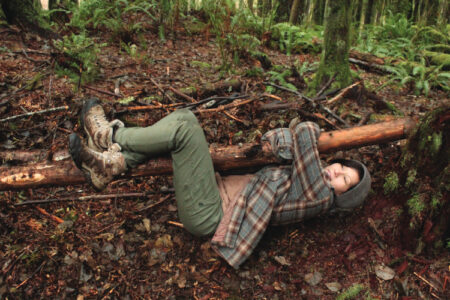
Adjust the length of the ridgepole and the placement of its bottom end until your body can fit underneath without much extra space. Test this by crawling underneath the pole. It should touch the ground just past your feet, with enough clearance that the tops of your shoes don’t project above the pole.
If needed, prop up the bottom end with a stone or piece of wood to create space for your feet. As you lie beneath the ridgepole, mark the ground with sticks about 6 inches out from both sides of your body. This is where the ribbing sticks placed in Step 4 will touch the ground. Although debris huts are supposed to be snug, they shouldn’t be so cramped you can’t straighten your legs or turn over.
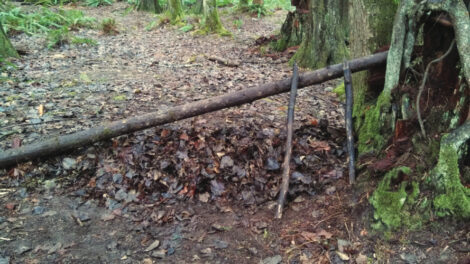
Step 3: Make a Mattress
Create a debris mattress to insulate your body from the ground by piling up at least 1 foot of debris (dead leaves, mosses, ferns, soft evergreen branches, and so on) within the footprint of the shelter. Dry, fluffy material is preferable. If conditions are wet during the construction process, try kindling a small fire outside the shelter for drying debris. Pile the debris around the fire and turn it over periodically so the heat from the fire can dry out the material, and then stuff it inside the shelter. Dry debris will increase your comfort and help you get a better night’s sleep.
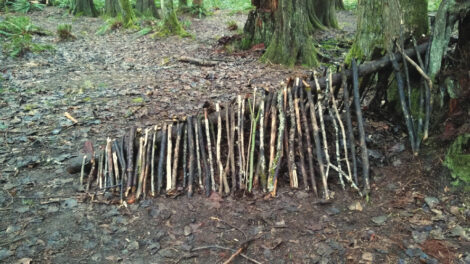
Step 4: Ribbing Sticks
Add ribbing sticks to the ridgepole spine. Gather several large armfuls of sticks of various lengths. The sticks should be a minimum of two finger widths thick, and strong enough to support the weight of the debris you’ll be placing over them. Ribbing sticks need to span the distance between the ridgepole and the ground, but not extend past the ridgepole. Set them along the ridgepole as close to each other as possible to prevent debris from falling through later on.
Place the ribbing sticks on the ridgepole at about a 45-degree angle. Any steeper, and the exterior debris will likely slide off; any shallower, and water will probably penetrate. The top ends of the rib sticks shouldn’t project more than 2 or 3 inches past the ridgepole, because this can channel water into the shelter during heavy rain. Remember to leave a space for a door.
Step 5: Create a Doorway
Leave a small gap without ribs at the highest end of your bushcraft shelter, near where your head will rest when you’re inside. The doorway should be just big enough for your shoulders to fit through. Keeping it small will reduce heat loss and make it easier to plug the door when you crawl in for the night.
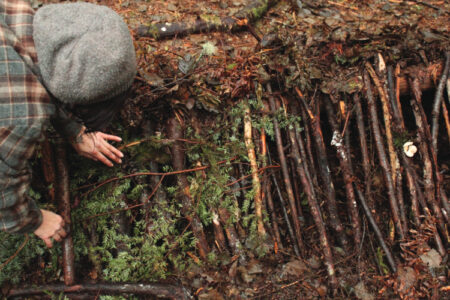
Step 6: Latticework
Gather several armloads of long, thin, feathery branches. Place these latticework sticks on top of the ribbing in different directions (not woven into it). The shelter will look like it’s covered with a web of sticks. This latticework will hold in place the debris you apply in Step 7. Place several overlapping layers of latticework on the shelter to minimize the chance of debris falling through. Cover all the ribbing, including above and alongside the doorway.
Step 7: Add the Debris
Pile a tremendous amount of debris on top of the latticework. This vital step will take up the most time and effort in shelter construction. The most efficient way is to collect large amounts of debris each time you need it. You can use a garbage bag, jacket, or tarp to help gather large amounts. Improvise with whatever you have at hand.
Gather many armloads of any kind of fluffy material available, including leaf litter, small conifer boughs, ferns, mosses, pine needles, and even grasses. Then, poke your head inside the shelter to note where light is penetrating, and add material to those spots. Continue checking and adding more material until no light penetrates. Aim for 3 feet of depth on all sides of the shelter. A good way to test the debris depth is to gently work your fingers into the material and move them down and in until you can feel the ribbing sticks. Is the debris layer all the way to your armpit? If not, keep adding more! The more debris you add, the warmer your shelter will be.
Next, pack the inside of the shelter with dry debris, on top of the debris mattress, all the way to the ceiling. To keep you warm, this inner debris layer needs to contact your body on all sides (except your face). Any large airspaces inside the shelter will become cold spots if they’re not filled with debris.
Step 8: Plug the Doorway
You must have some means of plugging up the doorway after you’ve crawled inside the hut. One way is to fill a bag or extra jacket with debris. If the doorway is small enough, you can use a backpack. If neither of those options is possible, gather a large pile of debris and pull it into the doorway as you crawl inside the shelter.
Enter a debris hut feet first, being careful not to disturb the debris walls, and plug up the doorway as you crawl in.

Test Out Your Survival Shelter
I encourage students at my wilderness school to practice their survival skills by making a test debris shelter. Many subtle skills can be learned only through practice. Try sleeping in your test shelter for a few nights, and then make adjustments until you feel it’s in optimal shape. Experiment with different kinds of insulating materials for both the interior and exterior of the debris hut. Sleep in your bushcraft shelter during a variety of weather conditions, including rain and snow.
Always be cautious when practicing survival skills. Tell people you’re sleeping in a debris shelter so they’ll know where you are and when you expect to return. Bring along a backup sleeping bag or wool blanket in case you get too cold during the night. If you start to shiver or feel extremely uncomfortable, get out of the survival shelter and warm yourself with jumping jacks or by jogging in place. Then, climb back into the shelter with your backup sleeping bag.
As with all survival skills, bushcraft shelter building requires practice in the field to build your confidence and proficiency. Invite your friends and enjoy building practice debris shelters together. Many hands make light work, and differing viewpoints can produce useful observations that could come in handy during a real survival situation. Plus, it can be lots of fun!
Avoid Leaks During Storms
It may not be insulated well enough. Add more debris and observe the changes. If the problem persists, examine the ribs. If they’re not set at a 45-degree angle, it might be worth your time to carefully remove all the debris and adjust the rib angles. You may find some of them are too short or too long and you’ll have to collect more. Any that project more than a few inches beyond the edge of the ridgepole must be shortened, or they’ll become channels for water to run down into the interior of your survival shelter.
Remember to Insulate
An obvious cause is insufficient debris on the exterior. But if the debris is at least 3 feet thick, consider other possibilities. Perhaps the shelter is too large, and therefore warm air isn’t being kept close to your body. You can fix this by rebuilding the shelter at a smaller scale, or by stuffing extra debris inside.
You can also minimize heat loss via conduction by ensuring your body is well-insulated from the cold ground with a thick debris mattress. If you skimp on debris inside, even 3 feet of debris on the outside likely won’t keep you warm. Lying on wet debris will also make you cold, so choose only the driest and fluffiest materials you can find. If that’s not possible, try drying out some or all of it by a fire.
Jason Knight is director and co-founder of Alderleaf Wilderness College (www.WildernessCollege.com) in the foothills of the Cascade Mountains. He’s a seasoned wildlife biologist and wilderness educator. This is an excerpt from his book, The Essential Skills of Wilderness Survival.


