
Learn how to build a DIY mudroom with the author as he chronicles replacing and extending his home’s mudroom addition.
When I moved to my 1907 four-square farmhouse a few years ago, I was pleased that it was equipped with a mudroom. In this particular case, the approximately 8-foot by 8-foot mudroom was part of a hip-roofed addition that had been made on the southside of the house in the late 1940s by enclosing a covered entryway. The addition included a small main floor bathroom of about the same dimension. Since the old mudroom housed the washer and dryer as well as the hot water heater, it was barely more than a cluttered corridor that led to the kitchen door. I knew right away that I’d need to make a new mudroom before too long.
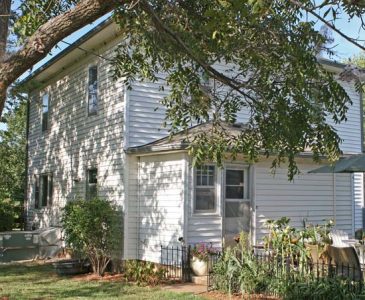
Just about a year ago, in the process of making several other changes around the place, the walls of the old mudroom were torn off the house — I figured I had at least 6 months to make a new mudroom of the old space before winter arrived to freeze the exposed pipes. Since the house and the ground around it were already torn up, I decided to make the new mudroom larger than the original. My first step for making the new mudroom was to pour a concrete slab over an existing patio (complete with footings) to support the walls. I hired this done because concrete intimidates me.

Once I had the slab paid for, I commenced to frame the new space — actually it took me until October to begin the framing. I used treated lumber for the bottom plates and regular stud-grade lumber for the studs and top plates and the like. I used blue Tapcon concrete screws and Liquid Nails construction adhesive to secure the the bottom plates to the slab. I didn’t tear off the old roof until absolutely necessary to protect the existing bathroom, which is behind the aluminum-faced Celotex-clad walls.
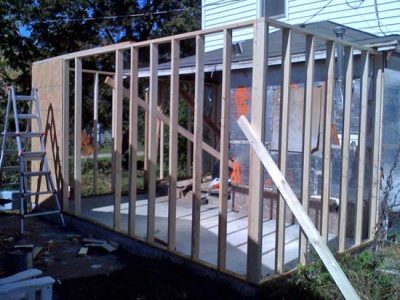
In a more perfect world, I would have removed the old roof before framing, but this world is not perfect. By the end of October, I was just about ready to remove the old roof to frame up the new mudroom.
Framing under the old roof was a total pain, but I really was worried about rain ruining the bathroom.
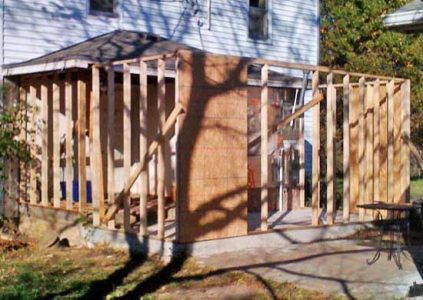
Since I am not a very good carpenter (I don’t know jack about creepers), I decided to go with a regular old gable roof instead of the hip. I am good at math so laying out the common rafters and cutting them was fun. Setting the ridge board all by myself was a trick, but it wasn’t too difficult. It took me three days of vacation to get from the last photo to this one — luckily I scheduled the vacation when Mother Nature scheduled 6 consecutive days without rain. Notice the interior framing of the new mudroom. The room to the right will house the hot water heater, washer and drier. The long room on the left will be the entry way and pantry. I got the thing shingled and partially sided by Thanksgiving — and then the arctic blast hit.
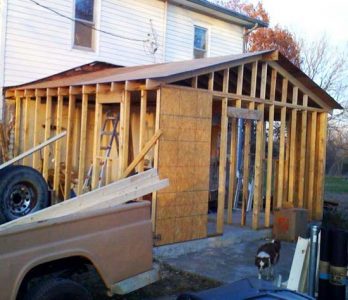
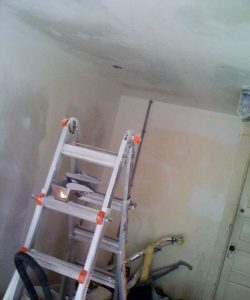
When the weather turned bitter in early December, I hurried to get the windows and door installed. I wrapped exposed pipes with heat tape and insulation — pipes still froze, but thankfully none broke. With the help of a propane-fired construction heater, I warmed up the space sufficiently to run wiring in the outside walls and in the ceiling. Then in January, I stuffed insulation between the studs and ceiling joists, and sheet rocked — suddenly it was much warmer inside and pipes remained not-frozen, even on a zero-degree night. My partner in culinary crime helped with rocking the ceiling — oh what a pain that was without renting a jack. I finished up the plumbing last week and need to mud some of the sheet rock still, but I can see the end in sight.
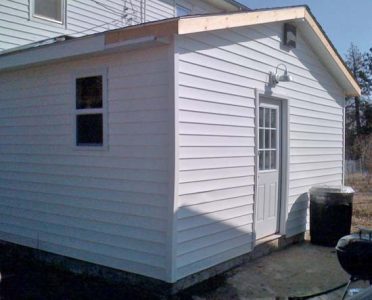
My DIY mudroom still has a way to go — and I need to adjust the siding on the house — and install a new electrical drop to replace the gnarly wiring that I inherited with the place — and oh so many other projects. But it’s good to have projects.
Check out Hank’s continued home improvement projects, like his multipurpose key cabinet and pantry cabinet builds.
Hank Will raises hair sheep, heritage cattle and many varieties of open-pollinated corn with his wife, Joanne, on their rural Osage County, Kansas farm. His home life is a perfect complement to his work as editor-at-large at GRIT and MOTHER EARTH NEWS.


