
Excerpted from American Axe by Brett McLeod. Used with permission from Storey Publishing.
Anyone can whip out their credit card and buy a new axe, but “certified” axe junkies face uncontrollable excitement when they spot a dark corner at the flea market filled with rusty, broken-handled axes. This, my friends, is the intersection of opportunity and euphoria. Once you’ve made the deal or have struck rusty gold digging at an old barn site, it’s time to start the restoration. Since the axe you start with is likely to be covered with a thick coat of rust, treat it as if you’re an archeologist, peeling back the layers of oxidation without damaging the steel (including any etchings) below. In a matter of hours, most axes can be transformed back into a work axe that’s ready for another century of use — or simply a mantel piece to be admired.
Finding Vintage Axes to Restore
Seeking out old axes and restoring them is well worth your time. It’s estimated that from 1850 to 1950, more than 10 million felling axes were produced by hundreds of different axe manufacturers. During this period, manufacturers had easy access to quality steel, and competition among forges meant the quality of axes produced remains unprecedented to this day. Relatively few high-quality felling axes are still made, but barns and basements continue to be great places to find a quality vintage axe just begging for a second chance.

Finding a vintage axe to restore is easy if you know what to look for. Don’t get hung up on the state of the handle. In most cases, the old handle will be brittle, cracked, or rotted near the eye, and you’ll need to replace it. Instead, focus on finding a salvageable axe head.
Size. A standard felling axe weighs 3-1/2 pounds. A longer, thinner-bitted axe will slice through wood more easily, while a short, chunky axe is better suited for splitting, where you’re not actually cutting the wood but simply “popping” the wood apart along the grain.
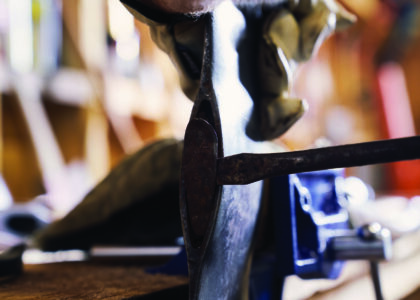
Numbers etched on the cheek of the axe often reference its approximate weight. (See image, below.) The larger number is pounds, and the smaller number is understood to be the denominator under the numeral one, so this would be a 3-1/2-pound axe.

Markings. Virtually all quality axe manufacturers included their name or etching on the cheek of the axe; in some cases, a bit of steel wool is needed to reveal a clear enough stamp or etching to identify the maker. Some of the more notable makers, who used high-quality steel in their axes, were Plumb, Kelly-True Temper, Mann, Collins, and Council.
Bit condition. The bit of the axe is where the work is done, so it’s important that the bit is relatively free of chips. A chipped bit will create resistance, known as “drag,” when you try to chop. Therefore, it becomes necessary to grind the bit until the chip is gone. The problem is that grinding the axe creates a shorter, stouter bit that doesn’t cut well.
Toe arc. The toe should carry the same arc as the rest of the bit. If it’s rounded off, that’s a telltale sign the axe has been used for cutting roots, or maybe even sharpening rocks. This is problematic, because an overly rounded bit coming in contact with a round log increases the odds of the axe glancing, or deflecting in an unsafe direction, as the two rounded surfaces make contact.

Eye condition. The eye is the only point of contact between the handle and the head of the axe. An eye that’s even slightly out of plumb means the axe will never swing true, creating just enough deviation in the swing to cause the axe to glance — and potentially score a date with your shin. There are two potential causes for an untrue eye. The first is a defect in the manufacturing process. When an axe is made, the eye is generally cut using a punch. If the punch isn’t perfectly aligned, an off-center eye will result. The second is a result of misusing the axe as a sledgehammer. Because the steel on the sides of the eye needs to be thin to achieve a narrow profile, it’s particularly susceptible to bending and warping. This deformation often prevents the handle from fitting properly. It’s best to avoid any axe that shows an off-center or deformed eye.
Poll condition. The poll is located directly behind the eye of the axe and is commonly “mushroomed” as a result of the axe being used as a sledgehammer. In cases of minimal damage, the burred edges can be lightly ground. In other cases, hairline cracks may extend from the eye into the poll, or the eye may be deformed, as described in the preceding paragraph. As a general rule, avoid axes with severe mushrooming and cracks.
A New Handle for An Old Axe
If an old haft, or handle, shows any signs of deterioration (cracks, a loose head, or a rotted eye), begin your restoration by fitting a new handle that you can safely clamp in a vise when you need to sharpen the head of the axe later on. “Hanging an axe,” as woodsmen often call the process of fitting a handle, is as much of a skill as swinging or sharpening an axe; it requires both patience and practice.
The expression “to get the hang of it” originated with lumberjacks who were referring to a proper union between haft and head. If a haft fit poorly, the jack would often proclaim, “I just can’t get the hang of it,” meaning, “I just can’t get it right.”
A common temptation is to toss the head in the fire to burn out the old handle, but this is a bad idea. Doing so changes the temper of the axe, in most cases making it more brittle and prone to cracking. Instead, the old haft should be sawed off and removed from the top down.
Pry or drill out the wedges. If the wooden wedges in the top of the handle are dry and brittle, they can be pried out with a screwdriver or chisel. If the wedges are firmly in place, it’s best to use a drill to remove enough wood that the plug can be popped out. Drill from both the top and the bottom of the head.
Drive out the handle. After the wedges are removed, place the head on two wood blocks, so you can drive out the handle with a hammer and a “drift” (a block of wood or steel that’s slightly smaller than the eye of the axe). For axes that have a larger eye at the top of the head than at the bottom, flip the head over to drive out the handle.
Selecting a New Handle
To finish your axe restoration, select a new, high-quality, hardwood handle that’s straight and has the right grain orientation.

Straightness. Handles are generally sawn out of hickory or ash logs and then turned on a duplicating lathe. Depending on where the tree grew and how the log was sawn, the handle may twist or bow. With the exception of broadaxes, which have intentionally curved handles, replacement handles should be examined for trueness. By holding the eye of the handle just below your eye, visualize an imaginary line on the handle running from end to end. Does the handle hold true to that line, or does it bow either left or right, or twist? Only straight and true axe handles should be used; a twisted or curved handle can make the axe glance, causing injury.
Grain orientation. The end of the axe handle is known as the “doe’s foot” and will indicate which way the grain runs. Ideally, the grain should run parallel to the bit of the axe. Handles in which the grain runs perpendicular to the bit are inherently weak and snap under percussion.
Growth-ring width and quality. Tight, narrow rings on the handle indicate slower-growing wood, which makes for a stronger handle. The color of the wood is also important: Is one side of the handle dark wood and the other side light wood? The dark wood represents heartwood, which is dense but brittle. The lighter wood is the more recently grown sapwood, which is strong and flexible. An axe handle made entirely of sapwood is best; one made of both sapwood and heartwood is more likely to fracture.
Hanging the Handle
Although much attention is given to sharpening axes, hanging the axe properly is just as essential. If a head is hung crooked, the axe will glance off the wood. If it’s hung too high or too low, it’s susceptible to breaking. And if a handle with defects is used, you’ll likely find yourself repeating the hanging process sooner than you’d like.
Fit the eye. File the eye of the handle with a rasp until the axe head fits on the shoulder of the handle; the fit may have to be fine-tuned to get the handle to hang perfectly straight. Check for trueness by aligning your eye with the axe head and looking down the handle.
Mark and cut. Mark the head location on the handle. The wedge slit can be extended with a thin-bladed handsaw, if necessary; it should extend to within 1/2 inch of the bottom of the axe head. Cut off any excess handle above the axe head.
Drive the head. With the axe handle fitted into the head, pound the doe’s foot with a rubber or wooden mallet. This drives the head onto the handle.
Drive the wedge. When the handle of the axe hangs true (straight or plumb), drive in the wooden wedge with a mallet. Saw off the top of the seated wedge with a coping saw.
Apply a coat of oil. A coat of linseed oil will help keep an untreated handle from becoming brittle or cracked. If the new handle is finished, use medium-grit sandpaper to remove the varnish (which can make for a dangerously slick axe handle in wet conditions), so the wood can be treated with linseed oil.
Excerpted from American Axe by Brett McLeod. Used with permission from Storey Publishing.
What to Do with Crooked Handles
The handles of used axes that have spent years stowed in a damp corner may develop several inches of “sweep,” or curvature. While this isn’t suitable for a felling axe, these curved handles make great offset handles for hewing axes. Crooked handles at the hardware store can be a bargain too. Store managers are usually happy to have them out of inventory, and will usually let them go for a 50 to 75 percent discount.


