
Engage the whole family in the homesteading lifestyle, and have fun in the process, by teaching kids to sew.
Getting children interested in and passionate about sewing is more than just buying those huge plastic needles, colorful yarn, and throwing down some crisp construction paper. That just ain’t gonna fly next to all the other stuff competing for your child’s attention.
Having recently become foster parents, my husband Josh and I began thinking of creative ways to get the children interested in simple living. This is no easy task.
We started with cooking, baking bread and cookies to give away, and making homemade laundry detergent. The children loved each task and seemed to grasp the beauty of ownership when presenting their homemade goodies to friends and family. The words “I made these just for you” build so much confidence. Yet there was more to our lifestyle than simply cooking and creating household cleaners.
Just as any other thrifty and active family, we have a constantly growing mending pile. As I pulled out my trusty sewing machine to tackle ripped jeans, torn sleeves, displaced pockets, split seams, missing or broken zippers, and countless button issues, I realized that we hadn’t yet introduced our children to sewing.
Tips for Teaching Kids to Sew
Sewing is a foundation block of our household. I’ve made drapes, pillows, quilts, tablecloths, aprons, washcloths, towels, clothing, and countless other money-saving items. I haunt the local flea markets and yard sales for scrap fabric all summer long. But how to get my children on board?
Select the Best Fabric
Let your children choose their favorite colors and patterns. Make sure the selections are easy to wash and durable with great textures.
Choose the Right Project
Keep it simple and useful. My advice? Begin with a drawstring bag. Regardless of your child’s interests, they will love special bags to stow away their favorite knick-knacks and trinkets.
Make It Fun
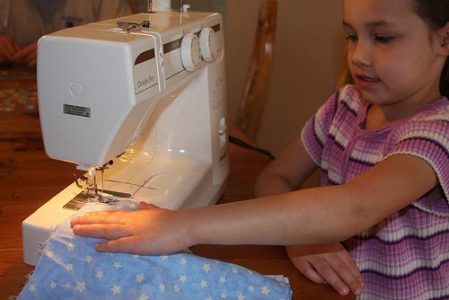
Keep in mind that you may be doing a lot of the work yourself, but that’s okay. Tell the kids everything you are doing as you do it. Pretend to be a television sewing guru. Use different accents. I like to pull out my best Robin Leach voice and be their guide as we place pins and measure seams. The fact that I am pretending to host Lifestyles of the Rich and Famous beside a gargantuan mending pile does not escape my notice. That’s just how we roll at our house.
Depending on the child, you may allow them to use the pedal, thread the needle, put pins in place, and guide the fabric.
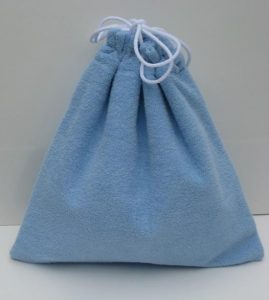
Sew a Drawstring Bag
Supplies
- 1 fat quarter (18″x 21″ fabric sections)
- 1 yard of ribbon or yarn
Directions
- From your fabric, cut one piece that is 6″ x 6″ (6.5″ x 6.5″) and one piece that is 9″ x 21″ (10″ x 24″).
- Place the right side (RS) of square facing up, lay the corner of the rectangle about halfway down the square, RS facing down. Sew it in place using a 1/2″ seam allowance starting 1/2″ from the start of the rectangle. (All that “right side” business means is that the pretty sides of the fabric are facing each other.)
- By carefully folding your work, continue sewing the rectangle to the square until you have made your way back around to where you first attached the rectangle with 1/2″ to spare.
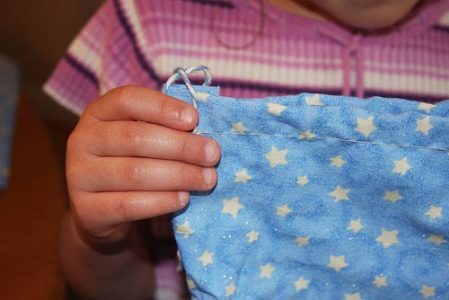
- Turn your work and sew up the bag stopping 3″ from the top to create a lidless cube, of sorts, with a “V” shaped gap at the top. Now, fold the edges of the “V” over ¼” and sew them to the back side of the fabric. This is where the drawstring ties.
![]()
- Fold the top down 1-1/2″ with your ribbon or yarn in the fold. Feed the string through the “V” and tie the ends together so they do not slide back through the channel for you to fish out later. Pin the flap down and sew it all the way around.
- Turn your work right side out and admire your handy work.


