Learn how to incubate chicken eggs and raise chickens by hatching your own chicken eggs.
Being “refugees” from the hustle and bustle of city life, we retired to a rural setting, where we bought raw acreage and began the process of developing it with a house and a couple of outbuildings for storage and shop facilities. It was the beginning of our brave attempt to be as self-reliant as possible. We had little previous experience with rural living and took the learn-as-you-go approach.
With the advent of spring one season, we were looking to replace a few of our chickens. When first considering livestock, we settled on raising chickens for eggs and meat; we bought 15 chicks at the local feed and grain store, ending up with 13 hens and two roosters. While the chicks were housed in temporary brooder facilities, we quickly constructed a coop and an appropriate outside run for that size of flock.
Once mature, the hens laid anywhere from six to a full dozen eggs a day in the first year, depending on their moods, the weather, and the season. The roosters fought and played Casanova to the hens throughout the year, with one becoming dominant and the other so intimidated he could not go outside without being chased back into the coop.

Let’s try this
The idea of motherhood seemed completely foreign to our hens, and egg-laying became more or less a drop-and-walk-away affair. Around the first week of April, a co-worker loaned us a tabletop incubator so that we could try our hand at hatching eggs.
Not knowing what we were doing, we hit the books, reading up on the subject of small-scale egg incubation. While nothing is fixed in stone, we knew that it would take 21 days to hatch, that the temperature needed to be maintained continuously at 99 degrees (ideally 99.5 in a forced-air incubator, and 102 in a still-air incubator) with a 10-minute cooling period twice a day, and that the humidity should be a constant 75 percent, meaning adding water to a trough in the incubator at least once a day — this all depends on the model of incubator you are using. Also, if your device doesn’t have an automatic egg turning device, you’ll have to be on hand every day, at least three times a day, to manually turn the eggs side to side, not end to end — the pointed end of an egg should never face upward. Eggs need not be rotated after the 14th day of incubation, and during the last three days, they should not be rotated — this allows the chick to become oriented and prepare for breaking out of the egg.
Check the instructions given in your incubator’s owner’s manual for temperature, rotation and humidity directions specific to your model.
We should also calculate a percentage of the eggs we try to hatch as infertile, another percentage of embryo deaths in the batch, and yet another small percentage of chicks that might die in the process of hatching. Hatched chicks were to be kept in the incubator for 24 hours after hatching, and on and on.
With a possible 30- to 50-percent loss during the process (we grossly underestimated the hardiness of chicks, as most sources offer 85 percent should be the success rate in most modern-day incubators), and wanting to successfully hatch maybe 10 new chicks, we loaded the incubator with 23 eggs — about three days of laying — and began the process, checking the thermometer in the incubator every couple of hours, adjusting the heat control accordingly, and filling the water trough when needed, all the while wondering if we were just wasting our time and electricity.

‘Murphy’s Law’ rears its ugly head
Then, like clockwork, on the 21st day, we watched the first chick pip then break the shell and emerge, wet and a little pathetic, yet miraculous. By 6 p.m., three had hatched and were drying out and fluffing up. Then at 9:55 that night, while the other shells were beginning to crack, our power shut down.
We had previously received a letter from our electric utility company announcing power outages in our area for up to 12 hours for replacement of substation equipment, though they had neglected to give any schedule of dates.
Retiring to bed that night, we expected to wake up in the morning to a bunch of dead chicks, unhatched eggs, and a realization of 21 days of wasted effort. Our only hope was that the outage would only last a couple of hours. Waking up at 3 a.m. to no electricity and a few muffled chirps from the incubator, it seemed safe to hope that maybe the three or four that hatched earlier might make it through the night. I dismissed all of the rest as goners.
At exactly 9:55 a.m., the power was re-established. The outage lasted exactly 12 hours to the minute. Before surveying the electric utility’s potential massacre, we brewed our morning coffee and found any other conceivable reason not to open the incubator and clean out the expected mess. When logic failed and it couldn’t be put off any longer, we opened the lid of the incubator.
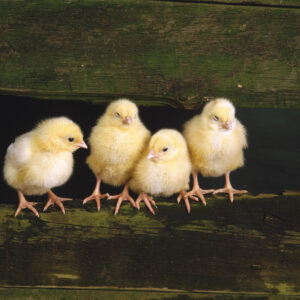
We were immediately inundated with chirping and scurrying chicks. Eighteen had hatched, and more eggs were cracking open. By the end of it all, 22 of the original 23 eggs hatched successfully with only one remaining intact. Two chicks subsequently died within a couple of days, which is commonplace, leaving us with an even 20 chicks to care for. As it turned out, there was an even split of 10 hens and 10 roosters.

Oh no, where do we go from here?
Because a cardboard box in the laundry room isn’t much of even a short-time solution to hold 20 chicks for very long, we built a 4-foot-by-8-foot brooder with coop and pen for the chicks, with plans to build a second one within days — the first might become overly crowded within a couple of weeks.
With the first one finished and the chicks relocated to it, the construction of the second coop started. Within a week of each other, a couple of hens from our original flock decided that motherhood was not such a bad idea, going broody and refusing to leave the nests in their coop. One was sitting on 10 eggs, while the second hen was sitting on six more. Trying to move them only made them growl and peck at one’s hands — yes, chickens can growl.
So plans and priorities were adjusted to build two broody hen pens (Maternity Wards), one for each setting hen, allowing them a peaceful place for their 21-day hypnotic trance.
Of course, with the heat of an early summer arriving at the same time, this meant a crash program in coop and brooder building in temperatures reaching into, and topping, triple-digit readings. The first brooder built was getting too small for 20 growing chicks, so once the Maternity Wards were finished, it was time to jump in and finish the second brooder pen. The next step was to separate the hens from the roosters in the original incubator-hatched batch and build another henhouse and yard, complete with roosts and nests.
In order to keep fighting to a minimum, and to give the hens a break, a rooster coop and pen also had to be built before the cockerels discovered their mission in life. Upon completion of the hen house and pen, the only thing left was to build a rooster house so that the roosters could be systematically cycled between the hen house and their rooster quarters, giving all of the hens a break from their incessant mating activities.
And what of the sitting hens? Well, the first one hatched all 10 of her eggs, so there were 10 more chicks, and the second one hatched three of the six eggs and abandoned the other three once her chicks were hatched, so into the trash they went. Of the 13 chicks that had hatched, the rooster population grew by five more.
Combined with the incubated chicks, we ended up with a total of 15 roosters and 18 hens, which is about right when you consider the odds are truly 50-50.

Lessons learned
Continuous habitation of roosters and hens in a single coop and pen is not the greatest idea, as we learned from raising the original flock. Roosters are aggressive when it comes to their favorite hens and have only one thing on their minds. Not only is there constant fighting, there’s also constant mating, tearing the feathers off of the hens and literally running them ragged. A good rooster to hen ratio — something like one rooster for every 10 hens — will help mitigate this effect.
What started out as an experiment in self-sufficiency as far as eggs and meat is concerned, expanded proportionally from one hen house and pen to a couple of additional full-sized coops, a couple of brooder pens that doubled as emergency isolation facilities for sick or injured birds, and a full-time rooster house.
Beginning with a flock of 15 and ending the spring with a total flock of 48 meant that as the older birds aged beyond a productive life, others were readily available to take their place. Eggs were in abundance, allowing us to supply extended family members and sell off the excess at a local farmers’ market along with crops that we harvested. The roosters and some of the hens were sold either as meat or as pets. Twice every year, a regular customer buys off all of the roosters we put up for sale.
While it initially appeared as an overwhelming situation, things worked out to our benefit, despite forcing us to expand more than we wanted to at the time. But we now have adequate facilities available for subsequent years.
We learned quickly to be realistic in what we wish for, making future hatching seasons more manageable and a little more predictable, though not entirely. However, being prepared with all of the structures in place even before they were needed would have made life a lot easier.
Still, we agree that coming from the life of urban comforts, we wouldn’t trade our first incubating and brooding experiences for anything that the city lights can offer.

Isolating the young
Broody hens should be separated from the flock to hatch and raise their young until the chicks are big enough to protect themselves, because chickens don’t have the smarts to consider small chicks anything but a meal, like the bugs that they scrape up from the ground. Adult chickens can appear to be pretty aggressive to another’s young.
Collecting eggs for incubation
Given that the typical egg takes 21 days of incubation from start to finish, one might expect that as the chicken keeper collects eggs in the nesting boxes, she should immediately place them in the brooder and begin the process. This isn’t so, and we have Mother Nature to thank. In nature, just-laid eggs remain dormant for a time, allowing the mother hen — or you — to accumulate a larger collection before beginning the process of incubation. The ideal temperature for storing just-laid eggs awaiting incubation is 55 degrees. Also note, the longer you store dormant eggs before incubation, the lower the success rate, and after six days of storage, the hatchability will drop significantly, roughly 1 percent per day. Gail Damerow, in Storey’s Guide to Raising Chickens, says she’s no longer comfortable trying to hatch eggs that have been stored for more than 10 days.

B.P. Lemmon and his family live in Corning, California, where they continue to enjoy raising chicks.


