Can your harvest safely with this primer on water bath canning vs pressure canning for beginners. Includes a homemade apple jelly recipe to get you started!
Cooking with vegetables fresh from my little garden brought me so much joy. Summer’s end was fast approaching, however, and the rewards of the summer’s hard work would end with the first cold snap. But did it have to? Why should I spend the winter using inferior canned tomatoes when I could enjoy my own heirlooms? Canning was the answer, and a guide to canning food would be very helpful for all undertaking this pursuit.
The prospect of home canning can be intimidating. I wish I could say I learned as a child at my grandmother’s side. The real story is that I learned alone with a shiny new boiling water canner, a “Ball Blue Book,” and the Internet. I was shocked at my success, but the fact is so many resources are out there for the uninitiated that anyone can tread fearlessly into home canning.
Once you know the basics of water bath canning vs pressure canning, you can start your home canning journey with the simple Homemade Apple Jelly recipe below!
Worth the bother
People choose home canning for many reasons. Memories of families getting together when their favorite fruit ripened and working in a steamy kitchen are enough to bring some folks back year after year. Others seek to reap the fruit of their labors long out of season, every jar of pickles stretching summer’s bounty a little further. Many appreciate that home canning is environmentally friendly in a tangible way: glass jars can be reused for years (or in my home, repurposed as drinking glasses), a bumper crop that would spoil before it can be consumed doesn’t go to waste, peels become compost, and fuel is not used to transport goods from farm to factory to table.

A parent would be hard pressed to find a better way to encourage environmental stewardship and self-sufficiency in a child. Choosing and preparing the produce yourself gives you control over the use of pesticides, sodium, sugars or potential allergens. Still others choose to home can to provide healthy food for their families. Homegrown vegetables are higher in nutrients than their commercially grown counterparts, and home canning means nutritious vegetables can be preserved at the height of their freshness without chemical preservatives.
Kim Krapcha of Oschner Hospital in New Orleans says, “With home canning you can preserve the foods at their peak ripeness. This means vitamins and minerals are at their highest concentration, which gives the home canner the best, most nutritious food available. Home gardeners often use fewer pesticides — if they even use them at all. This translates to far fewer harmful chemicals being trapped in canned foods and becoming a health hazard. Chemical preservatives aren’t used in home canning, which means foods retain their natural flavors, textures and nutritional value.”
Getting started
Home canning is a good idea for so many reasons, the only real question is how to go about it?
The good news is that many great (and free) resources are available for beginners. Your local cooperative extension system is a great source of information. Many have books and websites covering all the basics, including recipes and canning guides. Not all recipes found online are reliable, so stick with those approved by the U.S. Department of Agriculture
Dr. Jean Weese, professor and extension specialist at Alabama’s Auburn University, recommends the National Center for Home Food Preservation for a complete listing of USDA tested recipes. Several recipe books also are available, the “Ball Blue Book” being a perennial favorite. Ball also offers tutorials, instructional video, and step-by-step recipes on its website, Fresh Preserving.
Water bath canning vs pressure canning
Whatever resource you choose to guide you, the bottom line is this: The golden rule of canning is “acidity is everything.”
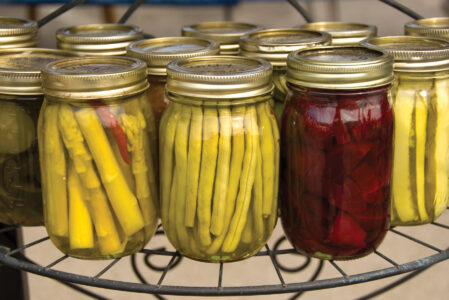
“Foods that do not have acid require pressure canning. These are foods such as green beans, peas, corn, potatoes and many others,” Weese says. “When you place food with no acid in a jar and seal it with a vacuum, you have created a great place for Clostridium botulinum to grow. This organism, when placed in the vacuum environment, can start growing and create the deadly botulinum toxin, which causes an illness known as botulism. If a person consumes even a small amount of this toxin it can result in death.”
The natural acidity found in some fruits and vinegar provides an inhospitable environment for botulism-causing microorganisms. Foods without this acidity must be processed at a temperature that cannot be reached in a boiling water bath, and so a pressure canner must be used.
Spoilers are everywhere
The causes of food spoilage are constant: loss of moisture, enzyme activity, exposure to oxygen and microorganisms. The process of canning slows the activity of spoilage enzymes, creates a vacuum that seals in moisture and keeps oxygen out, and prevents growth of undesirable microorganisms like mold, yeast and bacteria. Choosing fresh produce and cleaning it thoroughly also is important because micro-organisms live on the surface and can spread in bruised or insect-damaged fruits and vegetables.
Weese recommends jams, jellies or pickles for the beginner because the recipes are simple and forgiving. In that light, we’ll go step-by-step through a simple Apple Jelly recipe that is as delicious as a glaze for pork loin as it is spread on English muffins.
Putting on the pressure
Pressure canning can be a little intimidating for folks unfamiliar with a pressure cooker. When I first began canning, I would only approach my pressure canner using a pot lid as a riot shield. (Later, through a Google search, I learned that the pressure-regulating weight on my particular model is supposed to rock “more aggressively” than other models; at the time, though, I was convinced I was going to be killed in a tragic green bean accident.)

You also will need jars with two-piece self-sealing lids in an appropriate size for the type of food you are preparing. (Do you really need a half gallon of jelly?)
Remember that bands and jars can be reused (as long as the rings are free of rust and the jars are free of scratches or chips), but the lids cannot. You must use a new lid every time to achieve a good seal. You also will need a plastic spoon, a ladle and a funnel. Other inexpensive canning tools are available to make the job easier and safer. Jar lifters, headspace tools and magnetic lid lifters will keep your fingers out of trouble and can be found wherever canning supplies are sold.
Start canning: Homemade Apple Jelly recipe
For simplicity’s sake, we’ll start with a high-acid recipe for Homemade Apple Jelly that requires a boiling water canner, which is simply a deep pot outfitted with a lid and a rack to keep the jars off the bottom of the pot.
Once you have assembled your tools, it’s time to pick your produce — in this case, apples. Choose the freshest produce available, both for the prevention of spoilage and because you can only get out the quality you put in.

- Wash jars, bands and lids in warm, soapy water; rinse and dry the bands well. Use pint or half-pint jars for this recipe. Next, sterilize jars by placing empty jars right-side-up on the rack in your boiling water canner and then adding hot, not boiling, water to cover the tops of the jars by 1 inch.
Bring water to a boil for 10 minutes. (Note: At elevations greater than 1,000 feet, add one minute for every additional 1,000 feet.) Remove jars one at a time and save the water for processing later. Place your clean lids in simmering, but not boiling, water over medium heat. - Select 3 pounds of tart apples. Apples are naturally high in pectin (a complex carbohydrate found in fruits that causes jelly to gel), and the more tart the apple the greater the pectin content, so using 1/4 slightly under-ripe and 3/4 fully ripe apples will allow your jelly to set nicely. Wash them well, and, without peeling or coring, cut into small pieces. Add 3 cups water and bring to a boil over high heat. Reduce heat and simmer until apples are soft, 20 to 25 minutes. Strain through cheesecloth to extract the juice.
- Measure 3 cups juice, 2 teaspoons lemon juice and 3 cups sugar into a kettle and bring to a boil over high heat, stirring well. When the mixture reaches 220 degrees Fahrenheit, or sheets from a spoon, quickly skim any foam from the surface and begin ladling into your hot, sterilized jars.
Use your funnel to prevent spills, and leave about 1/4 inch of headspace. Wipe the rims of the jars clean with a moist paper towel and then apply the heated lids using a magnetic lid lifter. Tighten the bands to just finger tight. - Using your jar lifter, transfer the jars into the canner. The water left from sterilizing the jars should cover the top of the jars by 1 to 2 inches; if not, add more boiling water. Cover and bring to a boil over high heat. Start timing when the water reaches a brisk boil. Process jars for 5 minutes (10 minutes for altitudes 1,001 to 6,000 feet, and 15 minutes for altitudes above 6,000 feet). When time is up, turn off the heat and remove the canner lid. Allow the jars to rest for 5 minutes before removing them with the jar lifter and placing them on a towel. Leave at least an inch between adjacent jars so they will cool evenly.
Allow the jars of jelly to rest for 12 to 24 hours undisturbed. Do not try to retighten the bands, as this could disturb your seal. You can test your seal by checking that the lids’ centers are pulled down. If they are, then remove the band and gently lift on the lid with your fingertips; if the lid does not lift you have a good seal. Refrigerate and use the jelly right away if the lid does not seal within 24 hours.

Success! Enjoy this confidence-building recipe as your entry point into home canning. Once you learn the basics, you can make the Apple Jelly recipe your own. Add seasonal spices when extracting the juice, and wrap for Christmas. Try savory seasonings and citrus to make a glaze for pork chops.
The options for preserving your late-summer harvest are many. The experience is priceless, and the possibilities are endless!
Kristina Estis is a wife, paramedic, and athletic trainer in the Oak Grove, Alabama, area where she and her husband, William, try to wrangle their home full of dogs, cats, chickens, and an 11-year-old boy.


